Results 1 to 12 of 12

Thread: Building Federal Style Table Part 3 – Bellflower Inlay

  1. #1
    Join Date
    Feb 2011
    Location
    Carlsbad, CA
    Posts
    2,230
    Blog Entries
    2

    Building Federal Style Table Part 3 – Bellflower Inlay

    As I described in earlier posts, the curved apron for this semicircular table is made out of 5 layers of stacked pine. Each layer is arranged so that the joints don’t overlap; sort of a "bricklayer" approach that avoids steam bending. Here is the shop sawn mahogany veneer glued to the show side of the apron. I’m going to let this sit for a while to focus on the Bellflower inlay on the legs.


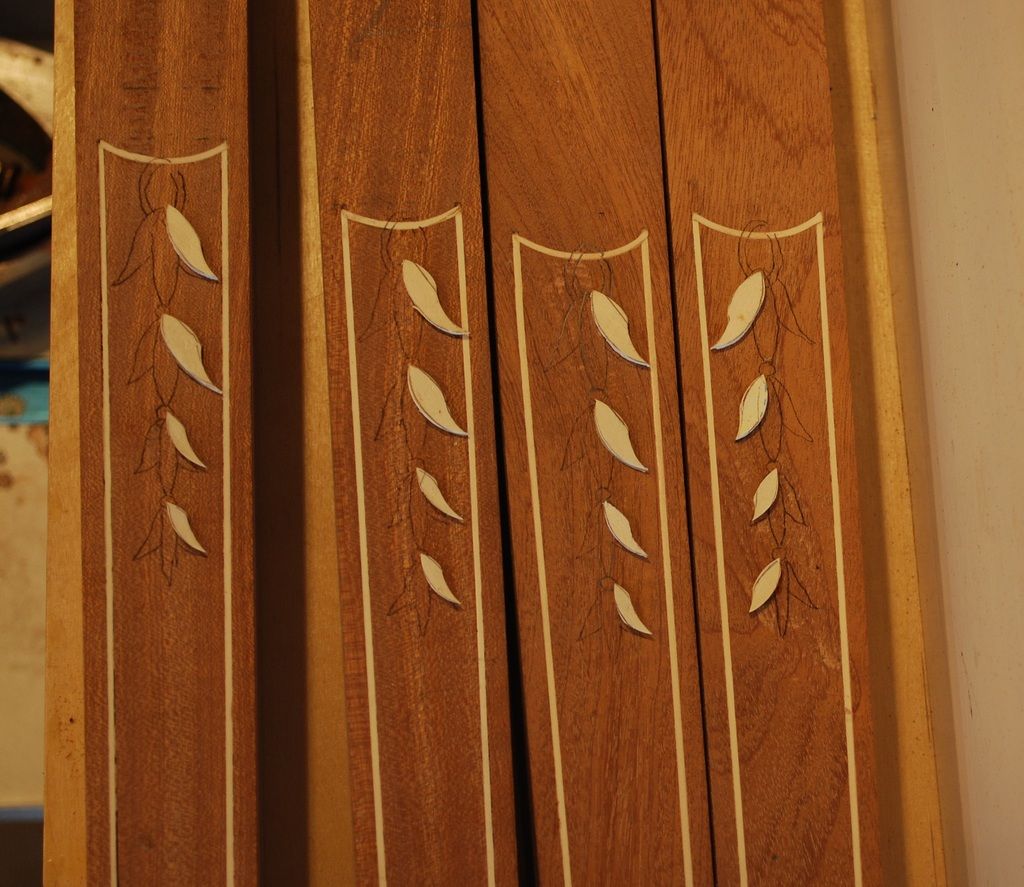
    With the Holly stringing that outlines legs already completed, now comes the hard part – the Bellflower inlays. I’ve never done this before, plus I’m pretty much an idiot. I don’t pretend to have any idea about how you’re supposed to do this. My only intent in posting is to share my experience.

    I made one of each Bellflower piece by gluing a photocopy of the design to the Holly inlay and using gouges to chop out a “master copy” that was used as a template to layout the multiple copies I will need for the 10 legs surfaces that will be inlaid.The central leaf in the Bellflower is a simple shape and I cut those out of 1/16” thick shop sawn veneer using gouges –pretty straightforward.

    The two side leaves of the Bellflower have complex curves. I thought trying to cut these out of the shop sawn veneer could lead to splitting, particular around the curve. Consequently I decided to use commercial Holly veneer with inexpensive backing veneer glued to at a 90° angle to the face veneer (the Holly is super thin- I’m not sure but I think 1/32”. Spoiler alert – this comes back to bite me in the butt later).
    The theory is two layer, cross grained veneer should be less likely to fracture along the short grain curves. This turned out to be true. Regrettably, the fact that the commercial Holly veneer was so much thinner than the shop sawn veneer turned out to be a real problem.


    The side Bellflower’s are inlaid first because the central Bellflower overlaps them. I secure them to the surface with a toothpick of hide glue. The next step is to use an X-Acto to outline the side leaves. Once the leaves are outlined, a sharp putty knife is used to remove them and it’s time to route their recesses.


  2. #2
    Join Date
    Feb 2011
    Location
    Carlsbad, CA
    Posts
    2,230
    Blog Entries
    2
    Turns out, inlay requires a lot of specialized tools; here’s the setup: a Dremel with.032” wide spiral bit. My eyes absolutely required magnifiers, and I found the fan to blow the dust away while routing to be really helpful - you need to be able to see the margins and the dust really gets in the way. Finally a foot pedal switch for the Dremel really helped because the biggest chance for screw up’s turning on/off the Dremel, the foot pedal let you keep both hands on the Dremel when starting/stoping.


    Here are the first side leaves inlaid with the second side leaves tacked in place for outlining.


    The second side leaves routed and inlaid.


    Next is the central leaf, which because of its simple shape I punched out of shop sawn veneer with gouges. Once tacked in place, X-Acto knife for outlining and then removed with the putty knife.
    ]


    Here are a couple pics of the completed Bellflower’s.


    This picture shows my problem of using the thin commercial Holly veneer’s laminated to a backing veneer for the side leaves – when scraping/planning everything flush I went right through the 1/32” thick commercial veneers, which you can see on the 2 right side leaves in this pic. I hate when this happens !!!


    From my perspective, this is the worst of all possible outcomes; now I have to remove the defective pieces and try and create a new piece of inlay (this time from thicker, shop sawn veneer) that what exactly fit the recess. This is nearly impossible for me and much harder than simply getting it right the first time. My thoughts about how to avoid this are:

    1) Make the recess deeper than the thickness of the inlay piece. This allows you to press the inlay level with the surface of the substrate. The alternative is leaving the inlay proud of the surface means you better not remove more than 1/64”in bringing it/, or you end up where I am.

    2) Thicker inlay pieces are better. The thicker your inlay piece, the greater your margin for error in bringing it flush to the surface.

    3) Use a clamp, cranked as tight as you can to try and press the inlay piece parallel with the surface of the substrate if it goes below the surface that’s fine. When it comes time to bring everything flush, you can remove as much of the surrounding solid stock substrate as you need. Alternatively, if the inlay is proud of the surface, you only have 1/32” of thickness to play with.

  3. #3
    Join Date
    Feb 2011
    Location
    Carlsbad, CA
    Posts
    2,230
    Blog Entries
    2
    The inlay design calls for 1/8” diameter circles (I could be wrong about that, maybe 3/16”) to connect the Bellflower’s. The FWW Latta article described using a brass tube and cutting teeth in the tubing to cut plugs. That seemed way over my head so I used a dowel plate to create 1/8” diameter Holly dowels:


    My first attempts at Bellflower inlay are, as expected, far less than perfect. Frankly this wasn’t very fun for me and I’m ready to live with whatever I have and be done.

    The remaining inlay for the legs is a circle that joins the Bellflower’s to the perimeter stringing. By definition, the circle inlay has lots of short grain - yeah that’s going to suck. I’m thinking 1/16” thick shop sawn veneer backed with birch commercial veneer with grain at a 90° angle. I’m hoping the result will hold together long enough to allow inlaying. However it turns out, it’s going in there one way or another.

    It seems increasingly likely this table won’t make the cut to end up in our entrance way. Maybe I can prevail on one of the boys to take it as a plant stand or something. I might have a little leverage with them, but the Boss is tough as nails. I guess we’ll have to see.

    Thanks for looking,

    Mike

  4. #4
    I think it is coming along quite nicely to be honest. I'm doing similar work at the moment and it is very painstaking. I also appreciate your willingness to show your shortcomings. When I make a mistake I hurl my efforts into the fireplace immediately as though they never existed.

  5. #5
    Join Date
    Oct 2006
    Location
    Washington, DC Metro Area
    Posts
    244
    Mike, It's looking really good. We woodworkers are our own worst critics; we're also the only ones who would look so closely at the inlay as you show in this thread. Lots of mistakes disappear from view once you take a few steps back (and if anyone sticks their face up close you can just kick at 'em to shoo them away).

    Regarding the sand-through on your bellflower, here's what I'd suggest (for next time):
    1) Use single-ply holly veneer. That's what they used on the period originals, and splitting shouldn't be too problematic as long as you have the grain oriented correctly when you punch them out. (and if you punch out a bunch at the beginning, you can just chuck the few that do split).
    2) Set the dremel bit depth to be equal the veneer thickness by placing 2 pieces of veneer under the base and lowering the bit to touch your bench. Take the time to be precise...if you get it on the nose you'll only need to scrape away any dried glue on the surface, no wood. The period makers didn't want to scrape the bellflowers either, because it removes the sand shading that they typically used.

    It shouldn't be too hard to re-do the one you scraped through, just make sure the replacement petal is large enough to fully cover it. Since it's not sand-shaded I doubt anyone would notice that the center petal is now overlapped (unless you take close-up photos and post it on the internet). Personally, I like idiosyncrasies like that...they tell part of the story of the thing being made (it's exciting to find them on period pieces).

    Lastly, as a Marylander, I'm pleased that you chose a Baltimore/Annapolis bellflower.
    Mark Maleski

  6. #6
    Join Date
    Aug 2013
    Location
    Princeton, NJ
    Posts
    7,295
    Blog Entries
    7
    I know your pain Mike! Commercial veneer thickness is such an incredible PITA! If you recall a while back I made a rosewood valet box....it became a rosewood finishing supplies box after I planed through the veneer at one corner.
    Bumbling forward into the unknown.

  7. #7
    Join Date
    Feb 2011
    Location
    Carlsbad, CA
    Posts
    2,230
    Blog Entries
    2
    [QUOTE][/QUOTE]
    Quote Originally Posted by Mark Maleski View Post
    Mike, It's looking really good. We woodworkers are our own worst critics; we're also the only ones who would look so closely at the inlay as you show in this thread. Lots of mistakes disappear from view once you take a few steps back (and if anyone sticks their face up close you can just kick at 'em to shoo them away).

    Regarding the sand-through on your bellflower, here's what I'd suggest (for next time):
    1) Use single-ply holly veneer. That's what they used on the period originals, and splitting shouldn't be too problematic as long as you have the grain oriented correctly when you punch them out. (and if you punch out a bunch at the beginning, you can just chuck the few that do split).
    2) Set the dremel bit depth to be equal the veneer thickness by placing 2 pieces of veneer under the base and lowering the bit to touch your bench. Take the time to be precise...if you get it on the nose you'll only need to scrape away any dried glue on the surface, no wood. The period makers didn't want to scrape the bellflowers either, because it removes the sand shading that they typically used.

    It shouldn't be too hard to re-do the one you scraped through, just make sure the replacement petal is large enough to fully cover it. Since it's not sand-shaded I doubt anyone would notice that the center petal is now overlapped (unless you take close-up photos and post it on the internet). Personally, I like idiosyncrasies like that...they tell part of the story of the thing being made (it's exciting to find them on period pieces).

    Lastly, as a Marylander, I'm pleased that you chose a Baltimore/Annapolis bellflower.


    Mark I really appreciate your advice about using a double thickness of veneer to set the depth of the Dremel bit – it's super helpful!


    My biggest problems with inlay always relate to scraping/sanding through the inlay veneer !


    When confronted with this problem, in my ignorance, I thought the solution was to make the veneer thicker. I guess thicker, shop sawn on veneers can work, but they create another challenge; it's much more difficult to saw/chop the shapes for inlay from this thicker shop sawn material that it is to chop them out of much thinner, commercial grade veneers


    Your brilliant suggestion illustrates I was working on the wrong side of the problem – it's not the thickness of the veneer that counts, it's the depth of the recess!


    I wish someone would've told me when I first started that it's better to err on the side of making the recess too deep, rather than too shallow. It is only through painful experience I've come to realize if the inlay is slightly below a solid wood the surface, you can easily plane away the surrounding would to bring everything flush. On the contrary, if the veneer inlay is proud of the surface, you only have the tiny thickness of the veneer to play with it.


    IMHO, nothing in woodworking is more frustrating than spending an inordinate amount of time trying to do inlay, only to sand through the finished result at the very last step of the process – oh the horror!


    Mark, I'm definitely going to use your suggestion! I'm hopeful your approach will not only expedite what for me is a laborious process, but also produce a much better result.


    Chalk up another problem solved by the generous Neanders here on the Creek!


    All the best, Mike

  8. #8
    Join Date
    Feb 2011
    Location
    Carlsbad, CA
    Posts
    2,230
    Blog Entries
    2
    Quote Originally Posted by Brian Holcombe View Post
    I know your pain Mike! Commercial veneer thickness is such an incredible PITA! If you recall a while back I made a rosewood valet box....it became a rosewood finishing supplies box after I planed through the veneer at one corner.


    Brian you couldn't be more right!


    I have a long list of veneer projects that became firewood. Regrettably, it's a much bigger problem when the defective, horrible looking veneer is on the surface of a coffee table you spent 100's of hours building – please don't ask me how I know that!


    Maybe we need to start a support group for woodworkers traumatized by failed inlay efforts ? Er… Maybe that's not such a great idea either.


    Best, Mike

  9. #9
    Join Date
    May 2004
    Location
    N Illinois
    Posts
    4,602
    very nice work anyway!!!!! You have remarkable patience!!!
    Jerry

  10. #10
    Join Date
    Mar 2015
    Location
    SE Michigan
    Posts
    3,225
    Mike, back off yourself a bit! I put you on a pedestal for taking on a complicated inlay design and just getting after it. I think it looks great. I had to laugh when I read "however it turns out, it's going in there one way or another"
    Been there.

  11. #11
    Join Date
    Oct 2006
    Location
    Washington, DC Metro Area
    Posts
    244
    Quote Originally Posted by Mike Allen1010 View Post
    Mark I really appreciate your advice about using a double thickness of veneer to set the depth of the Dremel bit – it's super helpful!
    Mike, I'm sorry but I was unclear. I recommend shooting for the recess depth to be exactly equal to the thickness of the veneer (or as close as you came come to "exact"). After you've inlaid the pieces and the glue has dried, it should take just a few light passes with a scraper to bring things flush and remove any glue squeeze-out. I can see why my explanation led you to think I meant to double the thickness ...when I said "two pieces of veneer under the base of your router" I meant one piece under the base on opposite sides of the bit, so your router will balance properly as you lower the bit to depth. (Since we're in the Neanderthal section, I should mention that you would do the same thing with a small router plane to lower the blade to the depth you want...begin by chiseling the waste out, then use the router plane to work to depth and to your incised lines.) I don't think it would work to inlay the veneer below the depth of the leg, as you'd have to alter the shape of the leg to bring things flush, and might remove too much stringing in the process.

    Steve Latta's video on inlaid legs shows this process clearly from beginning to end. It's a great resource for all aspects including sourcing the right holly veneer, preparing the veneer, punching it out, etc, etc. (BTW he also shows the process of shaping teeth into the brass tube to cut out the circles, but you're in good company in using dowels. It's a shortcut, but a pretty common one).
    Mark Maleski

  12. #12
    Join Date
    Feb 2011
    Location
    Carlsbad, CA
    Posts
    2,230
    Blog Entries
    2
    [QUOTE=Mark Maleski;2611625]Mike, I'm sorry but I was unclear. I recommend shooting for the recess depth to be exactly equal to the thickness of the veneer (or as close as you came come to "exact"). After you've inlaid the pieces and the glue has dried, it should take just a few light passes with a scraper to bring things flush and remove any glue squeeze-out. I can see why my explanation led you to think I meant to double the thickness ...when I said "two pieces of veneer under the base of your router" I meant one piece under the base on opposite sides of the bit, so your router will balance properly as you lower the bit to depth.


    Thanks Mark appreciate correcting my misunderstanding. – Very helpful!


    I'm still struggling to find success here and look forward to trying your suggestion.


    Best, Mike

Posting Permissions

  • You may not post new threads
  • You may not post replies
  • You may not post attachments
  • You may not edit your posts
  •