Page 1 of 3 123 LastLast
Results 1 to 15 of 37

Thread: Bombe Chest Build – Continued

  1. #1
    Join Date
    Feb 2011
    Location
    Carlsbad, CA
    Posts
    2,230
    Blog Entries
    2

    Bombe Chest Build – Continued

    There’s a previous post that has the first part of this build. Based on suggestions from my fellow Creekers, I’m going to put all the rest of the build on this thread, rather than creating separate posts for subsequent steps.

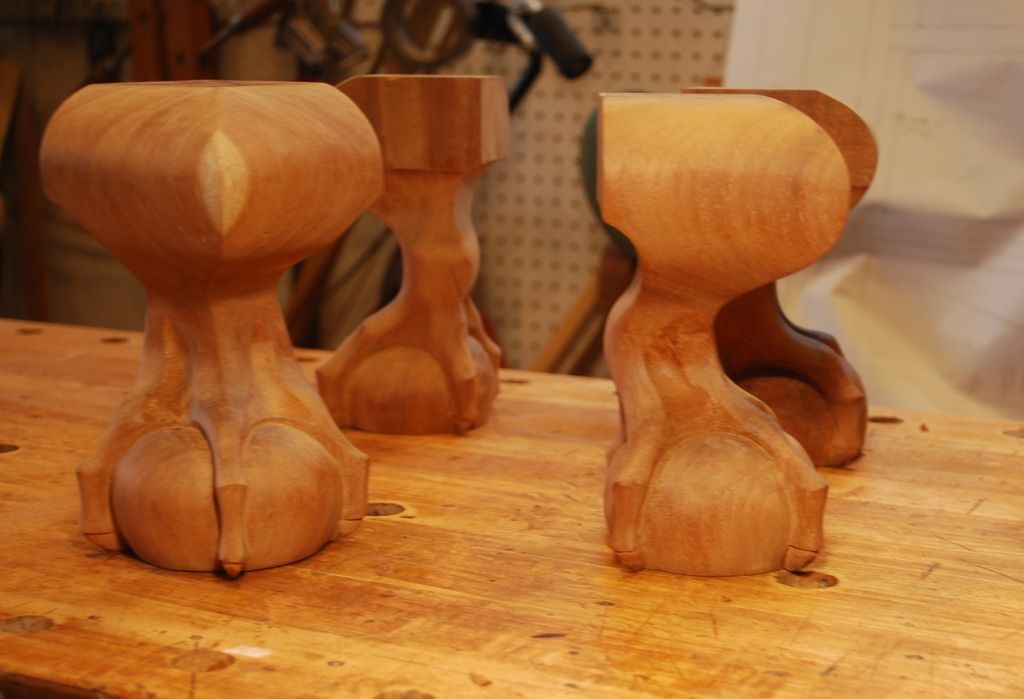
    The first post showed carving the ball and claw feet. A couple things I neglected to mention that may be helpful for those interested in adding a little carving to their furniture projects:

    1. One of the biggest barrier that prevented me from getting started with carving was I didn’t really know what carving tools I needed and I assumed I would need a lot . Pic of the tools I use for 99% of the carving: gouges # 2, # 3, # 5, # 11, a couple bench chisels, half round rasps/file, card scrapers and sandpaper.


    2. FWIW, my suggestion is to buy the carving tools you’ll need to do a specific project and build from there. I was surprised at what you can do with relatively limited kit. Secondly, rasps/files are your friend. For me, using a gouge to carve the upper surface of curved elements isn’t always the best choice, particularly if the grain isn’t cooperating. I’m not sure if true carvers would consider that “cheating”, but it’s been helpful for me.

    3. It’s worth it to spend a little time to make a durable template for your carving projects. Initially I tried to shortcut this step by using paper drawings for layout. For me using two-dimensional paper to layout three-dimensional carving designs was problematic. The other plus is that over time you will build a set of templates you can use for future projects.


    4. A key part of the layout/carving of symmetrical B&C feet are the 2 concentric circles on the bottom that represent the diameter of the ball at the midpoint and diameter at the floor. I suggest you leave final shaping of the bottom half of the ball to the correct diameter at the floor until after you finish the claws. You want all these finished surfaces to meet in a nice circle and shaping the claws may require removing more wood than you anticipate.


    Last edited by Prashun Patel; 12-21-2016 at 12:29 PM.

  2. #2
    Join Date
    Feb 2011
    Location
    Carlsbad, CA
    Posts
    2,230
    Blog Entries
    2
    The sides and front of the chest curve so it seems sort of “swollen” nearest the floor. I made a template for this curve using a beam compass and a French curve. The radius of the curve at the bottom is smaller than the radius for the upper part of the curve and that required more than a little bit of experimenting to get the right template. I’m not sure if the shape of the curve I ended up with is “correct”, but it looks okay to me.


    I want the finished thickness of the carcass sides to be 1 ½” to provide the necessary strength for a heavy load after the sliding dovetail sockets are cut for the horizontal shelves/rails. Based on my curve template, I need a total thickness of~3 ¾” for the rough stock at the deepest part of the curve. I’m planning to veneer the carcass sides so I’m gluing up 12/4 Poplar with 6/4 laminated on top for the widest section. The Poplar turned out to be waaaay harder and more difficult/time-consuming to shape than I expected. If I were doing this again, I would definitely try harder to find something softer.


    A course pitch crosscut saw comes in really handy for dimensioning stock this thick. This is a 5 PPI, 28” D-8, originally made in a rip tooth configuration, which I converted to crosscut. I actually use this saw a lot more than I thought I would.


    Here are the 2 pieces of a carcass side that will be glued together to get the desired width. I clamp them together to joint in hopes of getting a solid glue line.


    A #6 fore plane comes in handy for leveling the surface after glue up.


    Here is the lamination to get final thickness with the template to layout the curve of the carcass side.


    I’ll make a series of cross cuts and try to split out the bulk of the waste with chisels, gouges etc. A table saw or circular saw would’ve been very handy to make these cross cuts, on the plus side, I can skip the gym.


  3. #3
    Join Date
    Feb 2011
    Location
    Carlsbad, CA
    Posts
    2,230
    Blog Entries
    2
    I tried several different tools/tactics to split out the waste for the concave curve on the inside of carcass sides, none of which worked very well. Mostly it was a lot of sweating and hammering. Did the rough work with firmer chisel and number 3 gouge, while checking periodically with a straight edge for high spots.


    Scrub plane cross grained produced better results followed by the biggest round I have and a spoke shave.


  4. #4
    Join Date
    Feb 2011
    Location
    Carlsbad, CA
    Posts
    2,230
    Blog Entries
    2
    Equally sweaty was re-sawing the straight top and bottom profile of the carcass sides. I used a 28", 4 PPI ripsaw – not really sure how else I would do it.


    After the straight outer surfaces of the carcass sides were sawn, it was back to more sawing and cross grained splitting out the waste with a chisel. This time I tried it vertically on the saw bench, which still took forever.


    Cross grained planing to final shape is definitely easier on the convex, outer surface. A shop built big scrub and rabbit plane worked well, followed by final shaping with spoke shave and card scraper.


  5. #5
    Join Date
    Feb 2011
    Location
    Carlsbad, CA
    Posts
    2,230
    Blog Entries
    2
    Super messy work – chips went everywhere!


    With the curves shaped into the carcass sides, next step will be sawing the same curve profile onto the front edges.


    The profile of the front of the chest is supposed to be more “serpentine”, as compared to the two-dimensional curve along the carcass sides. I haven’t even thought about laying out that curve yet, which is almost certainly a mistake. Regrettably geometry will be necessary to work out some kinda template which will surely be an adventure in itself!

    Thanks for looking. More to follow as I make progress – unless my attempts at making these curved parts turns the whole thing into firewood. Wish me luck, I’m certainly going to need it!

    All the best, Mike

  6. #6
    Join Date
    Mar 2006
    Location
    Austin Texas
    Posts
    1,957
    One of the most interesting build threads ever Mike. I wish I was there to hand you tools, coffee runs, sweep up, etc. What is the straight edge you show on the side-on photo of the slab on your bench? Lee Valley? Can't quite make out the logo. Outstanding work and no way will it become firewood.
    David

  7. #7
    Join Date
    Feb 2011
    Location
    Carlsbad, CA
    Posts
    2,230
    Blog Entries
    2
    Quote Originally Posted by David Eisenhauer View Post
    What is the straight edge you show on the side-on photo of the slab on your bench? Lee Valley? Can't quite make out the logo. .
    Hey David,


    Thanks for your comments. In the picture of the carcass side on the bench with the wooden rabbit plane, that is a 24" Lee Valley ruler.


    In the earlier picture of the carcass side with a dead blow mallet and gouge, that's a Chester Rabone steel straight edge I probably had for 35 years. Given the dings and dents over the years, and more importantly my feeble attempts to fix them, I'm pretty sure it's not exactly straight anymore.


    Both get plenty of use.


    All the best, Mike

  8. #8
    Join Date
    Aug 2013
    Location
    Princeton, NJ
    Posts
    7,298
    Blog Entries
    7
    Very much enjoying Mike!
    Bumbling forward into the unknown.

  9. #9
    Mike,

    Wow! You get some things done in the shop. Appreciate you sharing like many others in here.

    Best Regards,

    Bob

  10. #10
    Join Date
    Mar 2015
    Location
    SE Michigan
    Posts
    3,225
    Stellar work, Mike. You would make Louis XlV proud!

    Thanks for sharing your gouge sizes...they appear narrow. Are they all in the 7-9mm range? Can you provide more detail?

    Also appreciate you sharing the vertical saw guage you use...and of course, the saw is beautiful.

    Look forward to the rest of the project.

  11. #11
    That looks like a lot of work! Well done so far.

  12. #12
    Join Date
    Sep 2007
    Location
    Longview WA
    Posts
    27,456
    Blog Entries
    1
    Very nice work. Has me wanting to head out to the shop, guess I will.

    jtk
    "A pessimist sees the difficulty in every opportunity; an optimist sees the opportunity in every difficulty."
    - Sir Winston Churchill (1874-1965)

  13. #13
    Looking good! I wondered why I seem to lack patience at times; it now seems obvious you received my share as well.

  14. #14
    Mike, fine ambitious work! Just reviewed it all and was wondering if you had considered piercing the ball and claw feet. I've looked at them carefully and it seems to me that what you have now could be altered with no distortion ,since the claws have a bit of stand off. Google carved and pierced ball and claw feet.

  15. #15
    Join Date
    May 2009
    Location
    Boston
    Posts
    1,740
    Mike, have you considered getting some transitional planes like the Stanley 36 and shaping the bottoms to work on some of these curves?

    I give you you a lot of credit for doing something like this by hand.
    Don

Posting Permissions

  • You may not post new threads
  • You may not post replies
  • You may not post attachments
  • You may not edit your posts
  •