Thanks. To be clear, I'm talking about the vise racking vertically, not horizontally. I think if the ear was tighter in the slot formed by the top of the stretcher/bottom of spacer board it would help.Originally Posted by William Fretwell


 Member
Thanks. To be clear, I'm talking about the vise racking vertically, not horizontally. I think if the ear was tighter in the slot formed by the top of the stretcher/bottom of spacer board it would help.
 Contributor
OK, I would also like to see/ hear more about your vise design. Maybe we need a new thread on shoulder vises, but then again, this is all part of "workbench principles", even if we're not speaking French about our benches.
I have needed to fine-tune my shoulder vise "clamping board" since it was built; it tends to bind against the bench extension on the left and the LV screw's head has never fit well in the bracket, so it grabs and spins the board. My ear is just an extension of the lower left end of the clamping board, so I could fix the spin by screwing a board to the underside of the bench, enclosing the ear and also filing the end of the screw. I'd like to see how your ear is shaped and spaced within its slot
here's mine when new- it's just dirtier now
bench05.JPG
BTW, regarding the allthread issue, that nut seen to the left of the screw started being about flush with the outside edge of the bench - now it's about 3/16 inset due to the wood compressing. I'm going to inset a hard maple bearing plate...soon.
Contributor
The force exerted by the screws is exerted over the area of the workpeice being held. A deeper chop gives a mechanical advantage in holding the workpeice. Yes for the same workpeice a deeper chop exerts less pressure per square inch but the coefficient of static friction is very high so the reduced pressure matters not. The mechanical advantage to resist twisting and movement of the workpeice is huge. So yes build a big chop but remember if the work does not fill the chop depth then wracking will ensue.
[LIST
Contributor
My few points:
- wider benches are better for assembly and collecting clutter (my 30" bench has spent most of its service life with back 12" holding excess lumber)
- expect to be flexible -- your usage probably won't match your
- Front vise and planing stops are my most-used features; holdfasts sometimes; end vise and dog holes rarely
- Planing stops in the dog holes are great. Make your own or get the Veritas ( http://www.leevalley.com/us/wood/pag...37&cat=1,41182 )
- leather (or crubber?) in the vise chop is a nice boost to the vise.
- look for tool storage to be quickly accessible from bench for common items (chisels, mallets, etc.)
- nice to have some sharpening close to bench. (strop clamped in end vise is a decent start)
Matt
[OP]
Member
Great responses. I'd like to share a more general principle that I've come to realise would work well for me - The bench should be a working surface, not a surface that gets cluttered or has piles of unfinished projects on it. A very wide bench or a bench with tool storage for me would end up being that way because I'm lazy and I will end up going the route of most apparent convenience. So a narrower bench with no tool tray/planing stop forces me to organise the rest of my shop, and to keep it organised....
Member
My bench is 5 foot with a criss cross and a bench crafted classic...works fabulously.
Member
A planing beam seems like it would be very efficient, I agree with the concept of a multi bench approach.
Contributor
The horizontal wracking is a good thing so you can hold tapered pieces! The vertical wracking will not be influenced by the tab however the wracking may influence the tab to break off!
When you move the vise face in or out it twists the face right or left just slightly but enough to wedge or jam the face edge against the shoulder if it touches. The corners of the vise face next to the shoulder should be rounded so they don't touch. The friction of the tab is trivial and the tab edges can be rounded as well.
See my reply to the post below for more.
 Member
My French-English bench in use:
Everyone has different needs....This one is as close to perfect as can be. What would/will I change on the next build? I expect nothing except instead of a "split fill" I may just have the split set at the correct width to hold saws and squares because it is never removed nor used for a stop.
ken
Contributor
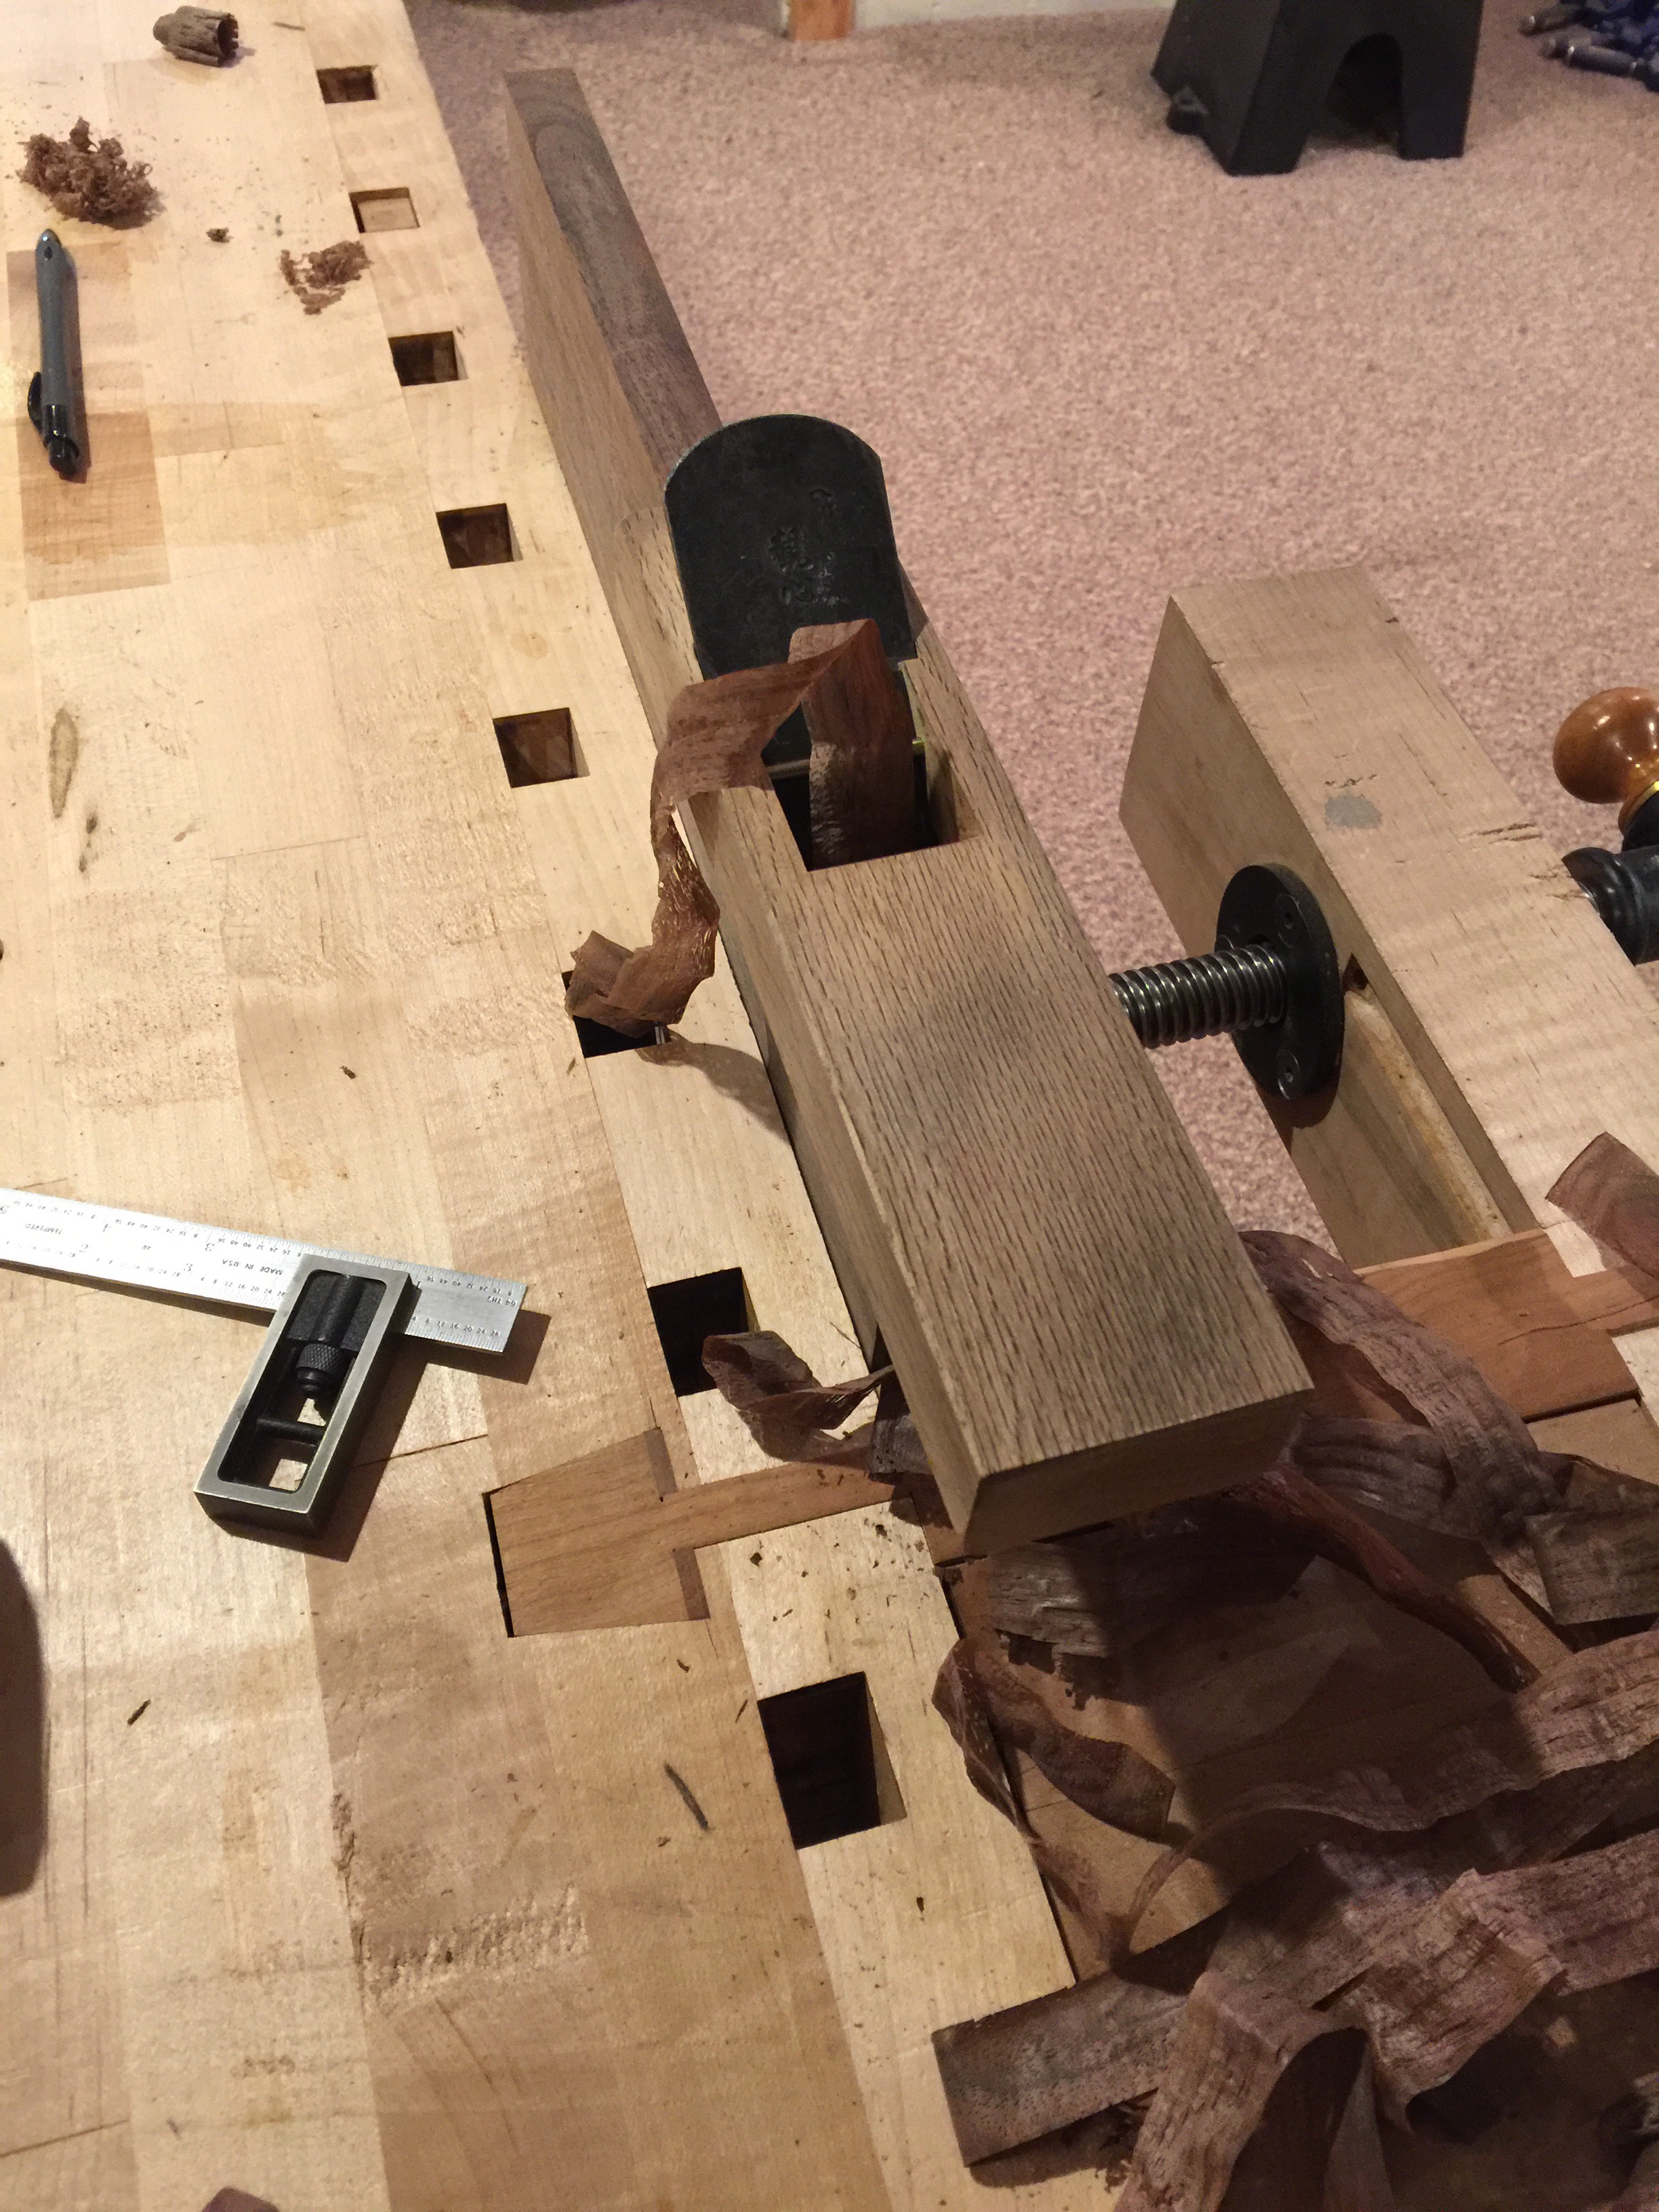
Fretwell's modification shoulder face.
Yes you should enclose the tab with a board. The end of the screw is a loose fit, the end does nothing, the shoulder pushes. If it is sinking into the back of the face then discard it and use a harder wood. While you are at it you can add my modification. I will describe it and add a photo later.
Now is later,
shouder vice.jpg
Fretwell's modification:
To stop vertical wracking holding a small piece the same size as the work below the screw keeps the face vertical but it falls out each time the piece is moved.
I added a 3/8" inch dado starting 1/2" from the bottom of the vise face. The dado is 3/8" deep, my vise face is 7/8" thick. I made a series of L shaped (NOT 'T' SHAPED) inserts that slide in with about an inch projecting UP the vise face from the dado. I made 1/4", 1/2", 3/4" and 1" to start. There is NO force on the dado insert.
They don't fall out at all but they can't fall with even several turns of the screw. They solve the wracking problem. Now you will say I've created a new problem as the top and bottom of the vise face are fixed and the screw pressure in the middle will break the vise face.
The reality is the mount is quite large spreading the force over a large area. Even if the insert is 2" below the screw centre it would require an enormous force to break.
Now my apron is 5" deep. If your apron in 4" deep I would add an inch to the bottom of the vise face so the dado is below your apron. This will keep your full clamping surface. The L shape will reach up to the bottom edge of the apron when required.
The advantage of a deep apron is the inserts still work with sizes that don't match but are close.
This modification is most useful in improving the performance of the shoulder vise. Use a good strong hard wood and in an hour you can have a new vise face with inserts! You can even hook a smaller insert onto an installed larger one to expand the range!
My end vise modification is substantial and has many ramifications for work position, end vise performance and leg design but will need a thread of it's own sometime.
Last edited by William Fretwell; 01-13-2017 at 9:06 PM. Reason: Add picture
 Contributor
Those shoulder bolts drove me nuts, once you fix it from crushing the side grain, you'll pull the threads out of the bench. Every single vintage scandi bench I've come across has that area damaged.
Here is my fix;
Bumbling forward into the unknown.
Member
I love your work bench, I am a sucker for a nice Scandi style bench.
Member
Japanese
Love the smoothing plane...and nice fix....
Contributor
That's very elegant Brian. It gives you a larger area to pull against. You do loose 1 & 1/2 inches of mechanical advantage compared to a threaded rod right at the edge of the shoulder.
I used a whopping 1/2" threaded rod with large washers. The rear nut and washer is buried way back in the bench. I used black walnut so I hope it does not pull through some day!
I also minimised the shoulder board by recessing the hardware into the arm. When my shoulder vise is fully open the back of the face is exactly flush with the arm. I had to build out the arm a little just where needed but not at the threaded bolt.
This kept my shoulder board as short as possible to save wood both there and the bench end (very short on my wood!).
To gain as much mechanical advantage as possible I kept the rod very close to the shoulder edge and made the vise face a little larger away from the shoulder. Having a deep apron and vise face increases the coefficient of static friction enormously so you actually use less brute force. Tucking your board into the shoulder also helps.
One more thing: When the shoulder vise is fully 'IN' it is 1/8" short of touching the apron. This was very deliberate as my engineer son (hope he does not read this) likes to stress things. I could see him stressing the shoulder 'just to see' what happens! I think it less likely with a workpeice involved. The reality is big screw threads can exert an enormous force when cranked. You can absolutely destroy any shoulder vise if you wish as the thread is so much bigger and has a large mechanical advantage. Used properly it should last a very long time but old stuff will inevitably get subjected to abuse over the years. Actually not having too large a handle on the vise may be a very good idea, especially in schools and colleges.
Last edited by William Fretwell; 01-13-2017 at 12:13 PM.
Contributor
Thank you!
Well....more like 1/2", since the centerline of the bolt is at least 1/4" from the edge (mine was more) and the centerline of the gooseneck is about 3/4" from the edge.
That is a great idea to inset the hardware, I should have done so as well. And also, I could have cut down on the throat opening considerably, since I use maybe 4" max, and I probably have more like 6". Typically I use up to 3", so if i were building it for that I could have minimized the leverage even more so.
Bumbling forward into the unknown.

 Reply With Quote