Page 2 of 3 FirstFirst 123 LastLast
Results 16 to 30 of 32

Thread: issues with Yeti and cermark

  1. #16
    Join Date
    Feb 2010
    Location
    New Albany, Indiana
    Posts
    47
    The more I think about it, I think my problem before was applying cermark on to thick. I was getting runs in the cermark.

    I did get some scrap pieces of stainless at work today. Although they are not brush finished, like the cups are it should get me in the ball park.

    Do you guys agree with that, as far as the finish?

  2. #17
    Get out the sand paper, you've got a couple of bad cups. Sand them off and start your trials on them.
    Lasers : Trotec Speedy 300 75W, Trotec Speedy 300 80W, Galvo Fiber Laser 20W
    Printers : Mimaki UJF-6042 UV Flatbed Printer , HP Designjet L26500 61" Wide Format Latex Printer, Summa S140-T 48" Vinyl Plotter
    Router : ShopBot 48" x 96" CNC Router Rotary Engravers : (2) Xenetech XOT 16 x 25 Rotary Engravers

    Real name Steve but that name was taken on the forum. Used Middle name. Call me Steve or Scott, doesn't matter.

  3. #18
    Join Date
    Mar 2014
    Location
    Iowa USA
    Posts
    4,482
    If you have a sloped cup prop up one end of the rotary until its all level otherwise it will engrave one side hotter than the other.
    Retired Guy- Central Iowa.HVAC/R , Cloudray Galvo Fiber , -Windows 10

  4. #19
    Kev was right about suggesting speeds - I got it in my mind you had an Epi for some reason. I use 10-15 because it works best with my machine and Cermark (don't ask me about the stuff for ceramic or glass, tho )

    You're doing what you need to be doing with this stuff: realizing you made a mistake, learning from it and getting better. You can't ask for more than that.

    I am curious about your 3 hour run time, though. @ 10s/100p/600dpi on my rotary, I can knock out a 5x5 image on a mug in 12 -15 minutes...
    Epilog 40w Helix
    Hottronix MAXX 16x20
    WAYYYY Too much Siser HTM
    Tons of "will it laser?" scraps...

  5. #20
    Quote Originally Posted by Jeremy Brown View Post
    The more I think about it, I think my problem before was applying cermark on to thick. I was getting runs in the cermark.

    I did get some scrap pieces of stainless at work today. Although they are not brush finished, like the cups are it should get me in the ball park.

    Do you guys agree with that, as far as the finish?
    On top of all the other great advice youve received, I would say a thick coat is definitely adding to your problems. I assisted someone when her laser went down at Xmas, and she was spraying them with an aerosol assist system. It was as thick as latex paint. She said it would take her 30 mins to do one, whereas I get annoyed if its over 3 minutes.
    355 - 10400 : )

  6. #21
    Quote Originally Posted by Mike Null View Post
    Look around your shop. Surely you have some tools you could mark with your name or initials for practice. In 1997 I had a new 25 watt ULS machine and was able to do Cermark items with about the same settings Kev mentioned.
    Everyone's house is LOADED with test subjects-- every kitchen knife, butter knife, fork and spoon is just BEGGING to be lasered!
    (just be sure to get your signficant other's permission)
    ========================================
    ELEVEN - rotary cutter tool machines
    FOUR - CO2 lasers
    THREE- make that FOUR now - fiber lasers
    ONE - vinyl cutter
    CASmate, Corel, Gravostyle


  7. #22
    Join Date
    Aug 2006
    Location
    Suwanee, GA
    Posts
    3,686
    Quote Originally Posted by Kev Williams View Post
    (just be sure to get your signficant other's permission)
    I live by "forgiveness vs permission"

  8. #23
    Join Date
    Jan 2017
    Location
    Los Angeles
    Posts
    21
    I have a 35 watt machine and the settings I use are: 100% Power, 20% Speed, 500PPI, Image Density of 5. I don't use the spray, I use the Paste and dilute it with denatured alcohol. 1 Part Paste, 2 Parts Alcohol. I just brush it on with a foam brush. I also use Metal Sheets from Home Depot that I practice on. I believe it's the Zinc Plated Steel, but it's been a while since I last purchased it.
    Trotec Speedy 360 - 80W, Graphtec CE6000-60, Brother GTX, Sawgrass SG400

  9. #24
    Using a 60 watt laser, marking a Stainless cup with Cermark yields nice results with the following RDWorks Settings Min 60, Max 60, Spd 300, Int .07
    I usually buy scrap stainless and have it cut to 6" or 12" squares. Works great for testing and customer proofs.
    Once you get down to testing with the rotary, you can use cheap Walmart or dollar store stainless cups.
    Red Bolt Laser Engraving
    Houston, Texas

  10. #25
    Join Date
    Feb 2010
    Location
    New Albany, Indiana
    Posts
    47
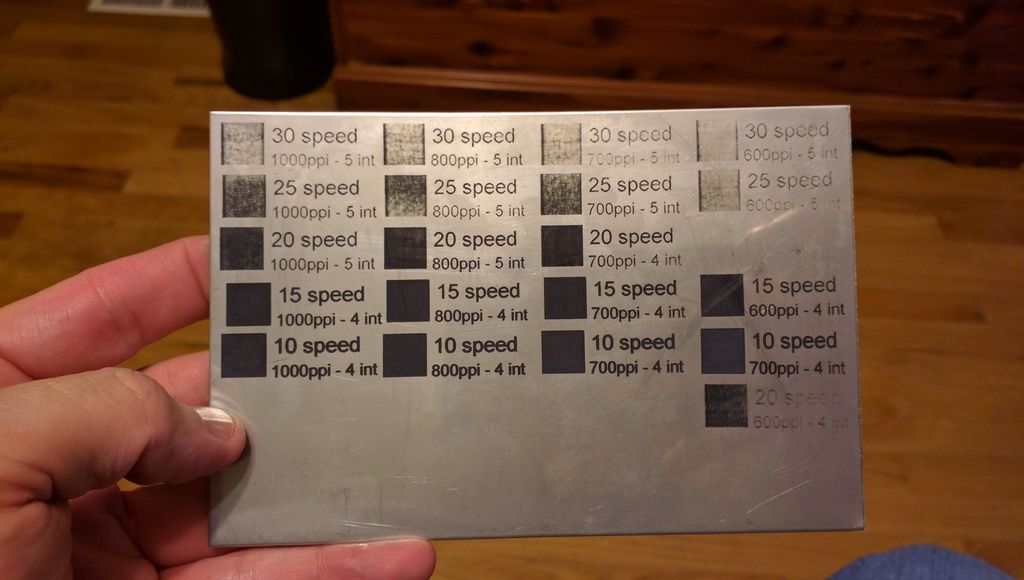
    Hey guys, I got a piece of stainless from work and decided to do a coupon test

    I did a test consisting below
    speeds: 30, 25, 20, 15, 10
    PPI: 1000, 800, 700, 600
    imagine density 4 (even though some of them says 5int)

    Note, the more and more I lasered the panel I was getting a slight smile in the panel, so each side was going slightly out of focus. the 20 speed, 1000 ppi looks slightly worse than the 800ppi right beside it. I'm going to chalk it up to the panel warping.

    It appears 20% speed; 700, 800 & 1000ppi give me pretty good results, this seems to the least amount on the surface height. the black has a slight tone shift
    15 and 10% seem to be the same as looks go and they have a surface height to them, the black color is even and dark.

    I did a thorough cleaning and used a dry dish towel to really scrub on it

    Last edited by Jeremy Brown; 01-24-2017 at 8:15 PM. Reason: grammer

  11. #26
    Join Date
    Aug 2006
    Location
    Suwanee, GA
    Posts
    3,686
    In order for your testing to be usable you need to figure out a way to keep it from warping. Focus will affect the mark as much as power and speed. After you figure that out then you should use a gray scotchbrite pad to really scrub the surface. Anything that sticks is guaranteed to stay stuck! One easy way to avoid warping is to mark a smaller patch, 1/4" is more than enough to see if it is sticking.

  12. #27
    Good job on the testing! Based on the photo alone, I'd probably be at 1000ppi and a speed of about 17-18%. From the photo, the 15 looks the best as far as a uniform spot, and I think you can probably bump it up a little from there, so I'm coming in around 17 or so. I'd always do 1000ppi on that. It doesn't add any time to the job and the higher the ppi, the better with Cermark, so I'd stay with 1000ppi. You didn't say what the Image Density was, but 5 works fine, on the rotary, you might be able to get away with 4, depending on the design.

    Looks like you are on you way to solving the problem. Good job for that.
    Lasers : Trotec Speedy 300 75W, Trotec Speedy 300 80W, Galvo Fiber Laser 20W
    Printers : Mimaki UJF-6042 UV Flatbed Printer , HP Designjet L26500 61" Wide Format Latex Printer, Summa S140-T 48" Vinyl Plotter
    Router : ShopBot 48" x 96" CNC Router Rotary Engravers : (2) Xenetech XOT 16 x 25 Rotary Engravers

    Real name Steve but that name was taken on the forum. Used Middle name. Call me Steve or Scott, doesn't matter.

  13. #28
    Join Date
    Feb 2010
    Location
    New Albany, Indiana
    Posts
    47
    Quote Originally Posted by Scott Shepherd View Post
    Good job on the testing! Based on the photo alone, I'd probably be at 1000ppi and a speed of about 17-18%. From the photo, the 15 looks the best as far as a uniform spot, and I think you can probably bump it up a little from there, so I'm coming in around 17 or so. I'd always do 1000ppi on that. It doesn't add any time to the job and the higher the ppi, the better with Cermark, so I'd stay with 1000ppi. You didn't say what the Image Density was, but 5 works fine, on the rotary, you might be able to get away with 4, depending on the design.

    Looks like you are on you way to solving the problem. Good job for that.
    yes, it feels good to get this far. The imagine density was set at 4, I wanted to start low and work my way up if needed. I may still do another sample group with less varition in setting but try imagine density of 5 then do a time study to see what gives me the best results in the least amount of time.

  14. #29
    What does Image Density relate to? Not sure Ive seen that in Coreldraw.
    355 - 10400 : )

  15. #30
    Neville

    I believe image density is a ULS term that deals with dpi settings..
    Mike Null

    St. Louis Laser, Inc.

    Trotec Speedy 300, 80 watt
    Gravograph IS400
    Woodworking shop CLTT and Laser Sublimation
    Dye Sublimation
    CorelDraw X5, X7

Posting Permissions

  • You may not post new threads
  • You may not post replies
  • You may not post attachments
  • You may not edit your posts
  •