Page 1 of 2 12 LastLast
Results 1 to 15 of 16

Thread: Coping Saw to remove waste, how do I do it?

  1. #1
    Join Date
    Jan 2017
    Location
    Florida Panhandle
    Posts
    56

    Coping Saw to remove waste, how do I do it?

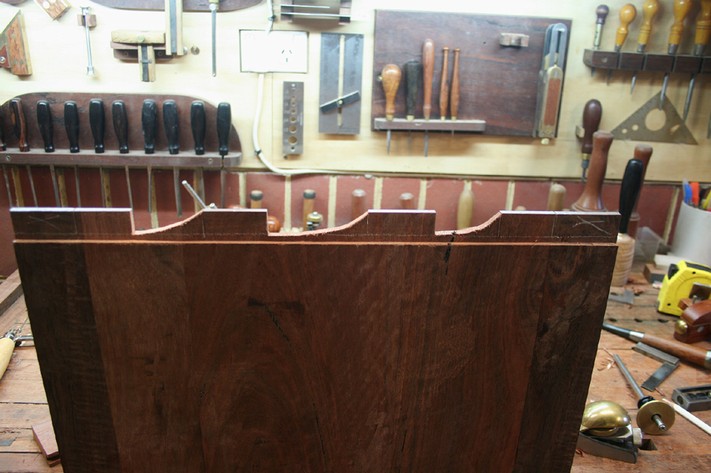
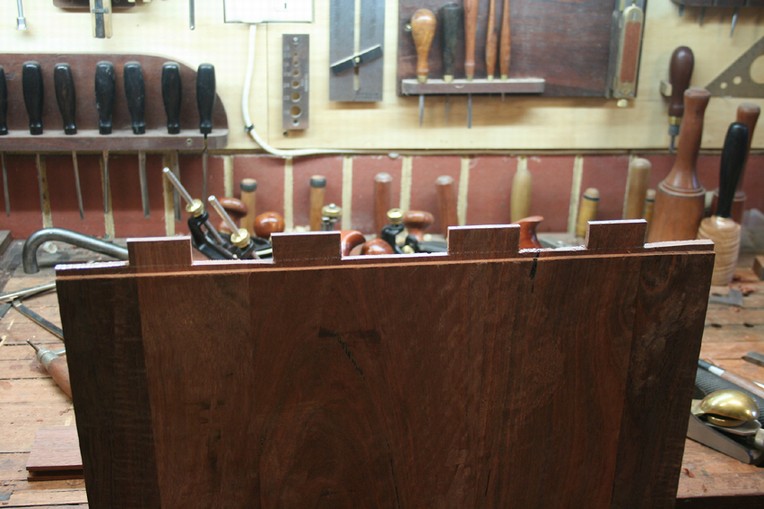
    I have to learn to walk before I can run. I'm trying to make box joints, dovetails will come later. I wasn't quite sure how to remove the waste, so I used Google. Found several articles suggesting I use a coping saw. I said "that makes sense, should be easy". Not quite as easy as I thought.

    The kerf left by my backsaw is not wide enough for me to get the coping saw blade in turned 90 degrees to the backsaw cut. Without making additional cuts, which to me seems to negate removing waste in this manner, how do I get the coping saw blade turned in the direction that I want to cut?

    Or do you know a better, easier way of removing the waste?

  2. #2
    Here are your choices:

    1. get thinner, skip-toothed coping saw blades (like the Pegas). The thinner the blade, the easier it is to make the turn.

    2. use an auger bit of an appropriate size to take out most of the waste (come in halfway from each face to avoid trouble)

    3. take out waste using only a chisel -- make your first chop away from the knife line which defines the bottom of the socket, to avoid bruising the wood, then work from each face.

  3. #3
    Join Date
    Feb 2004
    Location
    Perth, Australia
    Posts
    9,494
    I would prefer a thinner bladed fretsaw, but this is how you do it with a coping saw. The pics below are for a breadboard end - same principle ...

    Remove the waste with a coping saw by sawing on the diagonal ..


    Now saw back from an end on the horizontal ..


    Regards from Perth

    Derek

  4. #4
    Join Date
    Jan 2017
    Location
    Florida Panhandle
    Posts
    56
    Thanks Derek. That's how I would have done it using a sabre saw. I assumed with a non power tool, there was a different method. Unfortunately I don't currently own a fret saw.

  5. #5
    Bill,

    Fret saws can be cheaper than dirt if you do not go for the "space age" one. The cheap ones work just as well as the high dollar one....BTW, I have both. With any of the "turning" saws, fret, coping, or bow, if the blade will fit in the kerf go close to the bottom of the kerf and start your sawing motion with no pressure in any direction. Once you are "sawing" begin turning the saw while continuing the sawing motion. In two or three strokes the saw will have turned to horizontal. The key is very light pressure as it is with all sawing, let the saw do the work. The way Derek showed also works, take your pick.

    ken

  6. #6
    Join Date
    Feb 2016
    Location
    Marshall, NC
    Posts
    282
    You could bore a small hole in the corner of the dovetail, within your boundaries of course. You'll be able to turn the blade in any direction from inside the hole, but you'll have to be sure to clean the whole baseline. For me, I just cut down diagonally from the side of the dovetail to the other side multiple times kind of like what Derek showed. That's just my two cents (yep, I finally got to say it).
    I was once a woodworker, I still am I'm just saying that I once was.

    Chop your own wood, it will warm you twice. -Henry Ford

  7. #7
    Join Date
    Sep 2007
    Location
    Longview WA
    Posts
    27,454
    Blog Entries
    1
    Fret saws can be cheaper than dirt if you do not go for the "space age" one. The cheap ones work just as well as the high dollar one....BTW, I have both.
    My experience is different than Ken's. If he would be willing to trade a few of my older fret saws for a KnewConcepts version...

    The older style fret saws are workable. The Knew Concepts fret saw, imo, is worth the investment.

    Here is my feeling from the day it arrived at my door:

    http://www.sawmillcreek.org/showthre...rst-Cut-I-Knew

    jtk
    "A pessimist sees the difficulty in every opportunity; an optimist sees the opportunity in every difficulty."
    - Sir Winston Churchill (1874-1965)

  8. #8
    Join Date
    May 2007
    Location
    Newburgh, Indiana
    Posts
    918
    The key to getting the saw to turn sharply is to keep the saw reciprocating in the kerf before gently rotating the blade. I start about an eighth of an inch above the base line.
    Last edited by Bob Glenn; 01-24-2017 at 3:26 PM.
    Life's too short to use old sandpaper.

  9. #9
    Join Date
    Nov 2007
    Location
    Cincinnati, Ohio
    Posts
    132
    My two cents: box joints are typically a machined joint; dovetails are the easier hand-tool joint. Gappy dovetails will hold whereas gappy box joints will not. I say try the DTs!

    Either way, I concur with Joe on the Pegas blades. The blades are a little thinner than the kerf left by my go-to DT saw, so I can drop the coping saw blade into the kerf down near the baseline and start cutting on the horizontal. But as Derek says, you can swoop in and make two cuts on each if the blade is too wide for the kerf.

  10. #10
    I use a coping saw to remove waste. I think it is faster than a fretsaw, but it does take skill. Get a good coping saw that you can use on the push stroke (A flimsy saw will bend in the frame when you put too much pressure on it). I have used the Eclipse saw for 30 years; it is available at Highland Woodworking for $14.

    The coping saw usually has a slightly wider kerf than a dovetail saw, so slide the saw down into the kerf with a very slight sawing motion maybe 1/4 stroke. Slide it down to 1/8 (or 1/16 if you are skilled) from the gauge line. Then start sawing with the blade kind of stationary so that it cuts only at the side of the saw. This enables you to make a very tight turn to flat across. then cut maybe 1/32 inch from the gauge line to the other side. If you are making pins, note that saw will be a little crooked at the end of the cut because of the slant of the pin. Cutting on the push stroke enables you to see the gauge line easily so you can saw more closely.

    This all happens in two seconds or so, but it is worth slowing it down into steps to practice and learn. Slide the saw in, make a tight turn by making the saw cut sideways only, and cut horizontally.

  11. #11
    Join Date
    Jan 2017
    Location
    Florida Panhandle
    Posts
    56
    Quote Originally Posted by Megan Fitzpatrick View Post
    My two cents: box joints are typically a machined joint; dovetails are the easier hand-tool joint. Gappy dovetails will hold whereas gappy box joints will not. I say try the DTs!
    I don't have a lot of experience working with hand tools. I had originally thought about making these joints on my table saw, with a dado blade set. That saw is portable. With my recent surgery, it is heavier than I'm allowed to pick up, so I figured I'd implement my idea with the hand tools.

    I've have a couple of more to cut, but so far getting the coping saw moving before I start to turn it does seem to work OK. I am still having to make two swooping cuts, but the waste from the 2nd cut is much smaller. The joints (to me anyway) seem to be tight enough, but this is the first time I've tried to make anything like this. I realize this is not part of the joint, but I have though about, after everything is glued up, going back and putting in some dowels just to make sure the joint doesn't come apart. If you can picture a hinge, I'd be using the dowel as a hinge pin. With more practice, I'll no longer need the pins.

  12. #12
    Join Date
    Sep 2007
    Location
    Longview WA
    Posts
    27,454
    Blog Entries
    1
    With my recent surgery, it is heavier than I'm allowed to pick up, so I figured I'd implement my idea with the hand tools.
    Howdy Bill,

    I recently had open heart surgery and besides lifting restrictions my doctors didn't want me to be doing much hand work for the first three months. I cheated a bit and did some very light hand tool work.

    Not sure what your surgery is, but you want to make sure doing hand tool work will not interfere with your healing process.

    jtk
    "A pessimist sees the difficulty in every opportunity; an optimist sees the opportunity in every difficulty."
    - Sir Winston Churchill (1874-1965)

  13. #13
    Join Date
    Jan 2017
    Location
    Florida Panhandle
    Posts
    56
    Quote Originally Posted by Jim Koepke View Post
    Howdy Bill,

    I recently had open heart surgery and besides lifting restrictions my doctors didn't want me to be doing much hand work for the first three months. I cheated a bit and did some very light hand tool work.

    Not sure what your surgery is, but you want to make sure doing hand tool work will not interfere with your healing process.

    jtk

    Jim, thanks for the concern. I had a pacemaker replaced. There was an issue with the old one where the battery could unpredictably die. I think the biggest concern is that wires could be pulled loose. This is more of a concern with newly installed wires, mine have been in there several years now. My restrictions are more on the left arm use than the right. I can't pick up, carry, then setup the table saw with just my right arm/hand.

  14. #14
    Join Date
    Nov 2007
    Location
    Cincinnati, Ohio
    Posts
    132
    The pin (or "trenail" – a wooden nail) sounds like a design feature to me :-)

  15. #15
    Join Date
    Jan 2017
    Location
    Florida Panhandle
    Posts
    56
    Quote Originally Posted by Megan Fitzpatrick View Post
    The pin (or "trenail" – a wooden nail) sounds like a design feature to me :-)
    I've never heard the term trenail before. Thanks Megan, for educating me. I also would never have considered that a nail would be made of wood, but now that you point it out to me; it makes sense.

    When I said that the dowel is not part of the joint, I meant that a "pure" boxjoint would not have this feature. I also did not originally consider using the dowel, for me its an afterthought, thus not part of my original design. I'll be using it to compensate for my lack of skill and not wanting to make multiple attempts at getting the joint(s) cut perfectly.

    As of right now, I have the box shape fitted together. 3 of the 4 corners are pretty tight, but the 4th is only so so. It may or may not stand up over time. So its probably best that I use a new term and put in the trenails, just to be sure.

Posting Permissions

  • You may not post new threads
  • You may not post replies
  • You may not post attachments
  • You may not edit your posts
  •