Page 2 of 3 FirstFirst 123 LastLast
Results 16 to 30 of 45

Thread: working with laminate

  1. #16
    Join Date
    May 2005
    Location
    Highland MI
    Posts
    4,523
    Blog Entries
    11
    As far as glue, I guess I will be the contrary opinion. Our local cabinet supplier sells all three major brands of laminate. Anything you want is just a day away from the distributor, and you don't need to buy full sheets. Thinner edging (2" wide?) suitable for curves is available. I'm not even sure they sell solvent based contact cement anymore due to VOC laws in commercial work. I used Wilsonart water based glue IIRC (available clear and green) and had no problems. Did 8 large desktops with curved corners for work, 12 years later they are still going strong. Several projects since then, too. Helped my dad do a number of tables for the office coffee room when I was 14, (I'm now 69). Working in our basement, spilled a gallon of the old style contact cement. Quite a high time cleaning it up. Cabinet supplier sells and recommends a disposable pad style applicator to spread the glue after pouring it on the surface, they work great, clean up with water if you catch it before it starts to tack is real nice.
    Last edited by Ole Anderson; 03-10-2017 at 4:10 PM.
    NOW you tell me...

  2. #17
    Join Date
    Apr 2011
    Location
    Williamston, MI
    Posts
    464
    Quote Originally Posted by Bob Cooper View Post
    i picked up 9 1/2" dowels to cover 8'...i'm thinking 1' apart is close enough.
    I use the slats from an old set of plastic mini-blinds for spacers. They don't roll around and are still easy to pull out.

  3. #18
    Join Date
    May 2004
    Location
    columbia, sc
    Posts
    810
    All great advice. So a couple thoughts.

    1) I'm not really sure can assemble to top first and them offset the laminate. Reasons is its 16' long and would have an extra seam. Is it worth it?

    2) what kind of roller would one use. A normal paint nap? Clearly I'm thinking foam would melt

    3) I was going to put a laminate edge but maybe a 3/4" x 1.5" solid wood would look better. I assume you laminate the top first so that you can see the 3/4" edge of the wood from the top. Right? If so what's the best way to hold it in place? Clamp it front to back before I install the top?
    Bob C

  4. #19
    Join Date
    Jan 2017
    Location
    Marina del Rey, Ca
    Posts
    1,938
    Yellow foam roller.

    If you want a crisp edge, install the solid edge banding and surface flush before applying the laminate. If you want a bull-nosed edge, apply your solid edging after the laminate.

    "Anything seems possible when you don't know what you're doing."

  5. #20
    Ill bullnose solid after applying laminate on top, its not the same but its still a big radius bullnose. Ive seen far to much work in the past where after ten years the lacquer is worn off the wood looks like my hands after working on my 25 year old car.

    For the spraying comment further back if you were spraying id still use a gravity feed. I get you are talking 2 mm tip and thats fine thats why I used a primer gun but suction guns suck at what they do, they deliver fluid by venture effect and you need more pressure to get thicker material up there, gravity gun it just falls down. I started on the suction guns and had some favourites while it works with higher pressure it wont with low pressures.

    When I pressurized the suction cup the fluid is delivered to the tip via pressure so you can run a low air cap pressure not a high one, less overspray and fumes as you put it on. I realize contact doesnt have the same overspray as lacquers. I cant remember now but 15-20 lbs air cap pressure is fine. pressure stuff blows away suction and better than gravity feed. If you were buying a gun to spray contact I would not even consider a suction gun its inferior technolgy. it does nothing better and clean up is worse. Get a gravity feed a cheap one 1.8, 2 2.3 and better still use the 3M PPS bags on it you take the cup off put the plug in it then you have minimum clean up on the gun and dont have to clean a cup you just leave the left over in the bag. Thats if you want to spray.

    I dont really get what you are doing you have a 16 foot joined top and you are going to put laminate on it, how is the top supported how strong is it, is it on some support and will not be moved. without knowing that we dont know if you need a backer or not how it will sit how its attached supported etc

  6. #21
    Join Date
    Aug 2013
    Location
    Hatfield, AR
    Posts
    1,170
    Quote Originally Posted by Lee Schierer View Post
    In my experience, trying to cut laminate on a TS can be a problem. It doesn't want to lie flat and tends to chatter as it is cut, which is bad. Because it is thin, it tends to slide under your fence and hang up as you try to feed it.

    You need to cut it slightly oversize so you can trim it later with a flush cut router.

    The new water based contact cement is no where as strong and long lasting as the solvent based ones. Be sure to put at least two heavy coats on your substrate before gluing.
    +1 - Very very very important steps. Also, what Wayne said in regards to cleaning and denibbing. Prep work is key.
    -Lud

  7. #22
    Join Date
    May 2004
    Location
    columbia, sc
    Posts
    810
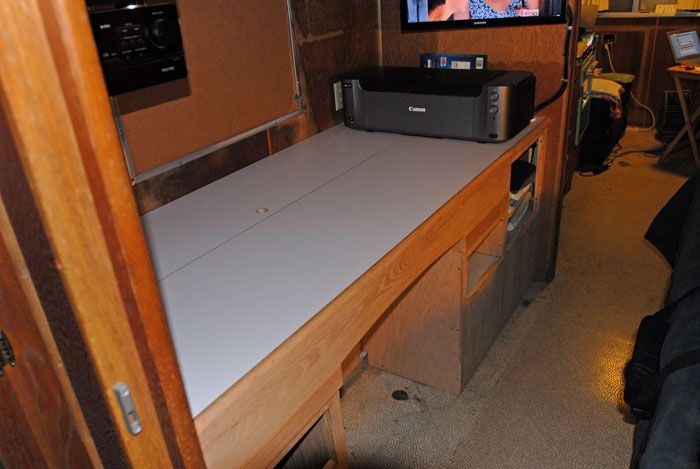
    Here's where it's going
    Attached Images Attached Images
    Bob C

  8. #23
    Hardly a day goes by I don't learn something from these forums -- this is certainly a classy place with no nastiness or patronizing comments (Sawstop conversations excepted ).

    I would like to add +1 on using the track saw for cutting laminate, much easier to handle than on a table saw and a nice clean cut to boot, easy to get the accuracy for theoverhang.

    And now -- having seen it here -- I'm going to use the bullnose effect on my next project -- refinishing the counters and table in my 1978 Boler.

    (Totally off-topic, but this is my second go-round on the refinishing. Last spring I completed a complete renovation of the interior of our 1979 Boler, new table and counters, new plumbing, custom cabinetry. We spent two nights in it heading to the Arctic then wrote it off against a bridge in the Yukon. Wrote the truck off too. Won't mention who was driving, it just irritates my wife).

  9. #24
    Join Date
    Sep 2009
    Location
    Medina Ohio
    Posts
    4,534
    Laminate is tough on saw blades

  10. #25
    Join Date
    May 2005
    Location
    Highland MI
    Posts
    4,523
    Blog Entries
    11
    I use an auxiliary fence on my TS that hugs the table so laminate doesn't slide beneath the standard fence. And a finer tooth blade.
    NOW you tell me...

  11. #26
    Join Date
    Aug 2013
    Location
    Hatfield, AR
    Posts
    1,170
    Quote Originally Posted by Jerome Stanek View Post
    Laminate is tough on saw blades
    How so? Flush trim bits are carbide, so are table saw blades (though I don't use saw to cut my laminate - too flimsy). I just clamp my laminate to the substrate with overhang by 1-2" on 2 sides then flush trim bit off the rest. Use saw horses to hold up the off cut. Once you're ready to glue, you have play all around to flush trim again the final product.
    -Lud

  12. #27
    Join Date
    Jan 2017
    Location
    Marina del Rey, Ca
    Posts
    1,938
    You don't need a special fence. I simply lay a narrow piece of door skin next to the fence, to raise the laminate and prevent it going under the fence. Also I often rest a strip of lumber on top of the laminate, close to the blade, to hold it down and prevent chatter. But the track saw is easy.
    "Anything seems possible when you don't know what you're doing."

  13. have you installed it now? show some output please.

  14. #29
    I'm late to the party, but will vote in favor of scoring. In the past I did a lot of laminate and tried lots of methods, table/radial saw, steel scoring knife, carbide scoring tool, router with straight edge, circular saw with guide, a Porter-Cable slitting attachment for there little router. The winner: carbide scoring tool. Just flop it good side down on the floor, grab a straight edge, score and snap.
    Most people can do that faster than you can wrestle a 8-12 foot piece to the table saw without even mentioning the hassle trying to keep the part near the blade flat to the table and finding clearance for a run off of 12 feet without sagging..

    The above is true for full sheets, but once reduced to narrower pieces, those I do on the table saw using an 80 tooth triple chip blade that I've had for 20-25 years.

    Cuts to length are Radial/miter saw for narrow, router/guide for wide pieces.

  15. #30
    great stuff here, I will be doing my kitchen soon and I am planning on doing my own countertops with a oak reveal 45 deg beveled edge. Thanks!
    Keep your mouth shut and nobody will know how stupid you are....I should have listened!

Posting Permissions

  • You may not post new threads
  • You may not post replies
  • You may not post attachments
  • You may not edit your posts
  •