Results 1 to 13 of 13

Thread: New member, new shop, big projects, small tools

  1. #1
    Join Date
    Mar 2017
    Location
    Kansas City
    Posts
    42

    New member, new shop, big projects, small tools

    Hi Folks.


    I just joined and thought I'd post a verbose intro first with a few pictures to break things up a bit.


    I am a machinist by trade, which has come in handy for upgrading & setting up my woodworking machines. When I was younger I did only woodworking, helping Dad & such, and dove down the metal rabbit hole in my late 20s. That's been my focus for forever it seems. But the past few years I've been putting off setting up a woodworking shop but I just can't ignore it any longer. I have 3 kitchens worth of cabinets I'm going to make, plus my house doesn't have a lick of trim in it from tearing it all apart remodeling the whole thing over the past decade or so. That and the continually growing to-do list seems to make it a no-brainer to get back into doing wood again in a major way.


    My shop building is a detached 24' x 24' cinder block garage with decent 220 single-phase power run to it. It has a flat roof and has leaked most of the over 15 years I've lived here and I was planning on building a gable end roof on it soon, but I'm nearly tapped out with the upcoming other projects which are all on a rush timeline. So today I've been working on giving it one last coat of tar to buy me a few months of temporary (but hopefully) dry roof before I need to tackle the dang thing for good.


    I've had a kind of decent 10" old Craftsman table saw for quite a while, but I decided it just wasn't stable and repeatable enough to keep up with what I need it to do. So about a year ago I picked up a used Powermatic 66 off Craigslist. It has 5hp 3-phase so I attached a phase converter and even with the de-rating it should offer up 3 of those original 5 horses, so that should be plenty of power for me. It certainly seems to have 10 times the poop of any other table saw I've used before so it seems pretty deluxe to me. The fence (Biesemeyer style) is OK but it seems that the face plates were designed to be warped at the clamp screws. One side was laminated particle board and needed replacing so I removed it. The other appears to be UHMW and I figure I'll machine new replacements from 3/4" maybe. UHMW is fairly inexpensive but the PM replacement part is sky high, thus my desire to just make my own. Anyway, I was ordering a few things from Grizzly the other day (more on that later) and while I was at it I picked up one of their tenoning attachments to check out. It seems like it might be OK but I've only given it a cursory look so far. The saw itself works like a champ - I've set it up so everythings straight and true to within a thou or two.
    So here's a picture of that:


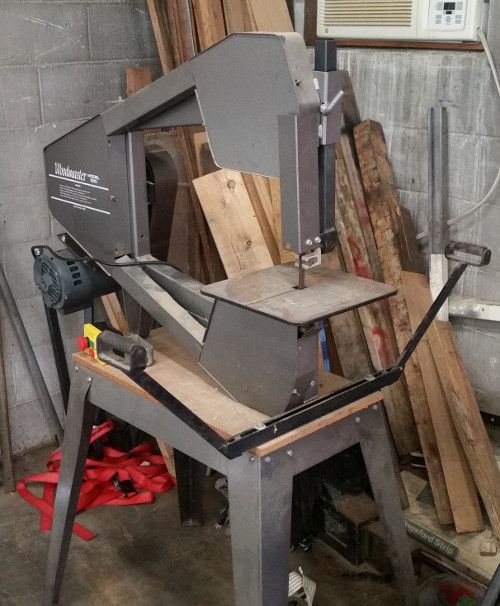
    I had a little Woodmaster model 500 3-wheel band saw for several years and this new direction inspired me to finally make the motor mount and get it running. It's somewhat flimsy, wimpy (1hp) and not the smoothest thing, but it seems to work pretty well despite itself. It won't handle resawing large stuff, but it will be handy for nibbling things and cutting curves if I need it.


    I have access to some rough-milled lumber from time to time and have a couple stacks of it in my own storage so I decided I needed a jointer. I was looking at investing in an 8" Grizzly parallelogram bed with helical cutterhead and almost went that route. But my space is kind of small and figured that the projects I can think of so far consisted of non-wide boards for the most part. And a nice little 6" Grizzly came up on CL for cheap the other day, so I figured I'd do that instead and picked it up. The next day I went ahead and ordered a spiral cutterhead from Grizzly (because... I set up the knives for the jointer & planer for the carpentry department at work and I've put in my set-up quota dangit). The "Grizzly" brand cutterheads you usually see orient the inserts parallel to the axis of rotation vs. a shear angle such as the Shelix offers. This one wasn't Shelix nor was it the typical ones I've seen offered by Grizzly. It appears to be a less expensive version of a Shelix (see pictures) saving a hundred bucks. Maybe a new Grizzly offering?.. I got it already and installed and tested it out last night. I must say I like the cutterhead immensely. When sighting down a fresh pass at a light source, you can kind of see "witness" lines between the insert edges I guess, but otherwise it's shiny smooth and very flat. I am certain I could use some more length on my tables so I plan to add some 12" (or so) extensions to it. That's not a tough project when you are surrounded by machine tools all day. Anyway, the jointer does indeed appear to take rough, ugly sticks and transform them into straight, flat clean stock. I never have used a jointer before so even though this one is small, it does well for what it is and I like it. By the way, my jointer is an older G1182 and the tech guy at Grizz said it wouldn't fit, but I bought it anyway assuming I could make it work somehow. The only thing I did was turning to shorten the length between the shoulders of the cylinder by .050", but during assembly it appeared that may not have been necessary and might have fit fine with the extra length due to clearance in the bolt holes. So anyway, decent jointer, new spiral cutterhead with new bearings. I'm good to go for a while - the table extensions will make it even better once that happens.

    The cutterhead installed:

    (The inserts looked "chipped" or something in the picture but they're not. They are sharp as can be.)

    Cute little machine, but big enough to be of some good use:


    So that's it for now. I have a HF dust collector I'll be putting together eventually too. My plan is to build a doghouse outside the building for that and plumb the duct work to it to cut down the noise in a major way. Also won't take up valuable floor space that way either of course.

    Looking forward to participating in the forum. I will definitely learn a lot and I hope to offer something useful now and then as well. I already regret not coming here first before ordering my Forrest WWII blade with the special grind rather than just getting the more practical standard grind. It might be nice to have that flat bottom now & then but I'll probably just be cutting through almost all the time. Well maybe I'll do more flat bottom slots on purpose just to "justify" my choice a little.

    More as the shop develops. At least I am able to do a few useful things with the stuff I've got as-is.

    Vinito out.
    Last edited by Vinito Caleb; 03-18-2017 at 10:17 PM.

  2. #2
    Join Date
    Mar 2006
    Location
    Austin Texas
    Posts
    1,957
    Welcome Caleb and very good start on the shop. Sounds like you have your work lined up in front of you and should have fun getting through the list.
    David

  3. #3
    Good luck and congrats on the shop. I upgraded recently from a Craftsman HD contractor saw to a Delta Unisaw of 1973 Vintage. Absolutely love the saw, I used a TECO FM 50 VFD to run the three phase motor. Your jointer looks great, but please consider upgrading the bandsaw. If everything works out right I should be picking up both a vintage 14 inch Walker Turner and a Powermatic over the next couple of weekends. Building a workshop is as much fun as building projects!

  4. #4
    Join Date
    Mar 2003
    Location
    odessa, missouri
    Posts
    1,931
    Blog Entries
    2
    Welcome..I'm in Odessa and work in KCK. Need any help with setup let me know.

  5. #5
    Join Date
    Sep 2016
    Location
    Modesto, CA, USA
    Posts
    9,997
    Have you considered a spray foam roof? They can slope it so it has positive drainage. But if it snows you can still have drainage problems.
    Bill D.

  6. #6
    Join Date
    Nov 2004
    Location
    Belden, Mississippi
    Posts
    2,742
    Glad to have you with us.
    Keep the updates coming.
    Bill
    On the other hand, I still have five fingers.

  7. #7
    Welcome Vinito! Glad to have you join us!
    Fred
    "All that is necessary for the triumph of evil is that good men do nothing."

    “If you want to know what a man's like, take a good look at how he treats his inferiors, not his equals.”

  8. #8
    Join Date
    Sep 2016
    Location
    Central Missouri, U.S.
    Posts
    1,263
    Welcome, Vinito. I'm in Sedalia and glad to help if you need any.

    Nick

  9. #9
    Join Date
    Mar 2017
    Location
    Kansas City
    Posts
    42
    Thanks guys! I might take somebody up on a little help once I get ready to lay out the shop which would require a drop-by. Could always use some experienced opinions there to keep me from making bad choices.

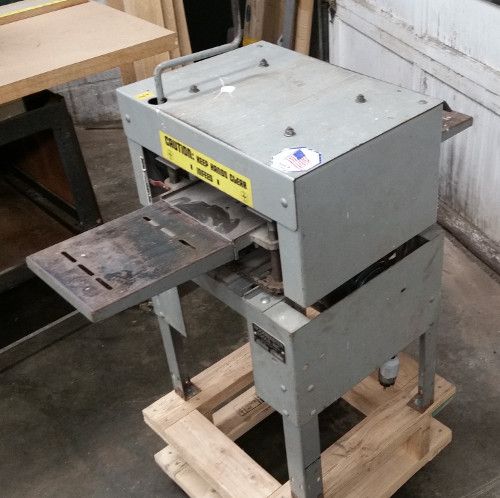
    Picked up a couple more flimsy toys today. One is a borrowed 8-in Woodmaster, which will just be a planer unless I figure out how & whether I can make the moulder cutters fit the narrower slot. The guy offering it has a newer, larger one (and a ton of moulding cutters) which is too different to be interchangeable without modification. I may just observe it a bit more and return it, but I might be able to modify it a little if I decide it's worth a try. Might be too wimpy to work as a moulder - I don't know yet.


    I have a cheapie 12" luchbox planer which seemed to work OK for what I did before. That's probably more practical for my small shop than the woodmaster unless I decide to modify it for moulding.

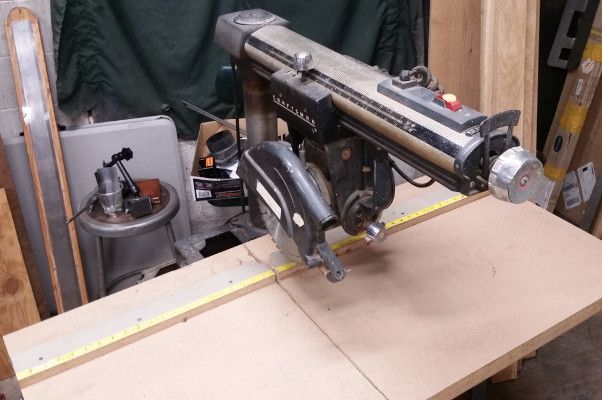
    The other is my old radial arm saw. I gave it to the same guy a while back, but since I'm doing this thing I thought it might come in handy against a wall bench in-line with a chop saw for doing slots or crosscuts or such maybe. It's not a great saw but it's not too bad. I took it on the condition that when I'm done with it he has to take it back, no questions asked.


    It rained a little last night, which was disappointing because my new tar layer was supposed to only be applied if dry conditions expected for 24 hours. Water was pooled up on it this morning. Braaachk!!! Only a few small pockets in town experienced any rain at all. I suspect the whole burg would have been dry as a bone had I not applied a layer of tar. It did get to sit unmolested for about 12 hours at least. Upon inspection it appears to be OK and it did not leak into the shop, so maybe it was a little test? The bigger rains will be coming later, so I shouldn't have to wait long for a real stress test.
    Last edited by Vinito Caleb; 03-19-2017 at 9:06 PM.

  10. #10
    Join Date
    Mar 2017
    Location
    Kansas City
    Posts
    42
    I did a little moving things around today. First I moved my old table saw and lunchbox planer into the shop. The table saw is an old Craftsman but it's a decent contractor's saw. The base was a hand-made thing it came with when I bought it. I never have cared a lot for it so it's time to build a better one. More on that later. I built a router lift into a table extension on the left side. It works better than you'd think, especially considering it's a Harbor Fright plunge router. I hacked the base heavily to lift & lower via a captured screw which is accessed via 3/8" allen wrench through a hole in the table. I've never used anything but 1/2" shank cutters in it which helps it perform a lot better. It's got enough power for non-huge bits though and the table allows me to use my saw fence on it, which comes in handy and much better than the half-dozen or less basic router tables I've used. Not a lot of bells & whistles as far as fixturing, but it does a good job on simple stuff.

    So the saw isn't fantastic but not bad, but I could leave it set up with a crosscut blade or dado setup or something and ease up on the wrenching.


    The lunchbox planer is a Ryobi, so hey, it's name brand cheap chinese junk. It has worked OK though for the dozen years I've owned it doing just smallish projects. It's prolly better than some I suppose.


    Sitting next to the aforementioned Woodmaster thingamajig for comparison:


    I'm thinking the Woodmaster is probably too flimsy to set up for moulding, but let me know if anybody out there knows different. I can machine most anything from scratch so it's not a matter of parts & such like that. But if it's just too wimpy I'll probably just be taking it back to the owner. Please offer opinions if you have any.

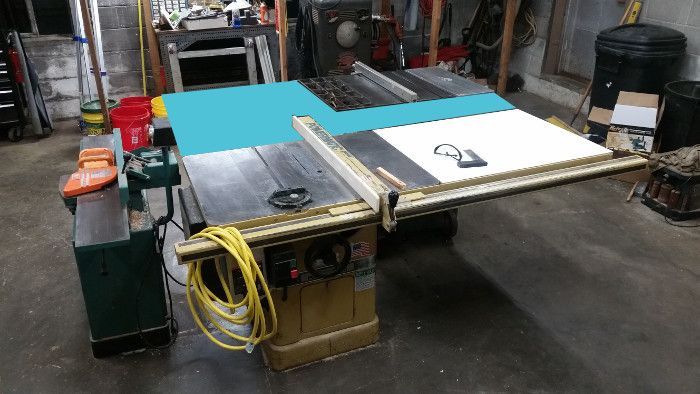
    So if I have both saws back-to-back and set them up all planar, then set the jointer next to them, I think it might have a compact but useful center hub in the shop. I'll have to raise the Powermatic a couple inches and move the switch on the jointer (which might be nice as it doesn't seem really well-placed anyway) so the highest points clear below the table saw level, which will be right at 36" off the floor. I'm 6'1" so a couple inches higher on the table saw seems to feel more comfortable anyway.
    Thus one of my first projects will be setting up some leveling feet and building pieces of table extension & stuff, but once it's done it could be laid out something like the following picture. Imagine some melamine, phenolic or Formica laminate tops (with help from blue photoshopped patch in photo) filling in the gaps so the table saw area is one constant patchwork plane. This provides for >48" outfeed for both table saws & router and all I'd have to do is move the fences out of the way to use the "other" saw.


    What do you think? I know I'm kind of cobbling something together with a few sub-par machines. But it's what I've got and I'm not sure whether I'll be taking to this in a big way yet. I'm getting older and though I always liked woodworking a lot, it just seems like there's less time every year so I don't want to go buy a shop full of pro tools and have them gathering dust after a couple years or so. I'm certain I'll be upgrading things in the upcoming months, but I'd rather do that as needed than try to anticipate with no real idea or chops and little direction yet.

    Let me know what you think though.

  11. #11
    Join Date
    Apr 2010
    Location
    Berkshire County in Western Ma
    Posts
    200
    My only thought is that the jointer planer might end up being in the way on that side when you are using the powermatic. For me, anyway, that side of the table saw is my high traffic area. I have a very old jointer on wheels that lives tucked under the right hand side of my tablesaw.

  12. #12
    Join Date
    Mar 2017
    Location
    Kansas City
    Posts
    42
    I made a little progress. I built a roller base for the PM table saw but realized my shop approach changed since I made that. So I replaced the rollers on the base with jacking/leveling screws. It now sits level and relatively planar with the other table saw. I need to make a new base for that old table saw with jacking/leveling screws on it and blend the whole island together right.

    Also, I dug out my old drill press project. It's almost done, I just have to attach & wire up the motor and install the spindle and a few little parts. It's a nice little Walker Turner radial drill press. I love these. It's one of the coolest little designs I've ever seen. The overarm allows you to move the head to reach anywhere on the table, and even way off the table around the back if you so desire. It's very massive for its size. You can drag it around on a concrete floor if you're fat enough (like me), but I used a little skidsteer to move it from the basement to the shop. Too heavy otherwise.
    Here's a pic of it after it was pushed into its temporary parking place in the shop.


    Just a little more assembly and it will be a working, handy drill press.
    Last edited by Vinito Caleb; 03-23-2017 at 8:14 PM.

  13. #13
    Join Date
    Mar 2017
    Location
    Kansas City
    Posts
    42
    Well it rained today... and ...

    Looks like I'm going to have to build that roof after all. Leaks every much as bad as it did before $100 worth of new rubberized fibered tar.
    Over the past couple weeks I've been thinking about it though, and I think I have a design which will be pretty quick and easy to erect. Nothing special, just decided to go ahead and pre-make full triangles and lay down a new attic floor later rather than try to tie in with what's there and use the old flat roof as the attic floor. That way all I need is a couple level top plates on either end to fasten the new trusses down, that and a couple end faces with studs for siding (simple gable-end thing). That's about the least painful way I can think of to slap a quick roof on the thing. The only weirdness then would be a little dead space between the old roof and new floor, which could be filled with insulation anyway.

    One step forward, two steps back.

    Oh yea, more bad news... I took my truck in to get looked at today as it was missing & running rough. $1000 to fix it, which is bad enough, but the truck isn't worth repairing. So looks like tomorrow I'll be truck shopping so I can just trade both my old car and truck in on and get one good truck with low miles I can count on running well for a good long while and get that behind me too.

    Holy crapola, life just keeps being expensiver every time a guy turns around.
    Last edited by Vinito Caleb; 03-24-2017 at 6:21 PM.

Posting Permissions

  • You may not post new threads
  • You may not post replies
  • You may not post attachments
  • You may not edit your posts
  •