The model can be determined by the plane's length and the blade's width.Originally Posted by Scott Archi

The blue color (spelled different in the States) puts it in the 1962-1967 time frame of manufacture.
jtk


 Contributor
The model can be determined by the plane's length and the blade's width.
The blue color (spelled different in the States) puts it in the 1962-1967 time frame of manufacture.
jtk
"A pessimist sees the difficulty in every opportunity; an optimist sees the opportunity in every difficulty."
- Sir Winston Churchill (1874-1965)

 Contributor
Wonder IF it looks like this one?
IMAG0284.jpg
The before...
IMAG0292.jpg
It had a plastic depth adjuster that I was able to change out..
IMAG0294.jpg
And, once it had been cleaned up, and sharpened..
IMAG0289.jpg
Just like a #4 plane should. Made in England.
 Contributor
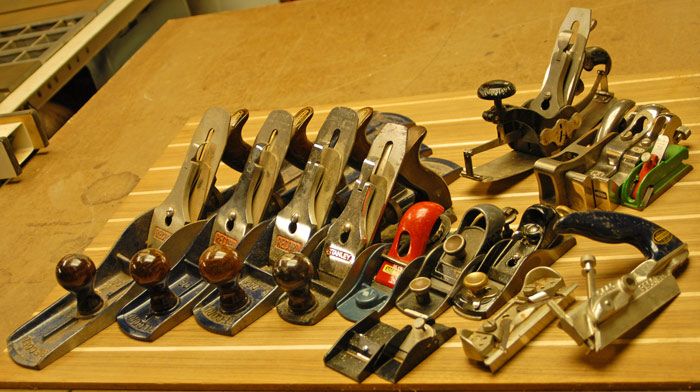
Here are some of my planes. Most I have owned for decades. Many I bought used, like new. None required restoration, other than blade sharpening. The 3 blue ones on the left are Records, which are equal to Stanleys. 4th from the left is a Stanley; if you had 1 of those, plus a low angle block plane and a shoulder/rabbeting plane, you could tackle most common woodworking tasks.
"Anything seems possible when you don't know what you're doing."
[OP]
Member
it looks similar.
 Member
For a beginning hobbyist with little shop time a ready to go user makes sense, assuming that the hobby is woodworking rather than tool fettling. Personally I find both quite satisfying, but I am neither a beginner nor a hobbyist.
Contributor
What about the hobbyist that doesn't have enough funds available to purchase a decent new plane?
Buying only new tools can be a steep climb for many wallets. Especially when someone like Mr. Newman has offered to put a used plane in working order for them.
The claim of one not being able to do woodworking if they choose to fix up an old plane is unfounded.
jtk
"A pessimist sees the difficulty in every opportunity; an optimist sees the opportunity in every difficulty."
- Sir Winston Churchill (1874-1965)
Contributor
Scott sent me some pictures of his plane to post. It appears to be a #4 type 20 or later:
Chip Breaker.JPG
All Apart.JPG
Behind the Frog.JPG
Frog.JPG
Sole.JPG
Strange, but one of the images didn't want to upload.
It shouldn't take a lot of work to get this plane up to its potential.
It is of the later dates of manufacture for Stanley planes. This is one on which I would have likely passed. That is just my opinion. Many have reported great results with planes from this time period in Stanley's production.
jtk
"A pessimist sees the difficulty in every opportunity; an optimist sees the opportunity in every difficulty."
- Sir Winston Churchill (1874-1965)
Member
I do think that starting by fixing up an old, complete plane is a good plan so long as you have the patience. I learned a lot about what makes a plane work well by doing this. Starting with a new plane, it will allow you to get started right away without worrying about the quality of the plane, but you also won't learn anything. I'm a mechanical engineer so I prefer to understand what makes something work well. Others may have different priorities or patience.
[OP]
Member
Got the plane blade sharpened, whoever had this before me put a 2mm "micro" bevel on it and it had chips fairly deep in it. I assume it hit a few nails. Took a while to grind it flat on my DMT C. Once it was flattened on the bevel and i could feel a burr on the back I flattened the back until the burr was gone. Worked the bevel again this time knocking the corners down as Paul sellers does in his videos on plane blade sharpening. Took the blade to my coarse India, fine India, pike washita and then my 8x2 Norton Hard Arkansas. Stropped on some green compound and bobs your uncle. I could shave with this blade.
I find plane blade sharpening comes very naturally to me freehand. I attribute this to my prior knife and razor sharpening.
I got the chip breaker flattened so it sits on the iron flat. Oiled all the screws. Put it back together. Not sure where to position the frog so I put it all the way back until it was bolt bound on the front of the slots. Put the cap iron on. Adjusted and took a shaving. Measured 0.002" but I haven't flattened the sole and will be doing that tomorrow. Other then that it's just learning the adjustments I think. This plane didn't seem to be very bad shape?? I thought "fettling" would have been harder.
Is there anything else I should look at?
Jim thank you for posting the photos for me.
Still on the hunt for a plane to true stock. Scrub or #5, #6 or #7?
Contributor
This could have your frog too far back. The plane of the frog bed and the back edge of the mouth should line up.Not sure where to position the frog so I put it all the way back until it was bolt bound on the front of the slots.
This might help:
http://www.sawmillcreek.org/showthre...ker-to-Jointer
Post #10 (depending on how your SMC viewing is set up), "Frogs to the left of me, Frogs to the right of me... " has a bit about setting up a frog.
An actual Scrub Plane like a Stanley #40 will set you back more than you might like. Many people set up another plane for that kind of work. My heavy scrub is an old junker #5-1/4. Yesterday I was using a #6 as a light scrub plane. Many use a #5 some like a #3 or #4. A scrub plane is usually used across the grain to remove a lot of material. A narrow blade with a pronounced radius works well for this. A wider blade with less radius will be more work to push. My heavy scrub can take two or three strokes across a board as fast as my #6 can be pushed across once.Still on the hunt for a plane to true stock. Scrub or #5, #6 or #7?
Glad to be of help.Jim thank you for posting the photos for me.
jtk
"A pessimist sees the difficulty in every opportunity; an optimist sees the opportunity in every difficulty."
- Sir Winston Churchill (1874-1965)
 Member
Truing stock would be the job of a #5 with a cambered blade. Get one from an antique store, or on that "e" auction site. A #5 doesn't have to be as perfect as a #4 when used to prepare stock for the #4. It is perfect for rough work, and can quickly bring a board to flat & square. A scrub plane is handy for boards that are in extremely bad shape, but a #5 works nearly as well. I use my #6 quite often (although many don't find them as useful). I use it with no camber to go over table tops as a jumbo smoother following a few passes with a #7. I use a #8 as my go-to edge jointer.
"I've cut the dang thing three times and it's STILL too darn short"
Name withheld to protect the guilty
Stew Hagerty
[OP]
Member
For smaller box making and smaller projects I can handle in my tiny shop, I think I will need a good block plane. I was thinking low angle veritas with the optional tote and knob which can make it like a #3 smoother if these components are added. This is well within my budget and means as a wood worker. Could I tune my #4 to take bigger cuts and straighten stock and then finish it off with the block plane?
I just don't want to buy a plane and never use it. Thoughts?
 Contributor
FULLY agree Rob...
Jerry
Member
Scott,
How big are you? What type of projects?
I have medium hands, but work on smallish stuff. I like a block, size 3, LAJ, and size 7.
Really, you can get by with a block and size 4.
I know one flamenco luthier that only uses a block plane as his only plane.
A #4 can easily be used as a scrub--you may just want to have an extra cheap body and a toothed blade....although a Mujingfang would be great here too.
I may be a minority here, but I'd prefer to use a router on a sled or a planer instead of a scrub!
Then again, I'm probably wimpier than most guys here.
Contributor
My current project is a small bookshelf. The 1X12 pine boards for the shelf are a bit cupped. There isn't a planer or a router sled in my shop. my scrub plane, a high school shop victim #5-1/4, makes quick work of taking out the high side or belly of the cupping. Then removing the sides of the cup is quick work with another plane.
My understanding is it can be a bit tricky to get rid of cupping using a power planer.
jtk
"A pessimist sees the difficulty in every opportunity; an optimist sees the opportunity in every difficulty."
- Sir Winston Churchill (1874-1965)
 Posting Permissions

 Reply With Quote