Results 1 to 15 of 15

Thread: First attempt at segmented turning....angles driving me crazy

  1. #1

    First attempt at segmented turning....angles driving me crazy

    I've never made a segmented turning before. Someone asked me to make a mortar and pestle for them for grinding garlic, so they're looking for something about 8 inches in diameter. I figured I'd make one out of maple but I didn't have a piece big enough for a solid turning. I used all the directions I could find about calculating the number of sides (6 in this case) and the thickness of the pieces. As I'm making it with 6 sides each cut needs to be 30 degrees. I understand all of that. What's driving me nuts is when I make the angle cuts. I used an angle finder and a protractor to double check the angle finder. I built a sliding sled and secured a fence at 30 degrees from the table saw blade. Double checked it with the angle finder and protractor and everything looked good. I made some mock ups with 1/4" plywood rather than ruining a bunch of maple. The angles didn't match...(*^#@*&!!!!!!!) I started adjusting the angle of the fence a little at a time, I tried using my miter saw, nothing got me on the mark for the 30 degree angle. What's the secret? Do I need to get a high end protractor? I like how segmented bowls and turnings look but I'm questioning my decision to try one at this point. Help!!!

  2. #2
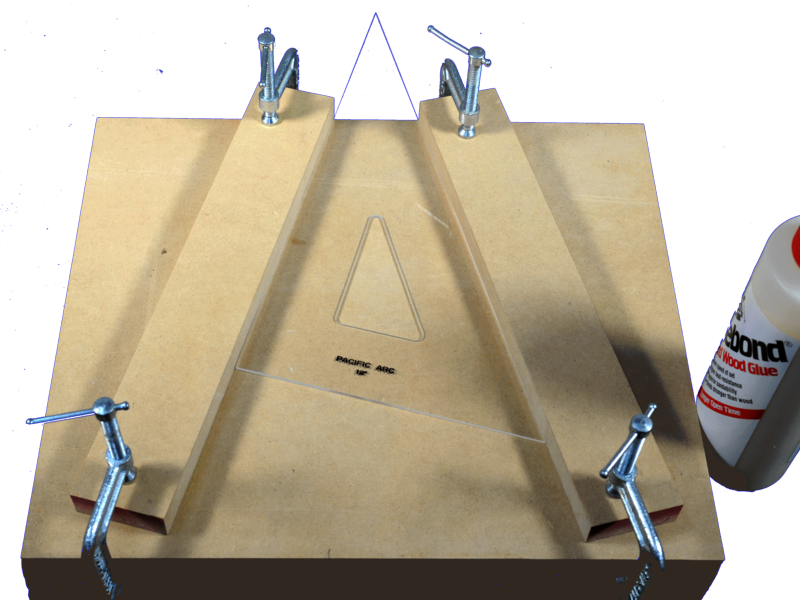
    Make a wedgie sled all you need is a 30 degree triangle from a craft supply store to set it for 12 segment rings. You can buy or make different degree wedgies to make different segment rings. I made one and make rings that are pretty close. I glue up in pairs then glue the pairs into half circles. Then with a piece of sandpaper glued to a piece of mdf I lightly slide the half circle ends over it to get the half circles to line up perfect.

  3. #3
    Thanks Chris. That's about where I am now. I glued up everything in halves. I'm figuring on sanding the ends or else try to carefully run them on the table saw with the flat side against the fence and the legs just kissing the blade edge. I'll have to check for a 30 degree triangle. I've got a 45 but didn't know they made them in different angles. Thanks for that tip.

  4. #4
    Join Date
    Jan 2011
    Location
    Norristown, Pa
    Posts
    269
    Skip,
    You can use your 45 triangle to make 8 sided rings. Look at Chris's link to wedge sled. To make it simple you make the an 8 sided only sled that will slide in you miter slot of your table saw.
    Attach a wood fence to that sled at any angle to the blade it can be at any angle. Then attach a second fence with your 45 square between them. The picture shows the 30 – 60 triangle to make 12 sided. You will replace the clamps with screws ( you know that) and add a runner on the bottom to slide in your miter slot on the table saw. Attach the runner so that some of the sled and each fence will be cut(trim to size). Note the runner should fit snugly in the miter slot.
    You cut the boards using fence 1 were the triangle is and then moving the board to fence 2 were the glue bottle is. If you get the second fence tight with the triangle against the first fence you will be able to cut 8 sided rings all day with sanding or cutting each half. If the ring doesn’t fit snug check your triangle between fences. When you want to “GO ADVANCED” watch the videos on segeasy.com If you want I can send via private email a pdf file with the cut sizes for bowls using 8 or 12 segments.


    Last edited by Bob Coates; 03-30-2017 at 7:47 PM.

  5. #5
    The youtube video I followed to make my sled. There is another video I saw that has a template to make wedgies that you can fine tune then lock the adjustment in place with a screw.

  6. #6
    Thanks for the info, I've got some studying to do!

  7. #7
    Join Date
    May 2010
    Location
    Ambridge, PA
    Posts
    968
    Skip,

    You've got good reply information from the other replies. Since you didn't say what table saw or saw blade you were using to cut the plywood test pieces or if your certain your blade is dead nuts parallel to your mitre slot. Not being there, makes it hard to diagnose your exact problem but I'd first go back and make sure your saw is tuned-up correctly. If your sure your sled is 30 degrees but you aren't getting 30 degrees, I'd say your sled might not be getting pushed straight thru the piece. Or your blade is getting deflected for some reason. Anyway good luck.

    Dave
    Member Turners Anonymous Pittsburgh, PA

  8. #8
    Thanks Dave. I built the flat part of the sled first with two guides under it. I'm using a 10" Grizzly cabinet saw. I made a cut in the base of the sled and using a square, established a 90 degree line to the saw cut. I used that line and the saw cut to establish my angle for cutting the pieces.

  9. #9
    Join Date
    Jan 2011
    Location
    Norristown, Pa
    Posts
    269
    Skip,
    Since you have the sled and one fence add a second fence spaced with your 45 or 30 triangle and then cut your segments from each fence.

  10. #10
    Thanks Bob, I'll give that a try. I'll keep everyone posted.

  11. #11
    Join Date
    Dec 2012
    Location
    Brenham, Tx
    Posts
    109
    Skip,
    All the responses to the building of a Wedgie sled are great. It's what I use.
    But, for this project, just cut a piece of plywood and fasten it to your miter gauge runner some how so it won't move. Then cut it off like a zero clearance and do not move it. Then get some double sided tape and tape down half of the ring with the top side up. Just barely hang it over the kerf you cut in the plywood. Trim off the edges of the half ring. Then get the other half of the ring. Turn it top side down and tape it to the plywood, just barely hanging over the side. Make the cut as you did on the other. Then the two halves should fit together. Just get some rubber bands and glue it together on a flat surface. If you have already glued it together but have a poor glue joint, break it apart at the bad joint and do the above procedure.
    RP

  12. #12
    Join Date
    Apr 2013
    Location
    North Carolina
    Posts
    43
    Skip, just saying....

    I do all my segmented, or staved vessels cuts on a miter/chop saw with no jigs. Just a stop with two G-Clamps to replicate the exact size of each cut. It is much simpler, safer and accurate.
    I did an Excel program to do all the angles for either segments or staves (combination angles) and you are welcome to a free copy and a phone call to explain how to use the worksheet. I just enter the inside, outside diameter and height and everything else calculates automatically, including the length of the piece needed to cut the segments. PM me should you be interested. IMHO, this thread is over-complicating the process.

    On the miter saw, I am normally correct with the first try. If not, I will trim one segment only ever so slightly on the disk of a combination sander until there are no gaps in the segmented ring and then make a very slight adjustment on the miter saw. Your saw fence needs to be aligned properly (both sides) and when set to 0 degrees cut exactly 90 degrees perpendicular prior to setting an angle. Also, the strip or board you are cutting the segments from must be true and straight.

    Last edited by Willem Martins; 03-31-2017 at 10:55 AM.

  13. #13
    Join Date
    May 2009
    Location
    Boston
    Posts
    1,740
    Good advice above. I've found that unless everything is perfect your going to get some gaps when you mate up the half circles so don't go crazy. However if the gap is over an 1/8th either in the middle or end the try to make some adjustments. As was mentioned above I glue 60 and 100 grit on MDF and use that to make sure the pieces fit tightly.

    It may be worth getting a piece of poplar and make a prototype. You can work out the bugs then use the good wood. I googled segmented turning PDFs and found a lot of good stuff.
    Don

  14. #14
    Join Date
    Nov 2013
    Location
    Leland, NC
    Posts
    476
    When you cut segments from a strip, mark the top of the strip. Then, after the pieces are cut, turn every other one over so that only half the parts have the mark on the up side. This takes care of any vertical angle problems with the blade. It is easy to miss that little step, pretty sure it is in the video.

    Also, my tip! I use hose clamps, not rubber bands. On larger rings rubber bands can be a challenge. Smaller clamps can be joined to make custom sizes. The best part is that I use a drill with a nut driver to tighten the clamps. Works great.

  15. #15
    I guess I was letting my OCD kick in when I was cutting the segments! I used the sled that I made to cut the angles and rigged it up to hold the glued up halves in place then ran them through the table saw blade just enough to make the ends flat. That seemed to work pretty good so all my circles are glued up for the night.

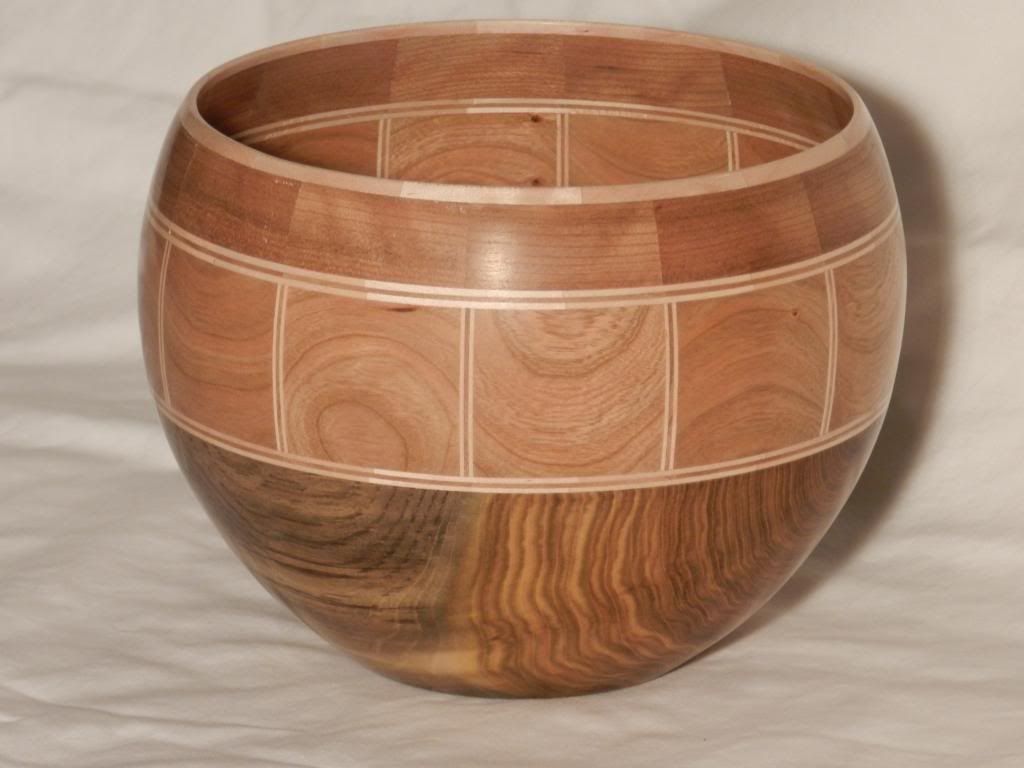
    I appreciate everyone's input, I guess I was trying too hard to be a machinist rather than a woodworker and going for 1000th of an inch tolerances. Willem, that bowl you posted the picture of looks great. Gives me something to shoot for. I appreciate the offer for the excel spreadsheet, I'm running a Mac so I don't know if it will work for me or not.

Posting Permissions

  • You may not post new threads
  • You may not post replies
  • You may not post attachments
  • You may not edit your posts
  •