Page 1 of 2 12 LastLast
Results 1 to 15 of 16

Thread: 4 mahogany boxes

  1. #1
    Join Date
    Feb 2011
    Location
    Carlsbad, CA
    Posts
    2,230
    Blog Entries
    2

    4 mahogany boxes

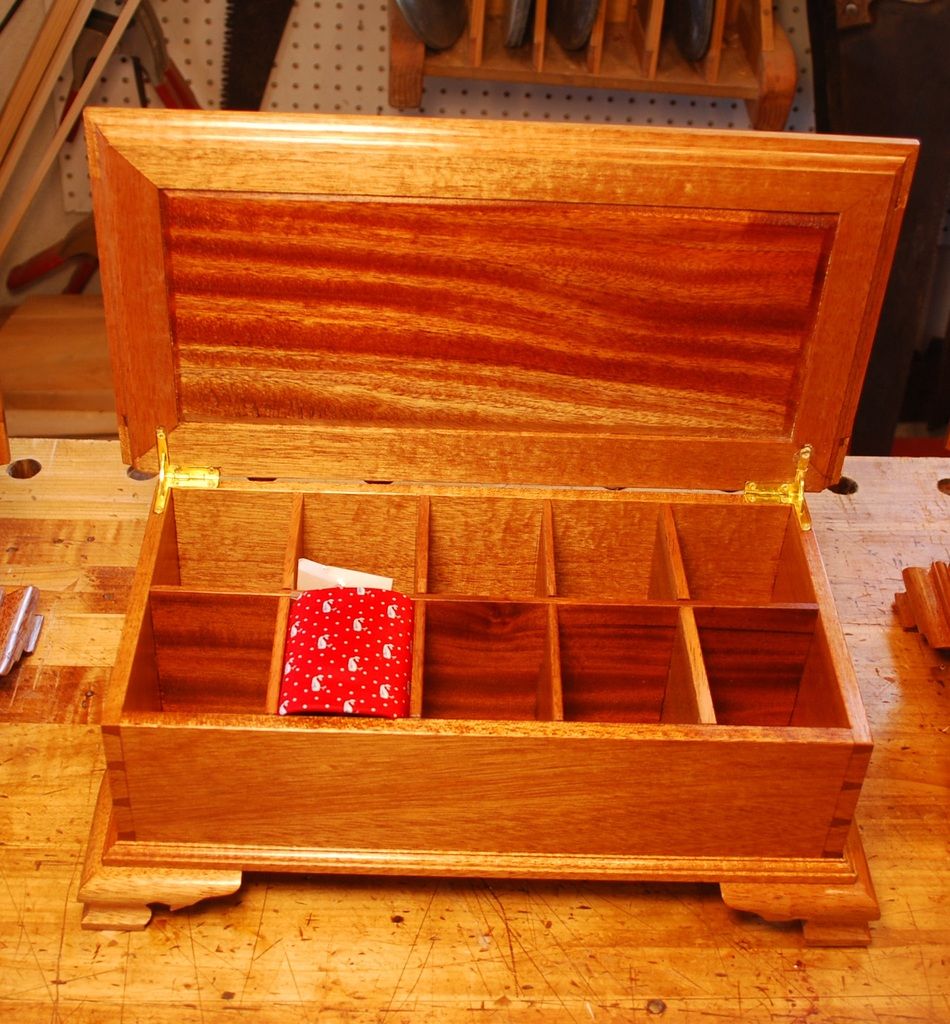
    Good Lord willing, our youngest Son will graduate college in a couple months. He enjoys watches, so I used some mahogany left over from a previous project to build him a box to keep them in. 16" x 8" x 6" high. Simple dovetailed carcass, Cabriolet feet, frame and panel top with mitered bridle joints and Holly string inlay circle with carved initials. Finish is oil and varnish followed by shellac, paste wax. A fun hand tool project that doesn't require much lumber/time.


    As I was starting the project, the LOML pointed out 3 of his best friends would also graduating at the same time. These 4 boys have been friends/teammates since they were 10, moving from age group water polo through NCAA Division I. They all pretty much grew up at our house and now they're roommates at school. The Boss suggested "wouldn't it be nice if we could give them each something personal that might remind them of their friendship". Since she's been in charge of gifts forever, I reasoned she obviously had something in mind. As usual, I totally missed the hint. Didn't take long before she spelled it out for me: "No genius, I mean you should make something for them".


    My woodworking is pretty much on a project by project basis. This was my first experience building multiples of the same project and thought some of my fellow Neanders might be interested in what I learned:


    * Work process – Upside: you save a lot of time planing/dimensioning stock when building multiples. Downside: keeping the multiple sets of parts straight, so grain matches etc., put a real premium on marking/labeling the parts. I spent lots of time sorting everything out repeatedly. Ultimately, using the cabinetmakers triangle on 2 edges of each part helped. Seems like I was always planing away one set of identifying marks - resulting in multiple, repeated "now which of these pieces go together again?" head scratching. Once some parts were assembled (top, carcass, feet), I ultimately resorted to blue tape labels to match things together.


    * Repetition made my dovetails and joinery a little better than usual –. I guess there is something to the benefit of practice.


    * Fussy jobs like fitting the bridle joints, shaping the Cabriolet feet and installing the quadrant hinges get pretty tedious when you have lots of of them to do.


    * For me finishing is something I don't really enjoy and pre-much just put up with. That's a workable philosophy for a single project, but problematic with multiples. I guess this is one of the reasons why I guess professionals spray on their finishes.


    Overall I enjoy the process of building a single, standalone project, more than building multiples. For me, building multiple copies of the same project seemed more like a job and less less like having fun. I guess this goes under the heading "be careful what you wish for, you just might get it"; as a hobbyist woodworker, always wishing for more shop time; I've thought wistfully about how cool it would be to make a living building furniture. I very much envy/admire professional furniture makers who are able to make this a reality. Their talent, courage and initiative are super impressive to me and something I know I could never accomplish. On the other hand, building these multiples has given me a renewed appreciation for how absolutely lucky I am to so thoroughly enjoy blundering about the shop, making shavings, without consideration for economic efficiency/productivity. In short, even though I have waaay less shop time than I would like, I'm grateful I'm free to spend that time enjoying the woodworking process, without the necessity of focusing on producing a useful result.


    Sorry for the navelgazing –back to the central thought I wanted to share, but am clearly butchering! I'm surprised how much I'm looking forward to giving these kids their boxes. Come on.... their young people on the cusp of their future! Clearly they're waaay more interested in something closer to a new computer/phone/trip, than a simple wooden box. Thinking about it out loud, a box as a graduation gift sounds awfully trite. Regardless, I feel good about it and I'm hoping for the best.


    All the best, Mike


  2. #2
    Join Date
    Mar 2006
    Location
    Austin Texas
    Posts
    1,957
    Oh heck Mike, now you're just showing off. Nice work and great gifts for all of the gang.
    David

  3. #3
    Super work, and congrats on the graduate. I'm sure his friends will be amazed at their gifts.

  4. #4
    Join Date
    Sep 2008
    Location
    N. Idaho
    Posts
    1,621
    Those are some great boxes. And the finish looks top notch. Appreciate you sharing your insights as well. I have similar thoughts about what it would really take to go pro.

    Will look forward to seeing the next project.

    Best,
    Chris

  5. #5
    Join Date
    Feb 2004
    Location
    Perth, Australia
    Posts
    9,494
    Mike, as always, that is first class work. Clean and well-proportioned.

    Regards from Perth

    Derek

  6. #6
    Quote Originally Posted by Mike Allen1010 View Post
    Clearly they're waaay more interested in something closer to a new computer/phone/trip, than a simple wooden box. Thinking about it out loud, a box as a graduation gift sounds awfully trite. Regardless, I feel good about it and I'm hoping for the best.
    Decades from now, when those computers and phones are obsolete and long-discarded, when even an exotic vacation is a fading memory, these young men will cherish the amazing boxes you built just for them.

  7. #7
    Join Date
    Sep 2007
    Location
    Longview WA
    Posts
    27,453
    Blog Entries
    1
    Quote Originally Posted by Joe Bailey View Post
    Decades from now, when those computers and phones are obsolete and long-discarded, when even an exotic vacation is a fading memory, these young men will cherish the amazing boxes you built just for them.
    What he said.

    Excellent work,

    jtk
    "A pessimist sees the difficulty in every opportunity; an optimist sees the opportunity in every difficulty."
    - Sir Winston Churchill (1874-1965)

  8. #8
    Nice work Mike. I like them! I think these are a heartfelt gift that the boys will come to appreciate more and more with time ..... "Mr. Allen made me this when I graduated from college, son."

    About the cabriole feet? Are they the same length on the side as they are on the front? It looks that way to my eye, but wanted to be sure because I am about ready to make some for one of my own boxes (havent done them before).

    Thanks.
    Fred
    Last edited by Frederick Skelly; 04-26-2017 at 6:43 AM.

  9. #9
    Mike,

    With the others on the boxes, beautiful work.

    The navelgazing was most interesting. Like you my time in the shop is limited and I wouldn't want it any other way. I've been down the advocation to vocation road a couple of times and ruined some nice advocations. One of those times ended up being my life work. It allowed a dumb old West Texas farm boy to see the world but it sure was more enjoyable when I was doing it for fun. I expect when I retire my shop time will not change too much, there is just too much enjoyment in putzing around, sharpening iron in different ways, planing something just to hear the sound of iron on wood, occasionally making something just because, and having coffee while sitting and looking at my tools. I don't want to chance taking that away.

    You are a smart man,

    ken

  10. #10
    Join Date
    Aug 2013
    Location
    Princeton, NJ
    Posts
    7,296
    Blog Entries
    7
    Very nice work Mike!

    I'm a hobbyist turned professional, so I get all the shop time one could want. I enjoy new projects for that reason that it makes the process more interesting, but doing multiples is certainly where you really build your skills.

    Having had a few vocations, I've learned that it is not actually what I do that keeps me interested in doing, but rather it's the challenge of improving. Woodworking offers many opportunities being that there are so many variables.
    Bumbling forward into the unknown.

  11. #11
    Join Date
    Nov 2007
    Location
    Goleta / Santa Barbara
    Posts
    969
    Impressive, as always. Michael, goood to see your latest, and congrats. Patrick

  12. #12
    Join Date
    Apr 2008
    Location
    Provo, UT
    Posts
    390
    Those are fantastic presents! Your workmanship is fantastic.

  13. #13
    Beautiful wood and work.

  14. #14
    Join Date
    Nov 2013
    Location
    United Kingdom - Devon
    Posts
    503
    Lovely work, Mike. Really attractive boxes.

  15. #15
    Join Date
    Feb 2011
    Location
    Carlsbad, CA
    Posts
    2,230
    Blog Entries
    2
    Thanks guys for the feedback – you're entirely too kind!


    [QUOTE=Frederick Skelly;2684401] About the cabriole feet? Are they the same length on the side as they are on the front? It looks that way to my eye, but wanted to be sure because I am about ready to make some for one of my own boxes (havent done them before).

    Thanks.
    Fred[/QUOTE]


    Hey Fred,


    The Cabriolet feet are the same dimensions in all 4 corners: 3" long x 1" tall X 1". Because I thought the boxes might get viewed from all angles including the back, I carried the profile all the way around, rather than going with a simple straight piece along the back edge.


    I'm certainly no expert, but having screwed up multiple sets of Cabriolet feet in the past, the advice I would offer is:


    1) Whole number ratios for height versus length (in this case 3:1) usually look decent. Same rule applies to the spacing of major curved elements along the bottom profile and for the height of the feet relative to the overall height of the box.


    2) I've tried use pictures from books to make a template for the curved profile, but usually can't a clear enough picture. I've had more luck using a drafting circle template (try to match diameter of curves to diameter of your forstner bits) and a French curve to draw connections between circles when something other than a circular line is needed.


    3) I roughly shape the profile of the Cyma curve on the show/outside surfaces (I think that's what's called? – 2 circle stacked on top of each other) with hollow and round planes before cutting the miters. I have challenges gluing up the miters so there perfectly square/aligned ,that's why I leave them a little fat of the line so I can complete final shaping once the feet are splined, mitered and assembled . Easier for me to get a nice symmetrical match of the curve.


    4) Half round rasps, files and dowels wrapped with sandpaper are helpful tools for smoothing final profiles. For small Cabriolet feet like these, I like using a machinist vise to hold them in place for shaping, which I find a little easier/more solid than bench dogs/devices.


    Good luck with your project – I look forward to seeing pictures of your work!


    All the best, Mike

Posting Permissions

  • You may not post new threads
  • You may not post replies
  • You may not post attachments
  • You may not edit your posts
  •