Page 2 of 2 FirstFirst 12
Results 16 to 30 of 30

Thread: Walnut Secretary Build

  1. #16
    Join Date
    Feb 2011
    Location
    Carlsbad, CA
    Posts
    2,230
    Blog Entries
    2
    Thanks all for your comments. I wonder if just because I enjoy hand tool build threads, am I imposing on the SMC community by posting mine. Goodness knows, it's frequently pointed out to me - just because I think something is interesting, doesn't necessarily mean anyone else shares my view. The usual context for this feedback is my family's response to my passionate interest in following the Los Angeles Dodgers. Somehow they just don't appreciate how critically important it is to watch every pitch when Kershaw's on the mound! Now that I think of it...... I'm pretty sure that's more about me than them. My apologies for the digression.

    This post is part 2 of the Walnut Secretary build - the pigeonhole unit.

    I’m still not sure about the profile for the Cabriolet legs so naturally I’ll put that off until it’s the only thing left, and then I’ll probably just end up using the template I already have.Here’s a couple pictures of building the small pigeonhole unit that fits under the bookshelf and on top of the desk surface.

    Here’s a profile for vertical dividers. I try to use templates for curved parts. I used to make them out of wood but spent more time making the template than the workpieces so now I use sort of thick poster board which is easy cut with an X-acto and durable enough for me.


    I tried to saw the profile on the vertical dividers with coping saw at the bird’s mouth, but it got tedious pretty fast (plus I’m horrible at sawing to a curved layout line). I ended up ganging the pieces together and using a 1 ½” diameter Forstner bit to create the primary curve and following up with files, sandpaper etc.


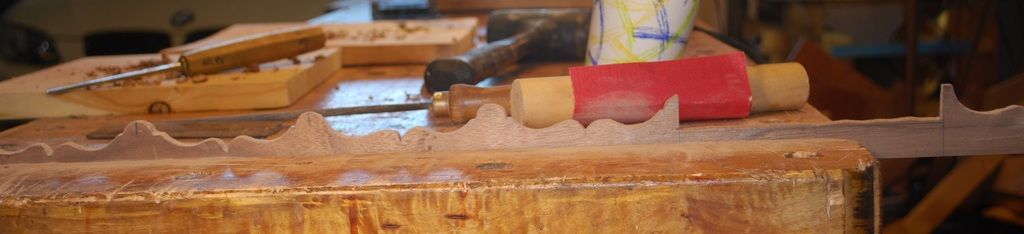
    This is the profile of the horizontal facing that trims the top of the pigeonholes.


    I couldn’t find anything I could copy so l layed this out with graph paper and a drafting circle template. FWIW, if you’re interested in adding some curves to your work, a drafting circle template is super handy. Much easier for me than trying to get the curves in the right place using a compass. I’m sure horizontal facing is not gonna match the exact width of each of the pigeonholes as there is likely more than a little variation in the finished widths. Means I’ll have to make some “adjustments” – if that sounds like sketching in something freehand and hoping no one notices, you’re way ahead of me.


    I tried 3 times to rotate this pic w/o success-a better person would apologize, but I'm too frustrated with my horrific IT skills. The center section of the pigeonhole will be a hinged door which might be a good opportunity for carved shell or something. I used an old Stanley beading scraper to put some beads on the middle vertical dividers (I like vintage tools, but I use LV cutters for beading). . I have better luck creating small beads like this (1/8” wide) with the scraper - seems to be less tempted to follow the grain. That said, I’m really interested to learn how this might be accomplished with the new LV large plow plane – I think that comes with beading cutters? I appreciate hearing from anyone who’s had a chance to try it out.


    I used ½ round files and sandpaper to smooth the profile of the horizontal trim piece.

    Last edited by Mike Allen1010; 05-23-2017 at 9:17 PM.

  2. #17
    Join Date
    Feb 2011
    Location
    Carlsbad, CA
    Posts
    2,230
    Blog Entries
    2
    I used ½ round files and sandpaper to smooth the profile of the horizontal trim piece. I epically screwed up the easiest part – the flat section in the middle that will be adjacent to the hinged door. As a consequence of my screw-up, the fit with the top edge of the vertical dividers I worked so hard on - looks like crap. I’ll have to find some kind of “recovery” which probably means an overlapping door or trying to glue in a tiny 1/8” wide repair to make things look straight. Neither of these seem very attractive. How much patience I have left once we get to the end of the build will determine if I listen to my Dad’s voice in my head “if it’s worth doing, it’s worth doing right” and attempt to repair or just let it go and hope no one notices. Option 2 means every time I look at this piece, all I’ll see is this mistake I didn’t try and fix. My experiences with this kind of small mistake is “the cure is worse than the disease”, and any attempted repair will be more noticeable than just leaving it as is. Fortunately I’ll be able to rely on the same rationalization I use for being a terrible golfer – “hey, I’m here to have fun, it’s not like I do this for living”.

    Here are the vertical dividers/horizontal trim piece glued up. The horizontal shelves in the pigeonhole units are dry fit for now. I’ll shape their front profile before gluing them in place. The idea is to make tiny little drawers with curved fronts matching the profile the vertical dividers, for the bottom section of the pigeonhole units.


    The reeded central divider on the right side is glued in place as a solid attachment for the hinges of the central door. The beaded vertical divider on the left-hand side of the central opening is the ever popular hidden compartment which slides in and out. Next to the sliding and the bird will be a fixed vertical divider (hidden behind the reeded front) that serves as solid attachment for the horizontal shelf.


    Getting the pigeonhole compartments in place is just a necessary prelude to building the drawers which is something I enjoy. After that will be building the 3 doorframes for the upper bookshelf. I’m thinking they will have glass with some kind of narrow, supporting muntins. Period examples have both elliptical/curving and straight/ linear geometric patterns – I’m leaning towards simple, straight and linear. I welcome any thoughts or suggestions.

    I’ll post more pictures as I make progress. Thanks for looking.

    All the best, Mike

  3. #18
    Join Date
    May 2004
    Location
    N Illinois
    Posts
    4,602
    Very nice work, Mike!!! Good attention to detail!!! Thanks for showing!!!
    Jerry

  4. #19
    Join Date
    Feb 2011
    Location
    Carlsbad, CA
    Posts
    2,230
    Blog Entries
    2
    Quote Originally Posted by David Eisenhauer View Post
    Thanks for the update Mike. How are you cutting the sliding dovetail groove?


    Hey David,


    When making through sliding dovetails (e.g. joints that cross entirely through adjacent case members -front to back-; I use the hand tool approach that Derek describes much better on his website then I can.


    For this piece, I used stopped sliding dovetails – in other words, joints that go completely through the back of the casework, but stop before they reached the show/front edge of the casework. I'm no expert – I made these with an electric router and a carbide 1:6 dovetail bit I spent a fair amount of time sharpening. I chose this approach because tolerances for sliding DT's are extremely tight and it's easier for me to create the female housing consistently, square to the carcass with an electric router.


    Normally I prefer exposed joinery, including through sliding dovetails that are visible from the front. I appreciate both the look of the joinery, which IMHO clearly demonstrates the difference between something built by a "cabinet maker" and anything you would get from IKEA, and the ability to make these joints with hand tools.


    For this build I wanted to focus my time/energy on other aspects of the project.


    All the best, Mike

  5. #20
    Join Date
    Aug 2013
    Location
    Princeton, NJ
    Posts
    7,295
    Blog Entries
    7
    Mike,

    I know you weren't requesting info in this regard, but I found that using a 14 degree dovetail bit provided a more secure fit than a 1/6 (9.5 degrees) with greater ease. I found that with the 1/6 that even the slightest bit of clearance would quickly seem loose, where the 14 degree is slightly more forgiving (slightly!) and a more secure hold.
    Bumbling forward into the unknown.

  6. #21
    Join Date
    Feb 2011
    Location
    Carlsbad, CA
    Posts
    2,230
    Blog Entries
    2
    Quote Originally Posted by Brian Holcombe View Post
    Mike,

    I know you weren't requesting info in this regard, but I found that using a 14 degree dovetail bit provided a more secure fit than a 1/6 (9.5 degrees) with greater ease. I found that with the 1/6 that even the slightest bit of clearance would quickly seem loose, where the 14 degree is slightly more forgiving (slightly!) and a more secure hold.


    Brian, your advice and suggestions are always welcome!


    I really appreciate your suggestion that a 14° slope dovetail bits offers a more forgiving joints vs.the 1/6 (9.5° slope) bit I'm currently using. I chose that slope primarily because it matched the dovetail plane I use to create the tail part of the joint. I'm sure I can attach a auxiliary fence to end up with a slope is closer to what you recommend. Again, very much appreciate your suggestions. I'm a big fan of your blog!


    BTW, I always wonder if it's more helpful to my fellow Creekers to add subsequent steps in the build to the initial post or create a new thread? Personally, given my microscopic attention span, I'm prone to skip over an original thread, assuming I read all the latest additions, when reality I frequently miss new posts because I failed to keep up with the original thread. Accordingly, I guess my bias is to post a new thread for part 2, part 3 etc. That's just me – again I appreciate the advice and suggestions from my fellow Creekers.


    All the best, Mike

  7. #22
    Join Date
    Aug 2013
    Location
    Princeton, NJ
    Posts
    7,295
    Blog Entries
    7
    Glad to hear it Mike! I received the recommendation to switch by Chris Hall and have not looked back, he's more extreme still using an 18 degree angle!

    I made a fence for my planes as well, and one I had to adjust the sole and the iron, but well worth the effort.

    I think a new thread is good, helps to return the attention to the build since a lot of times many will not follow with the conversation otherwise.

    Thanks for your comments on my blog! Glad to hear that you are following along with it.
    Bumbling forward into the unknown.

  8. #23
    Join Date
    May 2015
    Location
    NJ
    Posts
    1,392
    Excellent progress, Mike and looking really good.

    I'm curious of a minor detail: How many board feet of walnut are you using for the project?
    "The reward of a thing well done is having done it." - Ralph Waldo Emerson

  9. #24
    Join Date
    Mar 2015
    Location
    SE Michigan
    Posts
    3,225
    Mike, nice build...thanks for taking the time to post. I agree a new thread for each phase helps from needing to scroll through the previous posts.

    I'm curious of your method to create the female part of the sliding dovetail. Saw, chisel with 10 degree guide and router plane? Or do you do that part with a power router? I've not done it and would like to give it a try...thanks!

  10. #25
    Join Date
    Mar 2006
    Location
    Austin Texas
    Posts
    1,957
    Thanks for the dovetail info Mike. I agree with Brian on the 14* preference. I find the flatter angled sliding dovetails sooooo very finicky to get just right where they will slide but not jump out of the track so to speak. basically, no fun at all for my taste. I like your pigeon holes and they certainly display way more creativity than my simple circle-arc ones. I have been going through the "By Hand and Eye" book lately and your design looks like something that came out of that study. Please keep on updating in any way you feel comfortable with and I will find it to keep up with you.
    David

  11. #26
    Really loving this thread thank you so much for sharing. This is a type of project that represents a level a little above what I am capable of so you are really helping me improve my game!

    THANK YOU!

  12. #27
    Join Date
    Sep 2008
    Location
    N. Idaho
    Posts
    1,621
    Mike,

    this is one is sure to make it in to the house. Thanks for taking us along.

    c
    "You can observe a lot just by watching."
    --Yogi Berra

  13. #28
    Join Date
    Feb 2011
    Location
    Carlsbad, CA
    Posts
    2,230
    Blog Entries
    2
    [QUOTE=John Kananis;2693482] I'm curious of a minor detail: How many board feet of walnut are you using for the project?[/QUOTE]

    Great question John – not at all minor, – I think every project starts with "how much lumber do I need?" and for me at least, how much is it going to cost?


    26 board feet of 4/4 ($150) and 17 board feet of 12/4 ($250), which is primarily for the Cabriolet legs There's probably about 25% "extra" included in those costs. Those are market rate because you're in Southern California. I hope Walnut another comparable hand tool friendly woods are less expensive than other parts of the country, although I have no idea if that's true.


    I confess when I am at the lumberyard I am terrible at estimating amounts/costs. I literally have no idea plus/minus $150. As a brief aside, given that one could likely buy a functionally equivalent piece from IKEA for half that, lumber costs can be a significant barrier, particularly for young people just getting started with hand tool woodworking. Walnut is a luxury for me, but this project can certainly be just as nice with something less expensive.

  14. #29
    Join Date
    May 2015
    Location
    NJ
    Posts
    1,392
    Thanks Mike, was curious.
    "The reward of a thing well done is having done it." - Ralph Waldo Emerson

  15. #30
    Join Date
    Aug 2012
    Location
    Missouri
    Posts
    2,152
    Very nice work Mike. Your write ups are very well done too. You make it easy to follow along.
    Thanks Jim

Posting Permissions

  • You may not post new threads
  • You may not post replies
  • You may not post attachments
  • You may not edit your posts
  •