Results 1 to 15 of 15

Thread: Hand cut Dovetails...

  1. #1
    Join Date
    May 2006
    Location
    Omaha, NE
    Posts
    58

    Hand cut Dovetails...

    I was wondering what tools I needed to start practicing hand cutting dovetails. I've got and enormous number of scrap pieces that are screaming at me to cut them up, so I figured I may as well. I've got a dovetail saw and various sizes of chisels, along with the Mk II Honing guide (Lots of pratice with it since the chisels are dollar-store crap). A huge drawback for me is that I lack a vice, so I'm wondering if this is doomed from the get-go. But besides the vise, what would I need to start hacking away? I REALLY like the look of the houndstooth dovetails in FWW a few issues back. Any feedback is appreciated.

    Owen

  2. Owen,
    Cutting dovetails, or making anything for that matter without a vise, is a tall order. You can clamp the pieces to the edge of a work surface, with a couple of bar clamps and cut the dovetails, but you’ll need some way to square up the stock; a bench hook would help here. You didn’t mention a having a plane, but this too is essential, because for the dovetails to fit properly the ends of the pieces to be joined must be accurately cut and smooth. Another obstacle is the poor quality of your chisels; dovetailing demands a lot from a chisel. I use the relatively inexpensive Japanese chisels sold at Woodcraft. Despite their price, they are excellent tools; taking and holding a very sharp edge. You’ll also need a marking gauge or better yet a cutting gauge. With the tooling out of the way, the actual process of cutting the dovetails is very easy. There is way too much mystique surrounding dovetails; all it amounts to is sawing and chiseling to a line, the most basic tasks in woodworking. I think hand cut mortice and tenons are far more difficult.
    I’m dedicated to cutting the tails first, but many people choose to go with the pins first, so you should try it each way to see what works best for you. What follows is the way I cut a through dovetail.
    Strike a line with the gauge, set to the thickness of the stock, on both faces of the ends to be joined; this base line is very important to the finished look of the joint, so it is important that it be maintained while chiseling. Layout the tails (again I’m a tails first guy), for a pleasing spacing; I think dovetails look best with very narrow pins that taper almost to a point. For a drawer be sure the layout will result in the groove for the bottom, being hidden. Saw the tails. This doesn’t require a lot of precision, as far as the angle goes, but you want to have the cuts square to the face of the board, and don’t let the kerfs extend past the base line. For drawers, I just eyeball for square by experience and watching the reflection of the boards on the saws side. On dovetails for say a blanket chest, I will scribe a line to insure I make the cut square. Begin removing the waste, by taking a very sharp knife and deepening the base line in the waste area, then with a chisel, remove a little bit of wood at the base line; this makes a pocket for the chisel to rest in. This base line cut is essential, since it will establish a true line, and result in a tight fit on the finished joint. With light taps on the chisel remove the waste in steps, working vertically, then coming in at angle to the face and freeing a chip. On my first dovetails, I didn’t form this pocket, nor did I pay as much attention to the base line as I should. The result was I’d pound the chisel, and its wedge shape drove the chisel back, ruining that base line, and making unsightly gaps in the finished joint. Don’t chop in from the ends, as this will leave the waste unsupported when you work from the other side. After you get about half way through, flip the board over and work from the other side, following the same steps as above. This part will go very quickly.
    Lacking a vise, you’ll have to do some creative clamping, to have the pin board secured while you scribe the just sawn tails on to it. I use a very thin carving knife to scribe the tails onto the pin board, making sure that I accurately transfer the tails. Unlike when sawing the tails, sawing the pins requires extreme precision. When joining soft wood to hardwood, I let the cut run just a tiny amount into the waste, to insure a tight fit, since the soft wood can compress at bit. With hardwood to hardwood joints, the cuts should be right on the line. This requires a good saw, with little or no set, excellent up close vision, and a proper stance while sawing. I tend to crowd my saw, having it on the center-line of my chest, which makes the saw hard to control, so I have to concentrate on having the cut line, in line with my shoulder. Use a firm grasp, but don’t put too much downward pressure on the saw, as this makes it difficult to control; the old let the saw do the work thing. As with the tails, use a knife to deepen the base line. Because the waste around the pins is much larger than the tails, I use a coping saw to remove most of it, staying about 3/32” from the base line. Chop out the waste working from both sides, paying attention to that all important base line. Test fit the joint to see how it goes. I use a mallet and work the joint together with light taps, going back and forth, working it down evenly. Stop if you feel and undue resistance, and see what the problem is. After a few times the test fit won’t be necessary. Also, don’t judge your results on a dry fit joint, because many times they will look far better after being glued and planed.
    Rob Millard

  3. #3
    Join Date
    Oct 2005
    Location
    Hudson Oaks, TX
    Posts
    68

    Substitute Clamps for the Vise

    I could never decide on the vise configuration that I wanted on my bench, hence no vises. What I do is a lot of creative clamping. I find that I can usually position the wood in the same manner as I would in a vise by using some wooden hand screw clamps to clamp the stock and then clamping the hand screws to the bench with bar or C clamps.

    Hope that gives you some ideas.

    HB

  4. #4
    Join Date
    Nov 2006
    Location
    Hudson Falls, NY
    Posts
    42
    I use an old (and now broken) MDF desk, a couple of quick clamps, and a level to do all of my work. Now, its certainly not fine jointery, but if you pay close attention and re-level if the piece moves then you'll be ok. Sometimes I use two clamps to hold it to the side of the desk, to reduce the risk of movement.

    My first few hand cuts were bad but once I got the hang of it and payed attention to detail they're getting better.

  5. #5
    Join Date
    Jan 2005
    Location
    St Thomas, Ont.
    Posts
    553
    Wow Rob after I started this woodworking thing I was scratching my head about joinery, as I bought into the mystique of hand cut dovetails, and could not understand why I found them relativly easy and hand cut mortise and tenon joints so much more difficult. Guess my instincts were correct.

    However when people see the hand cut dovetails and oooh and ahh I don't tell them any different. Seems the one thing about woodworking the genral population does not understand is dovetails. I have seen old guys at wood shows watch Rob Cosman do his dovetail thing and comment no one does hand work like that anymore.

    Owen if you don't have a text that describes how to do the dovetails than Rob's tutorial is an excellent one to refer to, and if I were you I would get a vise if you are serious about this it can only help you. I would add as well a set of dividers to measure off your tails, evenly.
    Craftsmanship is the skill employed in making a thing properly, and a good craftsman is one who has complete mastery over his tools and material, and who uses them with skill and honesty.

    N. W. Kay

  6. #6
    Join Date
    Apr 2004
    Location
    New England
    Posts
    106

    Dovetails

    Like Rob I also make the tails first. There many sites on line to read about dovetailing and everyone does it a little differently. http://home.nj.rr.com/afoust/dovetails.html#saws
    When you cut the tails I put the chisel in front of the line because of the chisel bouncing back as Rob described to make the recess. After the recess is made you can pare to the line. After you chisel out put a chisel or ruler etc. into the recess to check the three surfaces are cut properly leaving no gaps. Then trace your pins, I use a marking knife but sharp pencil will work. You can try cutting to the line and if that doesnt work cut to the waste side use your coping saw and chisel to the line. I would use popular etc and not pine to practice. As far as making a drawer I have allways in the past put a rout into the drawer parts for a drawer bottom. I am now building a piece that I made the drawer bottom by making two 5/8 thick by 1" wide runners with a 1/4" rout to accept my 3/8" pine bottom. The dovetailed parts will then be glued to the drawer bottom. The bottom fits relatively tight but the drawer sides will be a 16th " less.The drawer bottom is flush to the top of the runners thus not dragging on the bottom. When you cut your dovetails try more than one method.

  7. #7
    Owen, I would echo that Rob's DVD's are a great resource for learning the how-to's of cutting dovetails. That was my single resource for learning (still learning) how to cut them. I don't have a bench as of yet so I clamp everything to the fence rail of my Unisaw - real lame I understand but it does the job for right now. Rob shows you how to use dividers - the coolest trick in the world - to make evenly spaced dovetails. I use an old compass that I had laying around. You can also make your own angle jig for drawing the dovetails - one with a 7 degree angle and the other side with a 10 degree angle. I patterned mine after the one LN sells. It's a great little tool and very easy to make.

    Have fun and be sure to show off the results!

  8. #8
    Join Date
    Dec 2003
    Location
    Laguna Beach , Ca.
    Posts
    7,201
    It is someting that requires practice and patence.....every cut and line is important.....I think the video is a good idea...though I haven't seen it
    "All great work starts with love .... then it is no longer work"

  9. #9
    Join Date
    Feb 2003
    Location
    Austin, TX
    Posts
    1,572
    You can do this without a vise, probably much easier with a Japanese pull saw, but doable with western push as well. Lay the piece down on the bench top, hanging over at least as far as you want your dovetails deep, usually the thickness of the piece. If it's a short scrap, probably clamping it to the bench is a good idea. Then you can saw away, standing up with the western saw facing away from you or with pull saws, in a situp position with teeth also facing away. It's real easy. You need never buy a vise for sawing.

    For a long piece you could make a sawing bench, short and narrow, brace the piece with a knee or sit on it for sawing, no clamps required.

    Pam
    Last edited by Pam Niedermayer; 12-05-2006 at 12:37 PM.

  10. #10
    Join Date
    May 2006
    Location
    Omaha, NE
    Posts
    58
    Thanks for all the information! Rob, thank you for the quick tutorial, I will try you method first to see how it works for me. I'll have to pick up a coping saw, plane and a marking/cutting gauge now. What kind of plane should I be looking at? I'm asking for the Veritas Low Angle Block Plane as a Christmas gift, I've read good things about it here. Will this work for dovetails? Will a marking knife work better than an normal exacto knife? The dovetail saw I have is a push style saw, but I'm hoping to get a japanese style saw sometime soon. Is there a huge difference in brands of marking/cutting gauges or are there a few that are better than others? I plan on using these forever, so I'd like to buy quality the first time around, unlike my chisels. The makeshift vice ideas are great, now I'll have an excuse to pick up a few more clamps! Thanks again.

  11. Owen,

    The low angle block plane will work nicely to true up the ends of the pieces to be joined.
    I like a small chip carving knife for scribing the dovetails, since it is a little more rigid than an exacto knife, but I have used them also. I like the rosewood cutting gauge from Marples, for the feel, but the blades are poor, so I had to make a new one out of some 0-1 steel. I also like the small brass combination gauge sold by Lee Valley; this comes with an interchangeable cutting wheel ( which I haven’t used) a pin, and a knife blade. The blades are replaceable with commonly available snap off blades, so you don’t have to put up with dull blades. I haven’t used a pull type saw, so I don’t anything about them. I use an inexpensive Stanley, and a LN saw for my dovetails; neither works better than the other, but I find the LN handle to be more comfortable.
    Rob Millard

  12. #12
    Join Date
    Apr 2004
    Location
    New England
    Posts
    106

    Dt

    Owen I have a Adria (Western saw) and a japanese pull. They both work fine. Use the one you have. I have a blue spruce marking knife and love it but your knife will work fine.I use a bevel gauge to set pin angles and then a square to add by top lines. I do plan to buy a veritas metal dovetail marker $15 from lee valley (and others) that will mark the slope and top line with one set up. The most important item is a sharp chisel.

  13. Jason,

    I’m astounded that you don’t have a bench, yet you are able to produce top quality work. I wouldn’t know what to do without my bench. It shows that it is not what you have, but what you can do with what you have.
    Rob Millard

  14. #14
    Join Date
    Dec 2004
    Location
    California, MD
    Posts
    486
    Quote Originally Posted by Harold Beck
    I could never decide on the vise configuration that I wanted on my bench, hence no vises. What I do is a lot of creative clamping. I find that I can usually position the wood in the same manner as I would in a vise by using some wooden hand screw clamps to clamp the stock and then clamping the hand screws to the bench with bar or C clamps.

    Hope that gives you some ideas.

    HB
    Before I got my vice, I also used the handscrew clamps to fashion a makeshift vice on my bench. Not really ideal, but it works. As for a saw, I prefer a japanese pull saw, but as everybody else says, it's all personal preference.

  15. #15
    Join Date
    Feb 2004
    Location
    Perth, Australia
    Posts
    9,494
    Owen

    A few items to add or emphasize.

    It cannot be said strongly enough that dovetailed boxes and drawers fail when the component parts are not perfectly square. Getting the boards the same thickness is helpful but not essential - just more measuring to do.

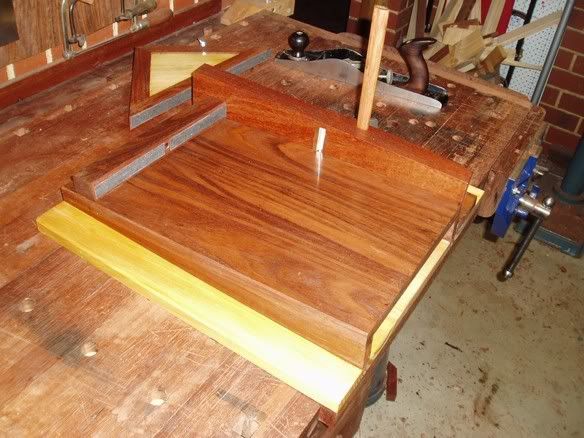
    To square up ends, use a shooting board. You can use just about any plane on this, but a low angle makes it easier to slice end grain. On soft woods I will use a low angle block plane, such as the one you have. You can make a simple shooting board out of a thin piece of ply, or go as extreme as this ramped version of mine.


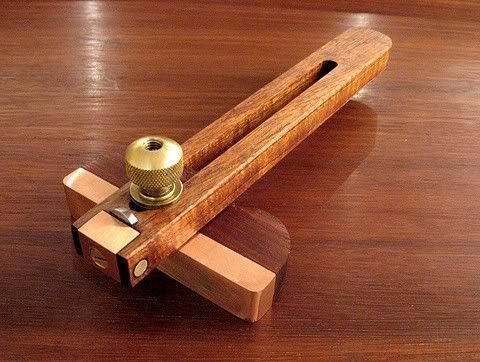
    Marking involves two tools. The first is a marking gauge. Since you are marking a line across the grain, I prefer a cutting gauge or a wheel gauge. A pin will tear the wood. Lee Valley make an excellent and inexpensive wheel gauge. Cheaper still, if you already own a pin gauge, then file the pin into the shape of a knife. Or you can make your own cutting gauge, like this one of mine.


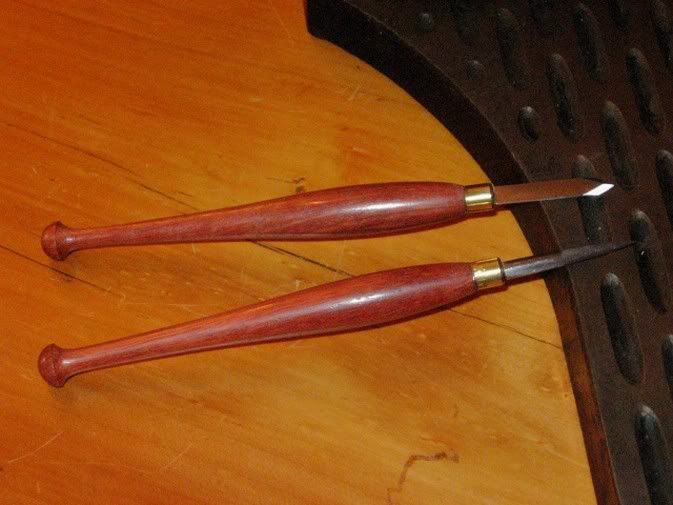
    The other marking tool is a marking knife. The better designs are double bevelled, or shaped like a "V". This way they can mark on both sides of a pin or tail (instead of requiring two knives). The bevel must be on one side only so that the knife marks right up against the pin/tail side. Veritas make a good, inexpensive marking knife. This is a good alrounder. However, if you want to cut the skinny dovetails that Rob has recommended, then the knife's blade must be thin. Dave Jeske of Blue Spruce makes a stunning knife, as does Dave Anderson of Chester Tool Works, but you can make your own. Here is a link to a tutorial I wrote: http://www.wkfinetools.com/tMaking/a...rkingKnife.asp

    This is what it looks like (actually a knife and scratch awl set I made for a Christmas present):


    A dovetail template is very helpful in marking out. I have one from Woodjoy (no, this is one item I have not made for myself .. yet): http://www.woodjoytools.com/prdove.html

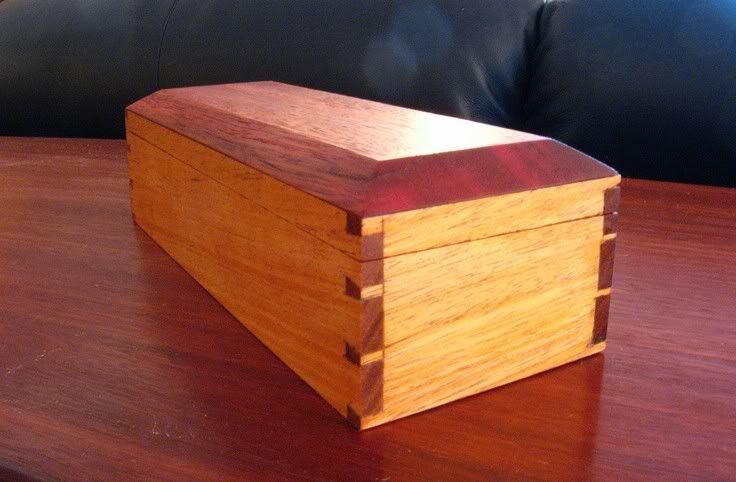
    Here is a Jarrah and Mahogany box I made today to house a few tools. The sides are only 1/4" thick, so it was a little more tricky sawing and chiseling than expected.


    Regards from Perth

    Derek
    Last edited by Derek Cohen; 12-10-2006 at 11:24 AM.

Similar Threads

  1. When were machine cut dovetails first used?
    By Steven Peters in forum General Woodworking and Power Tools
    Replies: 18
    Last Post: 10-30-2006, 8:05 PM
  2. LATE 1700'S APPRENTICE JOURNAL (revised 9/17/06)
    By harry strasil in forum Neanderthal Haven
    Replies: 22
    Last Post: 08-29-2006, 2:01 PM
  3. Dovetails and stain
    By Steve Coons in forum General Woodworking and Power Tools
    Replies: 2
    Last Post: 02-08-2006, 10:06 AM
  4. First hand-cut dovetails!
    By Jon Toebbe in forum Neanderthal Haven
    Replies: 9
    Last Post: 10-18-2005, 1:09 PM
  5. Inlay dovetails using C'man Jig????
    By Mike Tempel in forum General Woodworking and Power Tools
    Replies: 2
    Last Post: 10-12-2004, 8:58 AM

Posting Permissions

  • You may not post new threads
  • You may not post replies
  • You may not post attachments
  • You may not edit your posts
  •