Results 1 to 11 of 11

Thread: Joinery

  1. #1
    Join Date
    Aug 2003
    Location
    extreme southeast Nebraska
    Posts
    3,113

    Joinery

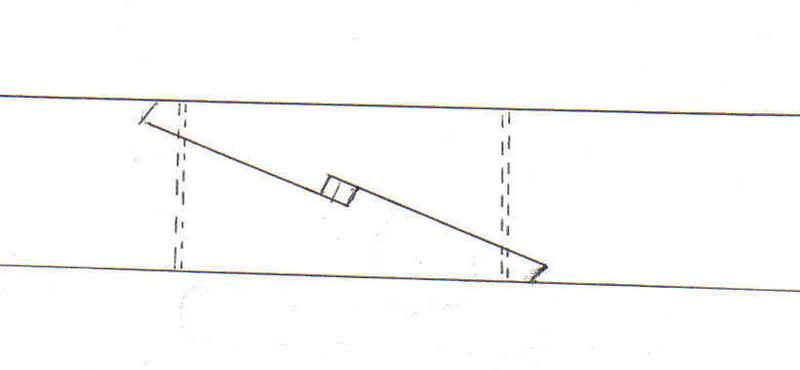
    I am a little on the frugal side and sometimes use a Stopped, Splayed, Keyed, and Doweled Scarf Joint if I don't have a piece of 2 by 4 or such the right length. I realize its a timber framing joint and I like to make wood joints, besides to me it adds character to a piece and modern Woodworkers just look at the joints in wonder and scratch their heads.

    Does anyone else do this?
    Jr.
    Hand tools are very modern- they are all cordless
    NORMAL is just a setting on the washing machine.
    Be who you are and say what you feel... because those that matter... don't mind...and those that mind...don't matter!
    By Hammer and Hand All Arts Do Stand

  2. #2
    Join Date
    Aug 2003
    Location
    extreme southeast Nebraska
    Posts
    3,113
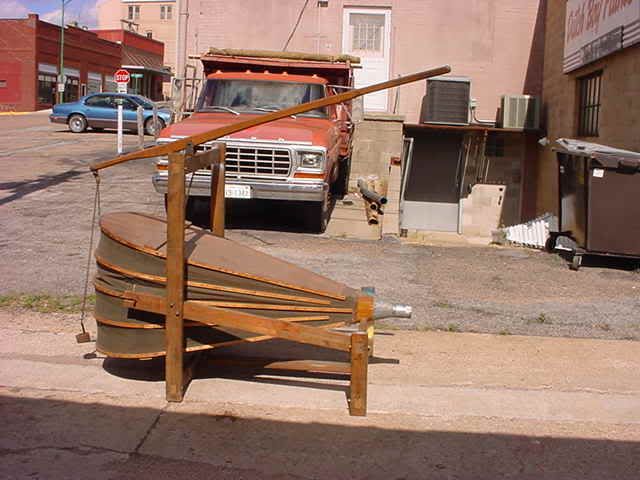
    I know its almost invisible but if you look at difference in wood color on the long support in the forground of my bellows stand you might be able to make it out. Sorry I don't have a close up to show. Its a different type of scarf, but still a scarf.

    Last edited by harry strasil; 01-23-2007 at 12:22 PM.
    Jr.
    Hand tools are very modern- they are all cordless
    NORMAL is just a setting on the washing machine.
    Be who you are and say what you feel... because those that matter... don't mind...and those that mind...don't matter!
    By Hammer and Hand All Arts Do Stand

  3. #3
    Join Date
    Jan 2004
    Location
    End of the Oregon Trail in Oregon City, Oregon
    Posts
    317
    If I understand your drawing correctly, that bit of joinery is ingenious! One question: is the "keyed" part the part in the center of the drawing, and is it wedged from both sides of the joint? And I bet that the construction of this joint is not as difficult as it might at first appear.

    Thanks, Harry, for your always interesting posts!

    Steve

  4. #4
    Join Date
    Aug 2003
    Location
    extreme southeast Nebraska
    Posts
    3,113
    Yes, Steve two hardwood wedges driven in from both sides. There are many joints similar in timberframing, this is one of the less complicated ones.
    Jr.
    Hand tools are very modern- they are all cordless
    NORMAL is just a setting on the washing machine.
    Be who you are and say what you feel... because those that matter... don't mind...and those that mind...don't matter!
    By Hammer and Hand All Arts Do Stand

  5. #5
    It reminds me of some Japanese joinery I've seen.

    I hope you're feeling better now, Harry, and that we'll hear more about the apprentice soon.

    Mike
    Go into the world and do well. But more importantly, go into the world and do good.

  6. #6
    Join Date
    Dec 2005
    Location
    Northern Virginia
    Posts
    243
    That's nice joinery Junior. How'd you lay it out?

    Maurice

  7. #7
    Join Date
    Aug 2003
    Location
    extreme southeast Nebraska
    Posts
    3,113

    Scarf Joint Layout, long winded version

    LAYING OUT A SCARF JOINT or the evolution of a Scarf Joint.

    1. To lay out a Scarf Joint in timber framing, you must first determine the use of the timber to be scarfed. What are the stresses on the piece, is it going to be Compression or Pushing (the ends pushing toward the center), Extension or Pulling (the ends pulling against each other), Is it going to be Load Bearing (supporting weight from above over its entire span), Is it going to be Supported from below ( a sill or joist).

    2. A type of Scarf designed to withstand the load limits for the use must be deteremined. There are many types and styles of Scarfs.

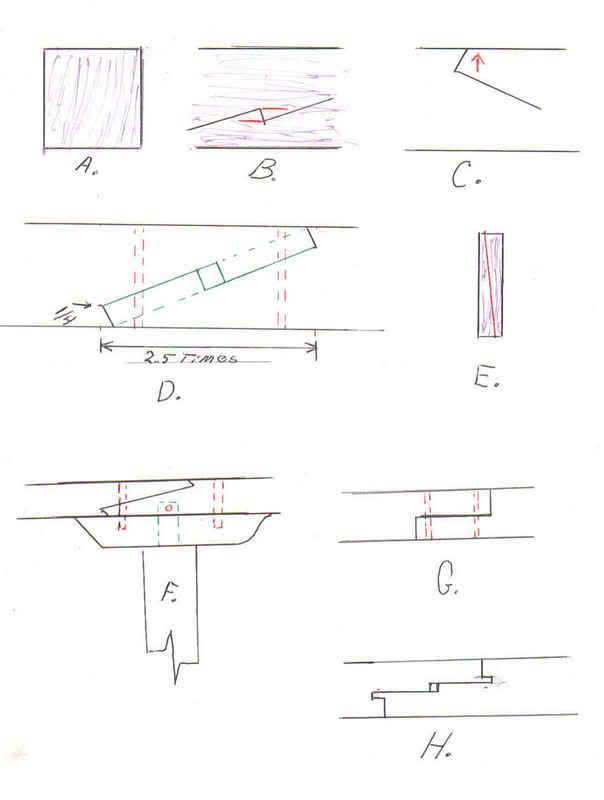
    3. Once the style of Scarf is determined. Orientation of the Grain in the piece must be determined, Grain orientated up and down as in figure A. below will support more weight and has very little flex under load. If the Grain is orientated cross ways the piece will have more spring and give to it.

    4. The orientation of the Grain also affects the strength of the Joint. As shown in figure B. below crossways grain orientation makes the keyed or locking feature of the joint prone to shearing along the grain.

    5. A birds mouth cut as shown in figure C. below gives resistance to spreading or seperating as shown by the Red Arrow.

    6. Figure D. below shows what is known as a Stopped (the birds mouth cuts), Splayed (the mating surfaces cut at an angle), Keyed (the tapered locking wedges that pull the joint together and limit it from pulling apart), Pegged (doweled to give extra sideways support), Scarf (lap) joint.

    7. The generally accepted rules pertaining to the cutting of this Joint are, the Birdsmouth cuts should be no deeper than 1/4 the depth of the beam, the Length of the scarf should be a Minimum of 2 1/2 times the depth of the beam, the key should be at least square in size and of hard wood. The dashed green lines are put in to show how the angle of the cut is obtained. The cuts are generally made wide of the splayed lines and pared to the line using a Slick and a square for squareness as fit is an important part of the joint.

    8. The Wedge is generaly sawn from a single square of hardwood a bit longer than the width of the beam and the sawn faces are placed together and then driven in tight with a mallet. The Sawn faces have a locking effect to keep the wedges from slipping apart.

    9. Tools I usually use are a Square, Ruler, 2 Bevel Squares, Crosscut Saw, Rip Saw, Wide Chisel, Pencil or marking knife.

    10. Scarfs that support a load from above are usually placed over upright supports posts from below to give added support and an extra spreader support is placed underneath as shown in figure F.

    11. Figure G. shows a simple Half Lap or Bladed and Pegged Scarf used for the main Sills that rest on the foundation.

    12. Figure H. shows a Tabled (flat surfaces parallel to the top and bottom), Mortised (the small mortised locking ends), Keyed, (the locking wedges), Scarf. Keyed Scarfs may be doweled or not according to the application.

    (note), Scarf Joints are named after the features used to make them.

    I hope this hasn't been a too long winded explanation.

    The Japanese Wood Workers have very elaborate Joints which are extremely strong but they get overly complicated just for the sake of the Visual Beauty of the joint and to show off their Skill at Woodworking.

    As most of you know the first time you cut a joint it is nerve wracking and time consuming, but after many times it gets easier and your skill improves.

    Jr.
    Hand tools are very modern- they are all cordless
    NORMAL is just a setting on the washing machine.
    Be who you are and say what you feel... because those that matter... don't mind...and those that mind...don't matter!
    By Hammer and Hand All Arts Do Stand

  8. #8
    I don't know if this will help, but I found this picture and it seemed to help me better understand the joint http://www.arlingtontimberframes.com/scarfjoint.htm
    Seems pretty inovative, even though it is not new, just new to me.
    Great pieces are hidden behind all of the shavings and sawdust, it just takes a craftsman to find them....

  9. #9
    Join Date
    Feb 2003
    Location
    Austin, TX
    Posts
    1,572
    Quote Originally Posted by harry strasil
    ...
    The Japanese Wood Workers have very elaborate Joints which are extremely strong but they get overly complicated just for the sake of the Visual Beauty of the joint and to show off their Skill at Woodworking.
    ...
    Nice joint, Harry, but I have to disagree about Japanese woodworkers. The ones I know are incredibly modest and never show joinery if they can avoid it. They do their best to hide it. For example, you never see them expose dovetails, they're all hidden.

    Pam

  10. #10
    Join Date
    Oct 2006
    Location
    East Brunswick, NJ
    Posts
    1,475
    To expand on Pam's point, there are also practical reasons for hiding the joinery in Japanese woodworking. Most of the wood used in Japan through the ages are softwoods, and objects made with these woods needed to be able to stand up to large changes in humidity. By burying the endgrain using techniques like hidden dovetails, the joint became more stable. You can see this in your scarf joint -- the only endgrain visible is in the key.

    Another reason for the complexity of the joinery in Japanese and other Asian cultures is that to some extent many structures built in Asia in olden times were not built to last in the same way that the western world thinks. Buildings like pagodas were designed so that when wooden members wore out or if rot set in, the piece could be replaced. Hence, the development of many keyed joints. I remember traveling through China and seeing a pagoda that had been standing for over 1000 years. The guide said that not a single wooden part of the pagoda was original -- it had all been replaced over the years.

    And finally, modesty does play an important role in the Japanese culture, as well as many other Asian countries. To show off joinery by exposing it is to call undue attention to your work. Of course, to the western world, it has the opposite effect, because most woodworking done in the west does incorporate the joinery as a design element.

  11. #11
    Thank you, Harry. I find your approach and philosophy fascinating.
    Regards

Similar Threads

  1. Drawer joinery questions
    By Rick Peek in forum General Woodworking and Power Tools
    Replies: 31
    Last Post: 05-06-2006, 9:12 PM
  2. Small joinery saws
    By Alan DuBoff in forum Neanderthal Haven
    Replies: 5
    Last Post: 03-21-2006, 2:49 PM
  3. Exposed joinery - Tusk tenons
    By Mike Johnson - Chicago in forum General Woodworking and Power Tools
    Replies: 8
    Last Post: 11-19-2004, 9:35 PM
  4. Design versus joinery
    By Ken Fitzgerald in forum Design Forum
    Replies: 5
    Last Post: 11-19-2004, 2:40 PM

Posting Permissions

  • You may not post new threads
  • You may not post replies
  • You may not post attachments
  • You may not edit your posts
  •