Results 1 to 15 of 15

Thread: smoothing curves for a template

  1. #1
    Join Date
    Dec 2005
    Location
    West Lafayette, IN
    Posts
    6,530

    smoothing curves for a template

    I have to cut a template for a curved chair leg on the bandsaw out of 1/4" plywood and it's not very smooth. I tried using a sanding attachment on my DP but that didn't help much. Now there are just undulating high and low points, and I don't want to oversand.

    There are six different shallow arcs for the back leg of the chair, so making a jig for the router would be very difficult.

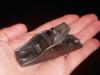
    Since I'm going to use this piece of ply as the template for the full size pieces with a flush trim bit, I need it to be spot on smooth. How can I do this? I think a spokeshave would be the right tool for the job? I know the plywood would dull the blade a bit faster, but I'm not that concerned about it.

  2. #2
    Join Date
    Jan 2004
    Location
    Peachtree City, GA
    Posts
    1,582
    Matt,
    If you don't have an ocsillating spindle sander, I'd vote for the spoke shave.
    Maurice

  3. #3
    Join Date
    Dec 2005
    Location
    West Lafayette, IN
    Posts
    6,530
    I don't have an OSS, but my DP with a sanding cylinder is pretty much the same thing, no?

    The problem I have with the DP sander is it seems to move off the high spots and just end up making the low spots lower.

  4. #4
    Join Date
    Jan 2004
    Location
    Peachtree City, GA
    Posts
    1,582
    Not sure how you're controlling your stock when working with your DP, but that might be part of the problem. I have have a healthy respect for my DP (3/4 hp), as it can sling something around that is not secured properly.

    Sanding with the DP is not something I do, but many have good success with it. Are you using the right speed for the sanding drum? Are you securing the stock so that it can be manipulated properly, yet safely?

    You may also want to keep practicing on your bandsaw until you get good consistent results cutting close to the line. The other day I was cutting a good bit of pine on my BS for some sign letters, and it was tough to cut consistently. I inspected the blade, and realized it was gummed up with pitch. Used some blade & bit cleaner on it, and it cut like going through butter.

    Also, have you smoothed the back of the BS blade with a stone? It really makes cutting curves a lot easier.

    Just some thoughts
    Maurice

  5. #5
    Join Date
    Dec 2003
    Location
    Laguna Beach , Ca.
    Posts
    7,201
    Use a rasp or file to fare the curves. half round is probably best.
    "All great work starts with love .... then it is no longer work"

  6. #6
    Join Date
    Jan 2004
    Location
    Peachtree City, GA
    Posts
    1,582
    Thank you Mark! Simple is best...... it just plum evaded me.
    Maurice

  7. #7
    Join Date
    Apr 2007
    Location
    Birmingham, AL
    Posts
    263
    David Marks usually uses a "flexible sanding strip" in addition to files and rasps when making his templates. I think he uses the files/rasps for tighter curves and the sanding strip for long gradual curves. The sanding strip is just a thin, flexible piece of plywood with a couple of wooden nobs on one side. Looks pretty useful, but I must admit no practical experience in this area.

    Found a picture:
    http://img.diynetwork.com/DIY/2004/0...k607_2fj_e.jpg
    If I could ever finish working on my shop, maybe I could find the time to start working in my shop.

  8. #8
    As suggested, rasps and/or sandpaper attached to a flexible strip of wood or plastic. The problem with a small drum in a DP is that the smaller the drum, the harder it is to be precise. It's much easier with a larger drum of 4-6" in diameter. But it can be done with the small drum. It just takes practice. So don't give up on it completely because if you can "master" the technique it can be a lot faster.

    YM

  9. #9
    Join Date
    Dec 2005
    Location
    West Lafayette, IN
    Posts
    6,530
    Maurice,

    I'm honestly not sure the speed I should use on the DP, but I did change the speed to about 500rpm IIRC. That helped still didn't give me good results.

    I like the flexible sanding strip idea. I'll probably try something along those lines first, then resort to buying more tools!

    Thanks for the suggestions.

  10. #10
    Join Date
    Dec 2003
    Location
    Laguna Beach , Ca.
    Posts
    7,201
    I have used the template routing approach in the past. I have found it is an extra step and what I now do is use the templates to outline the form . Then bandsaw with care and precision. Then I pair the components, ie., 2 legs clamped togeter and shape with rasps or a sander like the Rotex, checking across with a square. It saves time and is safer this way. Because after template routing there is still a lot of hand shaping so you really have not accomplished anything
    "All great work starts with love .... then it is no longer work"

  11. #11
    Join Date
    Sep 2005
    Location
    Placitas, NM in the foothills of the Sandia Mountain.
    Posts
    527
    Instead of plywood, try making the template from MDF - much easier to fair. Use files, rasps, card scraper, etc. Close your eyes and run your finger down the edge, any irregularity will seem like a pothole.

  12. #12
    Join Date
    Apr 2006
    Location
    Near saw dust
    Posts
    980
    I like 1/2" mdf for patterns and I like to use a combination of the blcok plane, sanding block, belt sander and OSS for fairing.

    You have to move your hands quickly to really determine if something is fair (try moving the piece past the sanding drum a little faster or miving the sanding block a little faster) and a small flexible ripping (1/8" x 3/8") is helpful to bend through the curves and show irregulrities.
    Strive for perfection...Settle for completion

  13. #13
    Join Date
    Feb 2003
    Location
    Lewisville, NC
    Posts
    1,359
    Matt,
    Just finished using rasps and flexible sanding strips yesyerday on legs and curved aprons for a table. I "feel your pain" as I tried using a sanding drum on my drill press awhile back and it is jusat palin difficult to get it as smooth as you woul like. I have given up on that technique and even though I now have an OSS, I have found that the control and spped of using rasps and flexible sanding strips can get it where I want it very quickly. I know I am repeating a lot of what you have already heard, but it jumped oput at me as I just finished doing that yesterday afternoon. I also like MDF for the templates as they give you a very smmoth surface afetr sanding to use wiht your flush trim bit. If not MDF, BB plywood is my 2nd choice.
    One tip that I have found helpful is to make several strips wiht various grits (80, 120, 150,160) and it won't take very long at all to get your curved as smooth as you want it. I also use a little hot glue and stick grip blocks on them ssometimes, but if I am in a hurry, I go wihtout them.

    My 2 cents,

    Jim

  14. #14
    Join Date
    Dec 2006
    Location
    Atlanta , Ga.
    Posts
    3,970
    Have to totally agree with Jesse and Ben on using 1/2" MDF. I make quite a few templates and the MDF is much easier to work with than ply. You can shape it much quicker with less effort. And in the worst scenario.. if you really mess up, it's much cheaper so you can have a second go for pennies literally.

    I use a Bosch barrel grip and cut to within 1mm to 1 1/2mm outside the line. I take it to the OSS and get it very close with a finesse touch. Then I use rasp.. files and sandpaper to take it to the finish line.

    BTW.. I have some pretty nice tools.. but the OSS I use has been worked hard for 5 years and still going strong even though most would call it junk by the mere mention of the name Ryobi. $99 and I have gotten my monies worth and a whole lot more. It does an excellent job, IMO.
    Regards...

    Sarge..

  15. #15
    Join Date
    Jan 2006
    Location
    Southern NH
    Posts
    219
    An alternative that I have used is to rip a thin strip of wood < 1/8" and glue it to the template. This will provide a smooth surface for whatever is following the template, like a router bearing. If the radius is very tight, the strip will have to be very thin in order to conform to it and the gaps that it can bridge will be shorter. Don't forget to figure the thickness of the strip into the template size when you cut it.

    David

Similar Threads

  1. Ticking Sticks - Duplicating Curves
    By Bob Smalser in forum Boat Building
    Replies: 5
    Last Post: 09-17-2009, 4:42 PM
  2. Deleting duplicate curves in Corel
    By David Friedman in forum Laser Engraving General Topics
    Replies: 5
    Last Post: 11-20-2006, 1:42 AM
  3. Shelix + Woodhaven Template trouble
    By Bill Grumbine in forum General Woodworking and Power Tools
    Replies: 14
    Last Post: 09-30-2005, 11:23 AM
  4. Smoothing Out Curves
    By Teresa Jones in forum General Woodworking and Power Tools
    Replies: 25
    Last Post: 01-29-2005, 12:20 AM

Posting Permissions

  • You may not post new threads
  • You may not post replies
  • You may not post attachments
  • You may not edit your posts
  •