Page 2 of 3 FirstFirst 123 LastLast
Results 16 to 30 of 41

Thread: Made on Epilog II

  1. #16
    Thanks again for the encouragement, always appreciated. Sometimes I tell laypeople "I made it on a laser" and they're underwhelmed because they think its like Star Trek-- you tell the computer what you want, the lights go blinky blinky and the desired object pops out a little door. The the nice thing about sharing projects and ideas with you guys here is we all know it ain't quite that simple.

    Here's part of the next building. I had to think about awhile before a solution came to mind, really pleased with the results.

    Dave
    Attached Images Attached Images

  2. #17
    That is incredible. Fantastic job and wow, what a camera

  3. #18
    Quote Originally Posted by David Fairfield View Post
    Here's part of the next building. I had to think about awhile before a solution came to mind, really pleased with the results.

    Dave
    Ok I'm hooked, You'll have to show us your technique on how you did this!
    Did you use a 2" lens?

    Ben
    Last edited by Ben Levesque; 08-05-2008 at 9:17 PM.

  4. #19

    Thats a work of art !

    Man those bricks are AWESOME !

    I already have way too many hobbies so I am not going to ask how you did all that.

    I am off to set fire to my laser now..........
    Epilog Helix 45
    Corel Draw X7
    Stepcraft 840 CNC
    Fully outfitted woodshop
    I'm a PC...........


  5. #20
    Ben--

    The bricks are just gray paper engraved through a layer of stippled brown paint. The dentils are a layer cake of flats cut from the same material. Artwork aside, once you have zeroed in on your power and speed settings to get through the paint but not through the paper, its pretty "simple"

    I'm using the lens that came with the laser, I guess that's the 2". How is the finer lens working out for your miniature work? Do you think I should invest in one?


    Anthony--

    Solution for too many hobbies is try doing one for a living! I really like your signature line BTW, very true

  6. #21
    David

    That is just awesome work! How do you go about marketing your products?
    Mike Null

    St. Louis Laser, Inc.

    Trotec Speedy 300, 80 watt
    Gravograph IS400
    Woodworking shop CLTT and Laser Sublimation
    Dye Sublimation
    CorelDraw X5, X7

  7. #22
    Quote Originally Posted by David Fairfield View Post
    Ben--

    The bricks are just gray paper engraved through a layer of stippled brown paint.
    Ok, this is very clear to understand.

    Quote Originally Posted by David Fairfield View Post
    The dentils are a layer cake of flats cut from the same material.
    Meaning you had put each dentils one by one with several layers of cardboard?

    Quote Originally Posted by David Fairfield View Post
    I'm using the lens that came with the laser, I guess that's the 2". How is the finer lens working out for your miniature work? Do you think I should invest in one?
    If the smaller scale of your work will always be 1:87 you will not need the 1.5 lens. At the scale I and others works on the Epilog (1:220) the 1.5 shows only a little differences, bricks at 1:220 are pretty small compared to 1:87

    Thanks David for the info

    Ben

  8. #23
    Mike... err... I don't actually do any marketing. The standard engraving work I do, nametags and signs and company premiums, is all local and word of mouth. The model work is more a hobby but I'm working on a couple of kits for commerical release. Want to have a small assortment before I invest in marketing / advertising. If you had any advice on marketing, I'd sure like to hear it!

    Ben, the dentils are a stack of 4 continuous ribbons, with no backing. Some guys like doing things the hard way, but not me!

    Hey, can you post a comparison picture of a vector cut and maybe an engraving with the 1.5 and the 2" lens? I've not seen what the difference is and I have some applications where it would be great to have a narrower kerf. Thanks!
    Dave
    Last edited by David Fairfield; 08-06-2008 at 5:39 PM.

  9. #24
    Quote Originally Posted by David Fairfield View Post
    Mike... err... I don't actually do any marketing. The standard engraving work I do, nametags and signs and company premiums, is all local and word of mouth. The model work is more a hobby but I'm working on a couple of kits for commerical release. Want to have a small assortment before I invest in marketing / advertising. If you had any advice on marketing, I'd sure like to hear it!
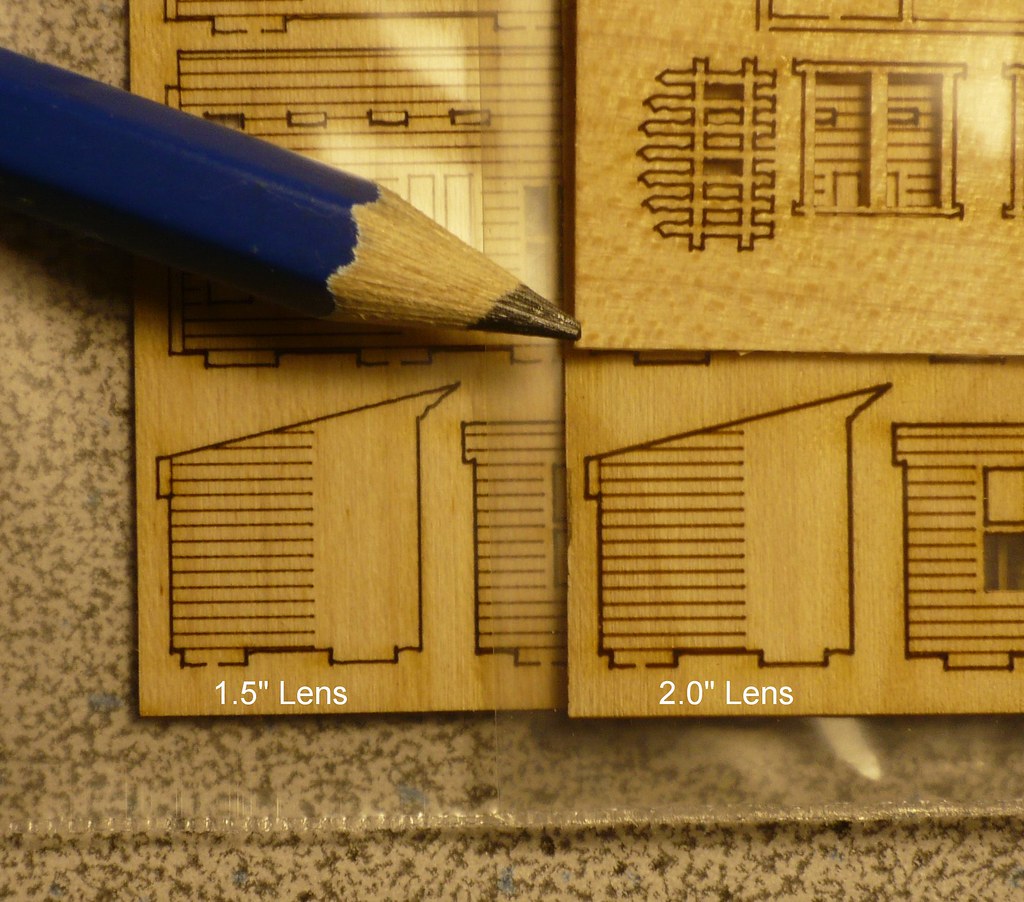
    For my part it was to show my work on train forums. mostly it is the users who had convince me to go ahead and create kits. Then people start to purchase, than magazine asked to show my work, and all of this in the first year of my laser.

    Quote Originally Posted by David Fairfield View Post
    Ben, the dentils are a stack of 4 continuous ribbons, with no backing. Some guys like doing things the hard way, but not me!
    Haaaa! now I get it, it is not noticeable when you look at the pictures, you need to look very carefully to see it the empty space under the dentils, woooo, this gives me ideas, this is great. thanks!

    Quote Originally Posted by David Fairfield View Post
    Hey, can you post a comparison picture of a vector cut and maybe an engraving with the 1.5 and the 2" lens? I've not seen what the difference is and I have some applications where it would be great to have a narrower kerf. Thanks!
    Dave
    Here you go, hope this can give you an approximation of the Kerf size.


    Ben
    Last edited by Ben Levesque; 08-06-2008 at 9:07 PM.

  10. #25
    That's wonderful work. Expertly finished.
    Laser Engraver: Epilog Legend 24TT 35-watt
    Lathe: Delta X5 46-746 - 3HP/220v, 16"x42"

  11. #26
    Join Date
    Feb 2007
    Location
    Savannah, GA
    Posts
    4,422
    Dave,

    Following this thread has been absolutely fascinating for me. I can't thank you enough for sharing. Maybe you should consider turning this into a tutorial for the under Woodworking Articles and Reviews. Although "technically" you are not wood working maybe the powers that be could make an exception.

    “Life is not so short but that there is always time enough for courtesy and chivalry.” —Ralph Waldo Emerson

    Everybody knows what to do with the devil but them that has him. My Grandmother
    I had a guardian angel at one time, but my little devil got him drunk, tattooed, and left him penniless at a strip club. I have not had another angel assigned to me yet.
    I didn't change my mind, my mind changed me.
    Bella Terra

  12. #27


    Ben,
    What speed are you using for these cuts I see lots of wiggles in the lines also near the tabs. There was a thread about this problem with Epilog, I am curious if this is inherent issue with Epilog.

    Kim

  13. #28
    Hi Belinda, thanks! A lot of the tasks in model building / engraving / woodworking are really just exercises in problem solving, which is what keeps the work fascinating. Always good to hear back from people who share the enthusiasm. Wondering what sort of woodworking thing you do that has laser applications?

    Kim, those darn wavy lines are caused by tremors when the laser's armature turns a corner at high speed, its like mini whiplash. Mine does it too but its always possible to work around it by lowering speed, breaking the lines into grouped sets of parallels, or engraving the part out of the material. By the way, those shake shingles you made for the 1/220 station you posted in the original "Made on Epilog" thread are super! Best I've seen in any scale. I need something just like that in HO scale, do you sell them, or can you give me some hints how you did it? Thanks!

    Dave
    Last edited by David Fairfield; 08-07-2008 at 9:09 PM. Reason: spelling

  14. #29
    Dave,
    I bought those from http://papercreek.com/ but now I would do it myself, it is just printed paper cut with a laser. The key is to get the right picture to print, For HO scale you can do way better than that by using real wood shingles google for paper wood and you will find it
    Here is one
    http://www.woodveneers.net/paperwood.html
    I have got one sheet of all types of wood and the dark ones have very good contrast and nothing to beat real wood shingles. Just add double sticky tape to the bottom and cut, I'll email you the vectors files I have in corel for the shingles when I get home.
    Kim

  15. #30
    here are some made on Epilog too

    http://www.youtube.com/watch?v=t7m_OxyQulo

    The forklift is 1/64" wood cut in different slices and glued side by side to form the 3D model.

    Here all the mechanism parts is cut by the laser. It is Acrylic

    http://www.youtube.com/watch?v=kyR69SQGFo0

    The laser gets u to do some prototypes fast

    http://www.youtube.com/watch?v=ZDC9c4CyXsQ

    I am fascinated by the things you can make with scrap acrylic

    http://www.youtube.com/watch?v=VHiHGaBGerc

    at the end of the video the plastic parts you see are all cut by Epilog.

    Kim

Similar Threads

  1. New Epilog Drivers and Firmware
    By Frank Corker in forum Laser Engraving General Topics
    Replies: 3
    Last Post: 01-05-2008, 10:09 AM
  2. Epilog Laser
    By Peck Sidara in forum Laser Engraving General Topics
    Replies: 32
    Last Post: 07-10-2007, 9:42 PM
  3. Epilog Driver & Firmware Update
    By Dave Fifield in forum Laser Engraving General Topics
    Replies: 30
    Last Post: 05-23-2007, 7:36 PM
  4. The Good, The Bad & The Ugly: Admissions of an old iron junkie.
    By Dev Emch in forum General Woodworking and Power Tools
    Replies: 20
    Last Post: 10-23-2005, 5:20 PM
  5. Made a few workstands
    By Jim Ketron in forum Turner's Forum
    Replies: 5
    Last Post: 01-24-2005, 11:22 AM

Tags for this Thread

Posting Permissions

  • You may not post new threads
  • You may not post replies
  • You may not post attachments
  • You may not edit your posts
  •