Cutting Boards Tutorial (Page 4 of 7)
Written by: Mike Schwing

OK, we'll now get started with actual procedures. Hope this makes sense! You can click on each one of the small photos to get a larger, more clear version.

If you haven't managed to find boards wide enough, glue them up with something else so they're at least 12" wide.  You're going to want something to push along the fence with when the blanks start getting skinny.
When they're glued (if necessary), them make each of them equally wide (retain as much width as possible!) Here I have wood for 2 cutting boards.
I prefer to plane one side clean so it runs against the table saw more smoothly. You want to preserve as much thickness as possible though. If you're using 4/4 wood you might skip this step.
Checking the width - just under 12" - enough for me. I also mark the fence side - its easy to forget!
I've made sure they're all exactly equal widths and lengths.
Make a first cut to give you a clean glue line as close as possible to the end of the board. Do this on each workpiece so they stay the same width!
Now ZERO your fence without moving it from this first cleanup cut line. Make it the zero mark.

Then, to make the first strip, 1/32" wide, move the fence 1/32" PLUS the width of your saw kerf (mine is 3/32", yours may be 1/8"!). For example, if my kerf is 3/32", I add 1/32" to 3/32" for 4/32" or 1/8" and I move the fence over 
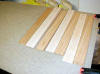
a total of 1/8". The resulting strips, cut off of both pieces, are 1/32" thick.

To make the second strip 2/32" wide, move the fence 2/32" plus the width of the saw kerf. In my example that is a total of 5/32". Make the cuts in both workpieces and then move to the next widest one, which is 3/32". Keep incrementing till you have 18 strips, the widest being 18/32". Remember to always add the saw kerf width to each cut! Line the strips up as you go, trying to keep them together.


Its a dust filled job, but my over blade guard collector and undertable collectors do a good job! (I no longer have a carpeted floor by the way)
As we get further along, the blanks get pretty skinny! No room for error here, whew!
[ Next: The Process ]


Home | First things first | Things you will need | Getting started | The process How - to | Completed Pictures