Results 1 to 11 of 11

Thread: Help with troubleshooting wooden coffin smoother

  1. #1
    Join Date
    Feb 2003
    Location
    Bucks County PA
    Posts
    646

    Help with troubleshooting wooden coffin smoother

    Hi gang
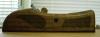
    I just finished cleaning up this Union Warranted Coffin Smoother and have been having some problems getting it to work properly. I took a lot of photos in the hopes that the more knowledgable of you could offer me some tips.

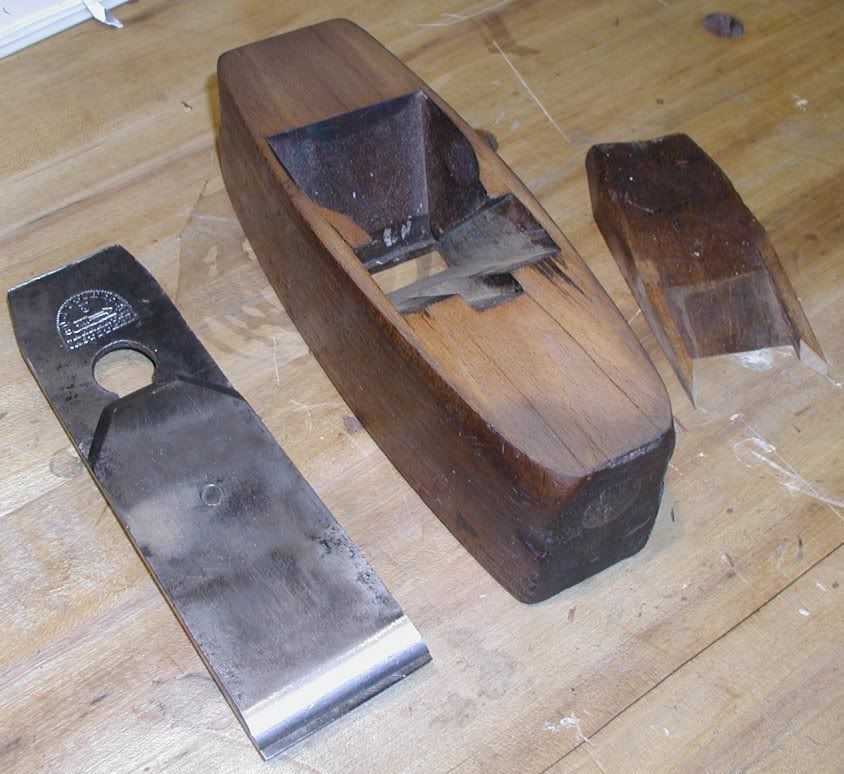
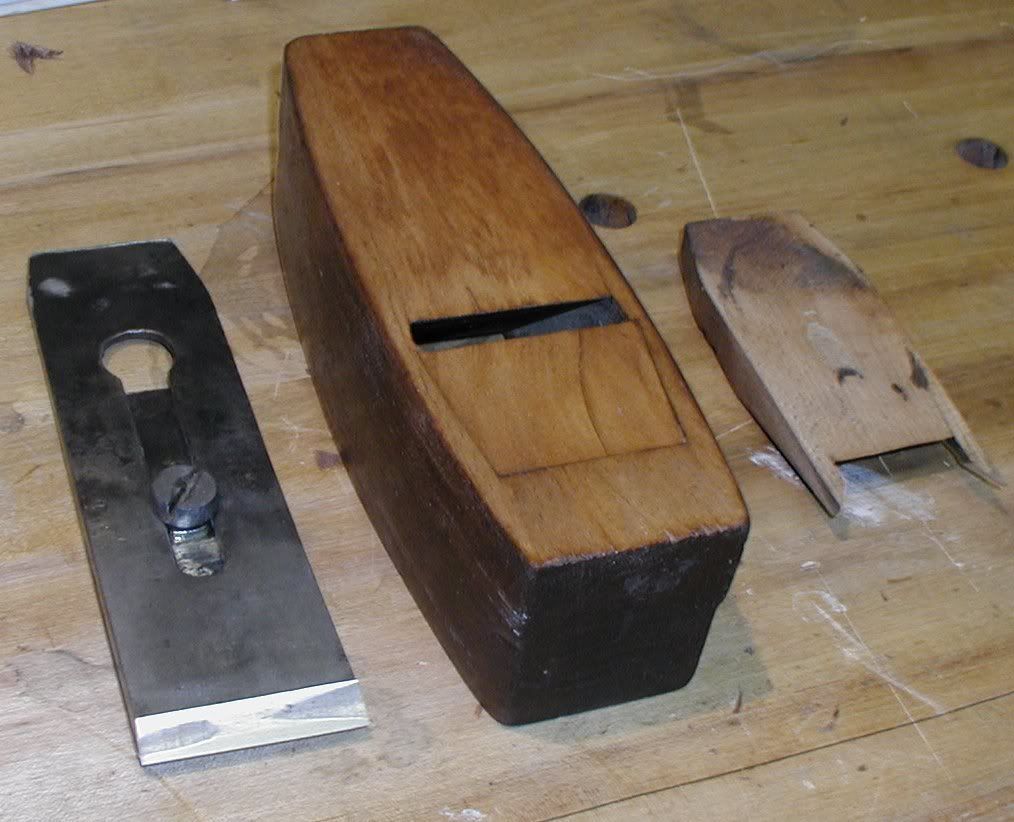
    This Union Warranted Coffin Smoother was purchased at a local flea market for the kingly sum of $5 and it came with a very nice Butcher Iron. But at the same place I found a Buck Brothers Iron of the same size. The seller threw that in as an incentive. So I can swap out one or the other. Both of these irons had their backs flattened and polished to a mirror finish. The bevels were hollow ground and sharpened to the point where they could cut end grain pine with little effort.


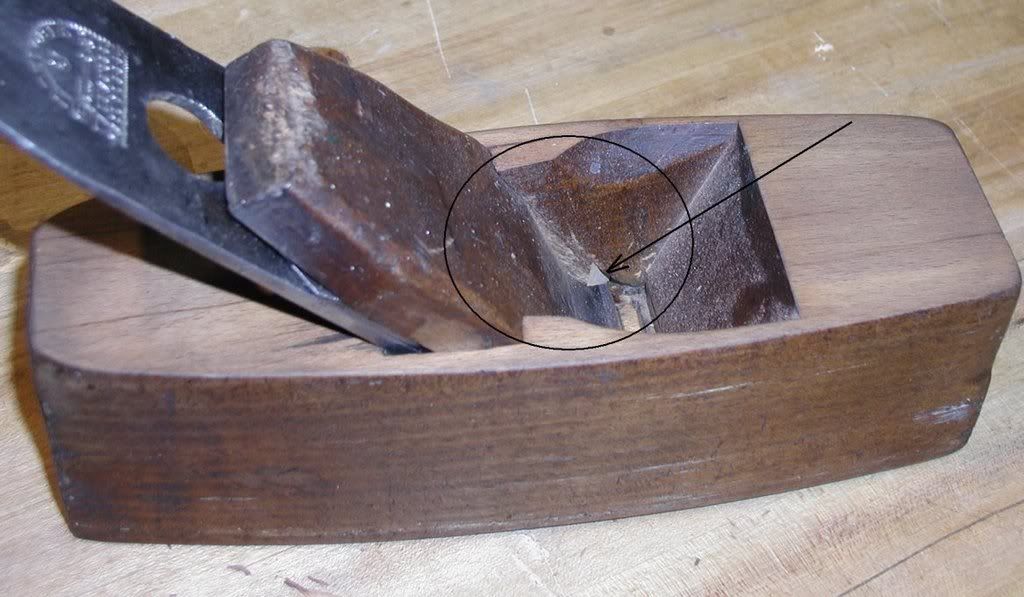
    There were some cracks on the body that I repaired with a bit of epoxy and some sawdust. But any that were in non critical areas I left alone. Near the abutments there were some stress fractures. But these were glued and clamped up overnight. In the photos below it LOOKS like there is a crack on one "ear", but it's really filled with epoxy and sawdust. I flattened the sole on some sandpaper as well as flattening the back of the wedge. I also cleaned up the points of the wedge to get rid of areas where chips would snag. Where I sanded, I gave the body a coat of BLO and allowed it to dry before waxing. I made sure that I didn't get any oil or wax in the abutments, bed, or ears.

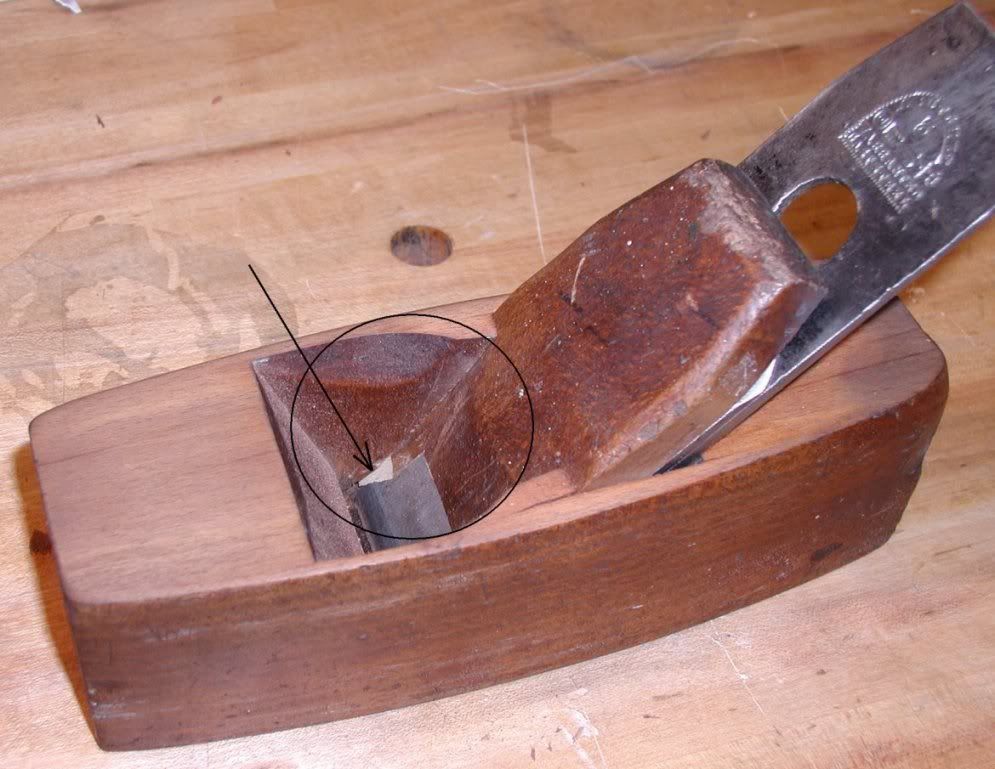
    When I installed the iron/chipbreaker assembly and wedge into the smoother I noticed that the wedge was VERY tight in regards to the sides. I believe that this would account for the cracks near the abutments. I sanded the wedge so that I got a nice even fit. I also took care to assure that there weren't any gaps between the wedge and the cheek. You can see this in the highlighted areas of the photos below.


    After all this tuning up, I decided last night to give this little beauty a test drive on some nice straight grained cherry. However, when I went to use it I ran into all sorts of problems.

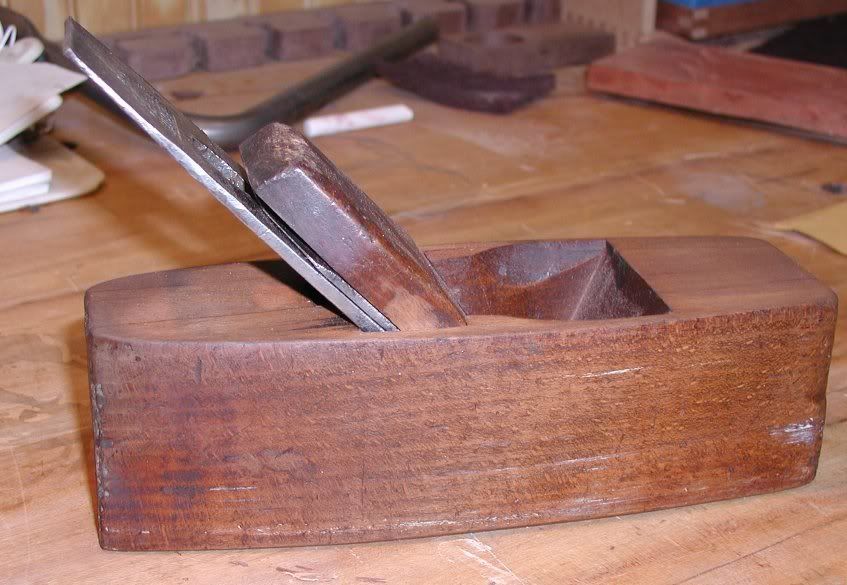
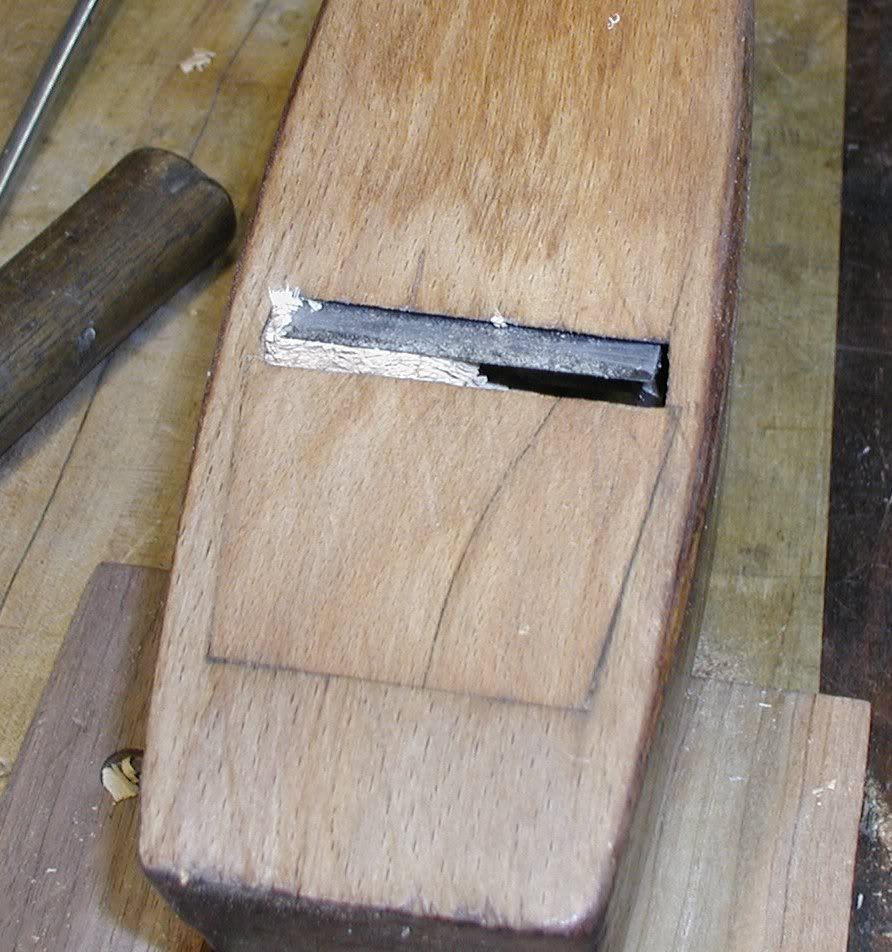
    1.) The original iron just fits the mouth opening. And I had thought that I re-ground the bevel so that it was 90 deg to the sides. But this iron has slightly tapered sides. So it's close, but not dead on. This makes getting an even "reveal" pretty difficult. I ended up swapping out the Butcher Iron and replacing it with the smaller Buck Brothers Iron. You can see the amount or room between the sides of the iron and the sides of the mouth in the last photo.

    2.) I can't get the wedge to hold the iron in place. When I hit a particularly knarly or tough patch of grain, it moves. From the photos you can see that I have the wedge as tightly fit as I can get it.

    3.) When I tap on the back of the iron, the iron moves and the chip breaker DOESN'T! This is with BOTH the Butcher AND the Buck Brothers Irons! So the amount of iron showing increases each time I tap the back of the iron!

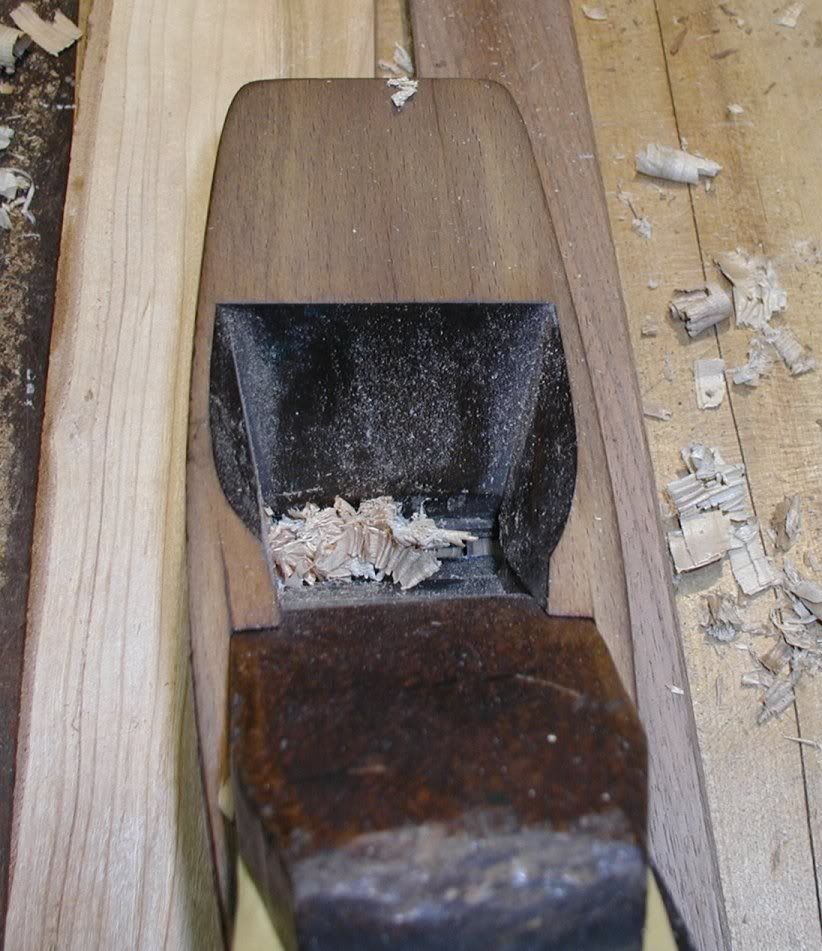
    4.) Last but not least; I get chips clogged in one corner. I'm thinking that the points of the wedge need to be shortened so that the are sitting on the flat of the chip breaker. If they are near the end where it curves, then there is a place for a chip to get stuck.


    I've been reading through Whelan's "Making Traditional Wooden Handplanes" as well as Finck's "Making & Mastering Wood Planes". These books helped a lot. But I would really appreciate input from members who tune up and use wood hand planes.

    Thanks,
    Dominic Greco

  2. #2
    Join Date
    Jan 2009
    Location
    McConnelsville, Ohio
    Posts
    54
    Here's a couple of things that may not be good. It's hard to tell from photos but here goes.
    1. The mouth is way to open. It needs another patch put in to close the mouth up. Take the patch that's in it now out and inlet another one about 1/4 inch deep. Close the mouth up almost all the way and gradually open it until a thin shaving will pass threw. You can always open it up more, but if you don't get it closed enough to begin with you haven't helped a thing.

    2. You can't switch back and forth irons and chip breakers. They're all different size. You can use a different iron but you will have to make a different wedge for it to fit properly. If the iron moves easily in the plane once the wedge is tightened it's probably not the original iron. You may have two irons that don't fit the plane. This is not uncommon these old planes get all switched around, sometimes the wedge isn't the right wedge for the plane. The good thing is all you have to do to fix it is make another wedge. Pick the best iron that fits the plane and use it with a new wedge.

    Close the mouth, make a new wedge, sharpen the iron properly, and you will be amazed how well these planes work. I'm sure there will be others with advice but that's my take on it.

    Berl

  3. #3
    Join Date
    Sep 2007
    Location
    Longview WA
    Posts
    27,468
    Blog Entries
    1
    I am not much of a wooden smoother user, but one thing I do recall is instead of tapping the blade to adjust the cut, tap on the back of the plane to decrease the cut and tap on the front of the plane to increase.

    The only tapping on the blade is for lateral adjustment.

    Someone else may be able to confirm or shoot this down.

    jim

  4. #4
    Dom,

    A lot of times with these old woodies, the wedge will shrink more than the body because the grain is oriented differently. What ends up happening is that at the bottom, the wedge does not fit tight to the sides of the wedge mortise. You can see if this is the case by disassembling the plane, cleaning all the chips out and then putting it back to gether. Now before you try it out, turn it over and look through the mouth opening. If there is a space between the bottom points of the wedge and the wedge mortise sides, then it's either the wrong wedge for that plane or more likely the wedge has shrunk and no longer fits correctly. If this is the case, the only thing you can do to prevent the shaving buildup at the corners is to make a new, proper fitting wedge. You don't want any space between the sides of the wedge and the sides of the wedge mortises or shavings will get stuck. Another option that I will occasionally do if I don't want to discard an original wedge is to grind the corners of the blade off at 45 degree angles to the edge. This effectively makes the iron thinner at the cutting edge and therefore the resulting shavings will be narrower making it easier for them to clear the protruding corners of the wedge. It won't solve all the clogging issues but it will help some.

  5. #5
    Dominic

    I would take a look at the following:

    1)Check the chip breaker and make sure it is properly sharpened. The underneath edge of the chip breaker needs to be as flat as the blade and meet with no gaps. I like to polish the chip breaker like the back of the iron. In addition if the chip breaker is moving and it shouldn't, check the tension of the breaker. This can be accomplished by bending it slightly. I use a wood block with a slot cut in it the thickness of the breaker. Mount the breaker in a vise and bend it slightly. This does not take great force, we only want a thousandth of an inch or two. Too little attention is often paid to the chip breaker.
    2) Check the ramp the blade rides on. Little high spots will keep the blade from seating properly. Coat the iron back with pencil lead and seat the iron and chipbreaker. Remove the iron and you will see the darker "high spots". Using a very sharp chisel, carefully pare away the high spots and repeat the process until you see even pencil lead across the entire bed. Now you know the bed is flat and the iron will seat tightly against it.
    3) Make a new insert and close the mouth up. On a smoother this should be a tiny opening. I usually make inserts oversize so the iron will not exit, leaving about 1/64th of an inch. Then with the iron and wedge in place for tension, lap the bottom of the plane on a flat substrate and sandpaper(I use a granite plate) until the iron will just peak through.
    These steps should "condition" your plane. This is usually necessary on older planes and it will be necessary on on wooden planes in the future. Wooden planes MOVE and they can be "fettled" into perfect condition.

    Good luck and congratulations on your find. I love these coffin smoothers.

    George

  6. #6
    Join Date
    Feb 2003
    Location
    Bucks County PA
    Posts
    646

    Thanks Berl

    Quote Originally Posted by Berl Mendenhall View Post
    1. The mouth is way to open. It needs another patch put in to close the mouth up. Take the patch that's in it now out and inlet another one about 1/4 inch deep. Close the mouth up almost all the way and gradually open it until a thin shaving will pass threw. You can always open it up more, but if you don't get it closed enough to begin with you haven't helped a thing.
    Yeah, you have a good point. I'll need to look into this. I have a piece of pear that would work perfect for a patch.

    Quote Originally Posted by Berl Mendenhall View Post
    2. You can't switch back and forth irons and chip breakers. They're all different size. You can use a different iron but you will have to make a different wedge for it to fit properly. If the iron moves easily in the plane once the wedge is tightened it's probably not the original iron. You may have two irons that don't fit the plane. This is not uncommon these old planes get all switched around, sometimes the wedge isn't the right wedge for the plane. The good thing is all you have to do to fix it is make another wedge. Pick the best iron that fits the plane and use it with a new wedge.
    I hear you on that. I think I'll stick with the Buck Brothers Iron. It fits the mouth with some room to spare and is in MUCH nicer shape than the Butcher iron.

    Quote Originally Posted by Berl Mendenhall View Post
    Close the mouth, make a new wedge, sharpen the iron properly, and you will be amazed how well these planes work. I'm sure there will be others with advice but that's my take on it.
    I hear you on that! But while I just love restoring old tools I need to determine if this one is damaged beyond "logical" repair. I think I'm going to look into the wegde first. I have a feeling that the wedge may need to be remade. I also have a feeling that even thought the cracks near the abutments have been epoxied, that may not be enough. If so, I may just bag it and make a new Krenov style plane and use the irons in that.

    All that being said, it sounds like I need to look at this plane more closely.

    Thanks for you input.
    Dominic Greco

  7. #7
    Join Date
    Feb 2003
    Location
    Bucks County PA
    Posts
    646

    Thanks Bob

    Quote Originally Posted by Robert Rozaieski View Post
    Dom,

    A lot of times with these old woodies, the wedge will shrink more than the body because the grain is oriented differently. What ends up happening is that at the bottom, the wedge does not fit tight to the sides of the wedge mortise. You can see if this is the case by disassembling the plane, cleaning all the chips out and then putting it back to gether. Now before you try it out, turn it over and look through the mouth opening. If there is a space between the bottom points of the wedge and the wedge mortise sides, then it's either the wrong wedge for that plane or more likely the wedge has shrunk and no longer fits correctly. If this is the case, the only thing you can do to prevent the shaving buildup at the corners is to make a new, proper fitting wedge. You don't want any space between the sides of the wedge and the sides of the wedge mortises or shavings will get stuck. Another option that I will occasionally do if I don't want to discard an original wedge is to grind the corners of the blade off at 45 degree angles to the edge. This effectively makes the iron thinner at the cutting edge and therefore the resulting shavings will be narrower making it easier for them to clear the protruding corners of the wedge. It won't solve all the clogging issues but it will help some.
    Thanks for the input. Your comments about the wedge sound dead on.

    Like I mentioned to Berl, it sounds like I need to look more critically at the wedge.
    Dominic Greco

  8. #8
    Join Date
    Feb 2003
    Location
    Bucks County PA
    Posts
    646

    Thanks George

    George,
    Thanks for the advice. Along with the wedge, I'll be looking at the mating surfaces between the bed and the back of the iron. I've been told that having a blade with a fully polished back is actually a detrement.

    On the advice I got from another WWing forum, I'm going to rough up the back of the iron, where the weld line between the soft and hard steel is. I'll leave the back of the hard steel (near the bevel) polished, but rough up the rest so it's not so slick. I also need to remove any oil that might have remained on the blade. A standard procedure for me after I remove rust from an old tool is to give it a soak in 3-in1 oil. So there may be some residue that's making it slick.

    The more I think about it, the more I think that making a new patch isn't as hard as I think it is. It shouldn't take me that long and will give me practice performing that operation. Like I mentioned before, I'm pretty sure I have a nice piece of dry pear wood that would work perfectly.
    Dominic Greco

  9. #9
    Join Date
    Sep 2008
    Location
    Raleigh, NC
    Posts
    2,854
    Dominic - to start with, don't bother making a new patch for the sole - it will not help with the clogging issue or the iron moving and not the chipbreaker, and you want to solve these problems before moving on.

    First, do not rough up the back of the iron. It isn't necessary to get it to hold, and you may do more damage.

    The problem that you're having with clogging on one side of the iron is from three factors - shortening up the "ears" on the wedge so that there's now a great place on the ramp and cheeks for the shavings to clog, the iron is too narrow for the mouth, and there's not enough camber on the iron and/or the iron is not laterally adjusted correctly to cut in the center 2/3s of the iron.

    There's little you can now do about the shortened ears on the wedge other than make a new one. However, you may not need to go that far. Put the original iron back into the plane and check to see that it correctly fits the mouth opening side-to-side. There should be little play at the mouth opening, but more several inches back from the edge - this allows you to make lateral adjustments from an iron that's not quite ground straight across (90 degrees to the side).

    If there's insufficient play a couple of inches back on the ramp for the iron, there are two solutions. You can grind the iron's sides a couple of inches back from the edge to provide some play - that's a slow process, and you want a continuous taper from the iron's edge to the top, and that can be a fussy. Moreover, as the iron is sharpened away on the front, you will get more and more space between the sides of the iron and the sides of the mouth.

    The other way to do this is to use a float to take a little wood off of the cheeks in the wedge slot a little way back from the mouth. The ideal tool for this is a side float - Lie-Nielsen sells them. If you're going to be re-habbing a lot of wooden planes for your shop, a side float and a bed float are good investments. As an alternative, if you're really good with a dovetail chisel, you can do this with a narrow one, and clean up with a triangular file.

    The wedge - Sanding the back of the wedge (and the top of the plane, for that matter) was not a terribly clever thing to do. What you've likely done is thinned the wedge out enough so that it's seated further down in the throat, and is now contacting the thread side of the cap screw - that's the reason just the iron is advancing when you tap it with a hammer (tapping the upper part of the iron for lateral and extension adjustments is a proper technique, btw).

    Moreover, the pressure point of the back of the cap iron screw thread is likely to be causing all sorts of problems, not just the problem of the cap iron moving relative to the iron. Your pictures show this - there's a pressure mark on the back of the wedge from this interference. There's two solutions - either file the back of the cap screw thread down to where it will not interfere with the wedge, or relieve the back of the wedge (#2 would be my choice, but either will work). Also, check the slot in the bed of the plane to ensure that the Butcher iron and cap iron you have is not "bottomed out" in this slot when the iron and cap iron are properly set to take a shaving. If necessary, extend this slot with some chisel work (you can re-establish the rounded end of the slot with a carving gouge of the proper sweep).

    Once you do these things (as well as providing a little more camber to the blade's edge), adjust the plane to take a fine shaving in the center 2/3rds of the iron, and try it out on a moderately hard wood. If it planes well, now's the time to consider re-throating the plane.

  10. #10
    Join Date
    Feb 2003
    Location
    Bucks County PA
    Posts
    646

    Your reply

    Quote Originally Posted by David Keller NC View Post
    Dominic - to start with, don't bother making a new patch for the sole - it will not help with the clogging issue or the iron moving and not the chipbreaker, and you want to solve these problems before moving on......First, do not rough up the back of the iron. It isn't necessary to get it to hold, and you may do more damage.
    OK, how will roughing up the back (with some 80 grit sandpaper) do more damage? I'm curious about that.

    Quote Originally Posted by David Keller NC View Post
    The problem that you're having with clogging on one side of the iron is from three factors - shortening up the "ears" on the wedge so that there's now a great place on the ramp and cheeks for the shavings to clog, the iron is too narrow for the mouth, and there's not enough camber on the iron and/or the iron is not laterally adjusted correctly to cut in the center 2/3s of the iron.
    Ah, I see what you're driving at. Shortening the ears made a place for the chips to be gathered. That makes a lot of sense.

    Quote Originally Posted by David Keller NC View Post
    There's little you can now do about the shortened ears on the wedge other than make a new one. However, you may not need to go that far. Put the original iron back into the plane and check to see that it correctly fits the mouth opening side-to-side. There should be little play at the mouth opening, but more several inches back from the edge - this allows you to make lateral adjustments from an iron that's not quite ground straight across (90 degrees to the side).

    If there's insufficient play a couple of inches back on the ramp for the iron, there are two solutions. You can grind the iron's sides a couple of inches back from the edge to provide some play - that's a slow process, and you want a continuous taper from the iron's edge to the top, and that can be a fussy. Moreover, as the iron is sharpened away on the front, you will get more and more space between the sides of the iron and the sides of the mouth.

    The other way to do this is to use a float to take a little wood off of the cheeks in the wedge slot a little way back from the mouth. The ideal tool for this is a side float - Lie-Nielsen sells them. If you're going to be re-habbing a lot of wooden planes for your shop, a side float and a bed float are good investments. As an alternative, if you're really good with a dovetail chisel, you can do this with a narrow one, and clean up with a triangular file.
    Well, I'm not really planning on rehabbing any more wooden planes. In fact I prefer using my cast iron ones or the transitionals I have. So buying a LN float is out. And I'd rather not try altering the cheeks unless absolutely neccesary


    Quote Originally Posted by David Keller NC View Post
    The wedge - Sanding the back of the wedge (and the top of the plane, for that matter) was not a terribly clever thing to do. What you've likely done is thinned the wedge out enough so that it's seated further down in the throat, and is now contacting the thread side of the cap screw - that's the reason just the iron is advancing when you tap it with a hammer (tapping the upper part of the iron for lateral and extension adjustments is a proper technique, btw).
    OooooKay. You do make a valid point with your comments above. But you lost me when the percieved tone of your response got somewhat condesending (sorry but that's the way I read it). While your advice is good, now you've colored it with that comment.

    The back was in pretty sad shape and I really just cleaned it up. I didn't remove hardly any material. I highly doubt that I changed the geometery THAT much.
    Dominic Greco

  11. #11
    Join Date
    Sep 2008
    Location
    Raleigh, NC
    Posts
    2,854
    "OK, how will roughing up the back (with some 80 grit sandpaper) do more damage? I'm curious about that."

    There are several possibilities, and depends a lot on how you go about it. It's not very difficult to mess up the bedding of the iron doing this. When these planes were originally made, the bed for the iron was carefully fitted so that the wedge forced a fairly large area of the back of the iron against it. That's really critical for getting the wedge and iron to hold under the stress of planing. Naturally, of course, if the iron's replaced the above no longer applies (and in which case I'd suggest re-bedding the iron).

    "Well, I'm not really planning on rehabbing any more wooden planes. In fact I prefer using my cast iron ones or the transitionals I have. So buying a LN float is out. And I'd rather not try altering the cheeks unless absolutely neccesary"

    Altering the flat portion of the cheeks that's parallel with the plane's sides is actually the best way to go about this. This is not actually a critical fitment - the wedge geometry and the surface of the wooden bed and underside of the cheek abutments is the critical area where having it not right be even a few thousandths will affect the usability of the plane.

    "But you lost me when the percieved tone of your response got somewhat condesending (sorry but that's the way I read it). While your advice is good, now you've colored it with that comment."

    Condescending, no. But that's an accurate statement - and I can only say that because I've made the exact same mistake. We all make them - there's a learning curve for everything.

    Beleive me, you don't need to remove very much at all from the back of a wedge or the top surface of the wedge ears to really cause problems. And you photograph does seem to show a mark of compressed wood where the cap iron screw thread has been pressed against it. Ideally, what you want is for the wedge to bear against the sides of the iron and 1/2" or so around the perimeter of the bed. If a lot of the pressure is on the back of the cap iron screw, then the blade can pivot on this point in use, and it's going to be difficult to hold the iron's lateral adjustment.

    That said, I would first check to see if the cap iron screw is actually bottoming out in the slot in the bed. If that's happening, the only solution is to either elongate the slot, or back the cap iron away from the iron's edge.

Posting Permissions

  • You may not post new threads
  • You may not post replies
  • You may not post attachments
  • You may not edit your posts
  •