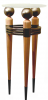
i was following along with this wonderful post so i could learn something new or elevate my woodworking skills by seeing how someone else works and i have to say that im blown away by the rosewood planes you are making. i would really like to see some details about how you go about building such pieces of working art. that is something i would like to add to my bench.

 Reply With Quote