Page 1 of 2 12 LastLast
Results 1 to 15 of 29

Thread: How I built my shop

  1. #1

    How I built my shop

    When I went into business back in 1993 I had to move from my 8×10 shop in the back yard to a space I rented for $350 a month. I had recently gotten an order from Leichtung workshops for 440 of my Intarsia Project kits. The space I rented was a 750 sq. ft metal building in the middle of an industrial park and I knew that I didn’t want to stay there forever. The kits sold well for several years but it turned out to be a seasonal thing with the most sales being between October through March. I was still working my full time job as an electrician foreman doing commercial work in grocery stores and shopping centers so the rental space would sometimes not really pay for itself during the slack months.I would still go to the shop and draw new patterns and make new kits for the next season and build a few pieces of furniture, all the while honing my woodworking skills and techniques. I decided that the time had come to find a place to call my own if I was to continue with the woodworking. I began making a list of all the things that I would like to include in a new shop. I wanted to be able to build it myself relying on the experience that I gained from building log homes in North Carolina. When I grew up in Maine I loved the spaciousness of old barns that we used to play in as kids so I wanted to build a timber framed structure. I didn’t want a concrete floor because of back and knee ailments associated with years of working on concrete floors doing electrical work plus I wanted the crawl space to run the electrical and dust collection under the floor.I also wanted high ceilings and an upstairs for extra storage space.The place that we found to build the shop was for sale and the location was perfect. A 2300 sq. ft ranch on 1.3 acres at the end of a cul-de-sac with wetlands to the left and RR tracks behind and 2 empty lots to the right that wouldn’t perk Perfect!!. We bought the house but because of county ordinances I was limited as to the size of the footprint that the shop could be so I designed it to be 20’x 38’ which was smaller than I wanted but I could make bigger by having the second floor. I drew up some plans and specs for the county and all went well. So here is the pictorial sequence of the building of Mike’s One Man Shop. I started by building a scale model.


    The model really helped during the material take-off of what was needed to build the shop.


    I laid out the footings and rented a mini-backhoe to do the digging.


    Big Day—pouring the footings. Hope I measured everything right


    Free bricks, free sand and free mortar. I laid the piers off the old school way using a water level. First time I laid brick but had seen it done plenty of times. Not rocket science!!
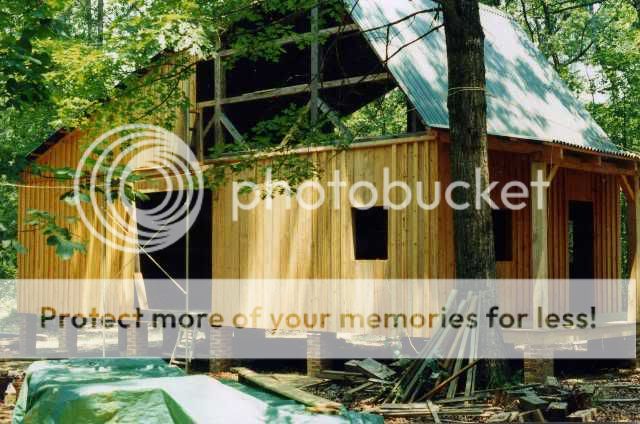
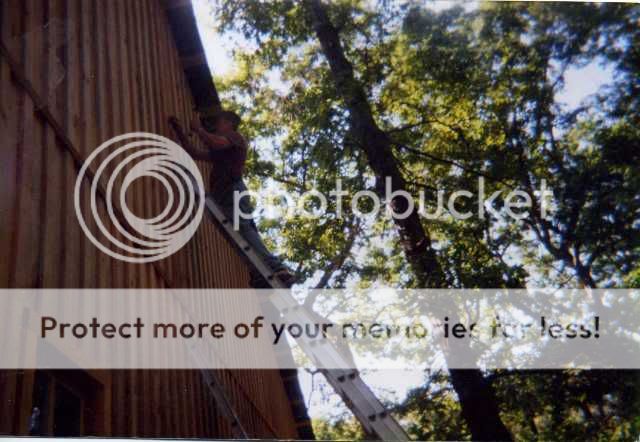


    Next sequence—-Let the building begin.
    Mike
    midlothianwoodworks
    ---------------------
    Why buy it if you can build it

  2. #2
    Join Date
    Dec 2005
    Location
    Spring, Texas
    Posts
    578
    Mike,

    A man after my own heart. Do it yourself, not always the cheapest or fastest, but it gets done the way you want it!

  3. #3
    Join Date
    Nov 2008
    Location
    Wilmington Island, Ga
    Posts
    654

    Most Excelent!@!

    Great idea with the scale model. I'm a big fan of sketchup modeling, but to do it in the "real" looks like it would give you way more feel for the real thing.

    Keep the pics coming!

  4. #4
    Thanks Mike - glad you agreed to do this thread after posting the pics of the shop. Looking forward to seeing the progression.

  5. #5

    How I built my shop--construction begins

    One of the challenges of building a timberframe structure was finding a reliable source for all of the timbers at a good price and having them cut on a schedule that suited my needs. I saw an ad in a local paper that advertised—lumber for sale for barns and sheds,custom cut,will deliver. I gave the man a call and told him what I was building and as it turned out he lived about 10 minutes from me and that he could mill everything I needed for the shop at a very reasonable price—.50bd ft for SYP,and .60 bd ft for oak. Wow what a deal. I ordered all of the girders for the floor system—6” x 8” x 8’and 10’ oak.


    Unloading first load of oak girders


    After finishing all of the piers (21) each with a 1/2 “anchor bolt,termite flashing and PT sill plate I began fitting the girders with a 1/2 lap joint using my Trusty Jonsereds 49SP chain saw.


    Setting girders with help from son #1


    Making good progress


    After getting all of the main girders in place I began to put in the 4” x 6” SYP floor joists using ledger strips and spikes


    Nailing down the floor with help from FIL and son # 2


    Stay tuned for more of Mike’s one man shop
    Mike
    midlothianwoodworks
    ---------------------
    Why buy it if you can build it

  6. #6
    Join Date
    Dec 2003
    Location
    West of Ft. Worth, TX
    Posts
    5,815
    OH, this is going to be fun to watch!! Thanks for the step by step with photos!!! Jim.
    Coolmeadow Setters...Exclusively Irish! When Irish Eyes are smiling....They're usually up to something!!
    Home of Irish Setter Rescue of North Texas.
    No, I'm not an electrician. Any information I share is purely what I would do myself. If in doubt, hire an electrician!
    Member of the G0691 fan club!
    At a minimum, I'm Pentatoxic...Most likely I'm a Pentaholic. There seems to be no known cure. Pentatonix, winners of The Sing Off, s3.

  7. #7
    Join Date
    Mar 2007
    Location
    Stony Plain, Alberta
    Posts
    2,702
    That looks like one very solid floor....

    This will be fun to watch unfold....
    Keep us up to date with progress pics.
    Is the whole building going to be timber frame?

  8. #8
    Join Date
    Jan 2009
    Location
    Camp Hill, PA
    Posts
    40
    Nice work, nice material. Just curious, why so far from the ground?

  9. #9
    Hi RayI built the shop off the ground mainly to access the electrical , dust collection and heating from below the floor. Plus after working on concrete slabs for thirty years I simply didn't want my shop on a concrete slab and I also had to accommodate the slope of the land.
    Mike
    midlothianwoodworks
    ---------------------
    Why buy it if you can build it

  10. #10

    How I built my shop part3

    I encountered many challenges while building my shop. For one , I was still working full time at my electrical job and working out of town alot so I could only work on the shop during the weekends. Plus I was still processing orders for intarsia kits at the rental shop which meant that my building time was limited to night work. With very limited time it took many months to get anything done. Setting the 6×6 posts was no problem but hoisting the6×8 beams was a real challenge working by myself. So I fabricated a small crane from an old grocery cart, a couple of pulleys, a boat winch and a 15’ hickory tree. Now I was able to do all of the cutting and notching on the beams and hoist them into position without any help.

    Using my boat winch crane to set a beam


    After many months I managed to get the first floor framed up and with the watchful eye of my supervisor got the stairway installed to the second floor.


    After putting down the deck for the second floor loft I began setting the posts for the roof.


    Because of the way I built the first crane I had to make a more portable crane to do the lifting of the beams and rafters for the second floor.


    Installing the roof supports


    Done with the crane on the second floor.


    To be continued
    Mike
    midlothianwoodworks
    ---------------------
    Why buy it if you can build it

  11. #11
    Join Date
    Jun 2007
    Location
    Newburyport MA
    Posts
    293
    Great pictures. I love that crane!

  12. #12
    Join Date
    Dec 2006
    Location
    Northern California
    Posts
    197
    That is really cool Mike! Back in the day, it would have been one long timber, some bracing, and a quarter horse. I suspect that once a "crane" was built, it was probably shared for all of the neighbers...

  13. #13
    Join Date
    Feb 2003
    Location
    In the foothills of the NM Sandia Mountains
    Posts
    16,658
    Did I miss part two?

    The crane is slick!
    Please help support the Creek.


    "It's paradoxical that the idea of living a long life appeals to everyone, but the idea of getting old doesn't appeal to anyone."
    Andy Rooney


  14. #14

    How I built my shop--part 4

    Well I may be jumping the gun a little but I got my first load of 1×8 rough sawn SYP siding and the 1×3 batten strips so just had to see what it was going to look like. I ordered the Ondura roofing material so I got time to do other things until it comes in.The front porch PT is done so lets do the siding.


    Me and son #2 working on the rear roof supports. learning how to use a left handed hammer


    The Ondura roofing finally came in so that takes priority now. I chose this roofing material over a metal roof mainly because of the oak trees with the huge acorns that would jump the hell out of me on a metal roof.


    Roof is done


    Back to the siding—getting tricky now!


    Well I have made and installed all of the windows and doors and this is the last piece of siding to complete the dry-in.


    Time to work on the inside
    Mike
    midlothianwoodworks
    ---------------------
    Why buy it if you can build it

  15. #15
    It indeed was a lot of work and time but sure was worth the effort involved.

    I dig the pics and watching something come together .... kinda like a TOH series.

    Nice job Mike

Posting Permissions

  • You may not post new threads
  • You may not post replies
  • You may not post attachments
  • You may not edit your posts
  •