I had another Creeker send me a PM asking about my homemade blade guard that I mentioned in a previous post, so I figured it was worthy of posting on the general forum.
The overhead arm portion I cloned from the Biesemeyer design with a few modifications. It is all made from 14 ga square tube steel. The main support is made from 1½ tube. The telescoping arm is made from 1¼ tube. With ¾" UHMW tape from Woodcraft applied to all 4 sides of the 1¼ tube, it made for a perfect fit inside the 14ga 1½ tube. For the front to back adjustment I again used 1¼ tube inside 1½ tube, but notched the bottom out of the 1½ tube to allow a 1" vertical tube to slide freely. I welded on an 1/8" thick steel piece at all the locations for the knobs so I had more meat to drill and tap. All of it was welded up with a MIG welder at my brother's place. Working with metal was kind of fun (although not nearly as fun as wood). After a few practice welds, I was able to make functional welds. Making them pretty is another story, thank goodness for angle grinders. I left open the possibility of adding a telescoping support leg, but didn't end up needing it. The final step was to paint the whole thing with Hammerite paint trying to match the Grizzly green.
The idea for the blade guard portion was obtained from Gordon Sampson's article in the BP archives of WC. I used a 4" flex hose for the dust port. I drilled and tapped a 3" sch 40 PVC coupling and attached it to the top Lexan piece for the adapter to the flex hose. I will say that if I had it to do over I might use 1/4" Lexan instead of 3/8", because 3/8" is really heavy. I might also build a Brett style guard also for ripping narrow pieces. I installed the Lexan guard piece with clevis pins for quick removal in case I wanted to switch between a Brett style and a basket style guard quickly. I won't go into much more detail as you can read more about it at the BP archives.
I spent about $50 for the metal, $50 for the Lexan, and probably another $50 for the flex hose, paint, and hardware. It wasn't a huge savings, but it was worth it to get exactly what I wanted.
Thanks for looking,
Todd

 Reply With Quote
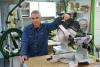

 </O
</O