Page 1 of 2 12 LastLast
Results 1 to 15 of 17

Thread: Finally done! A restored 1917 Disston backsaw

  1. #1

    Finally done! A restored 1917 Disston backsaw

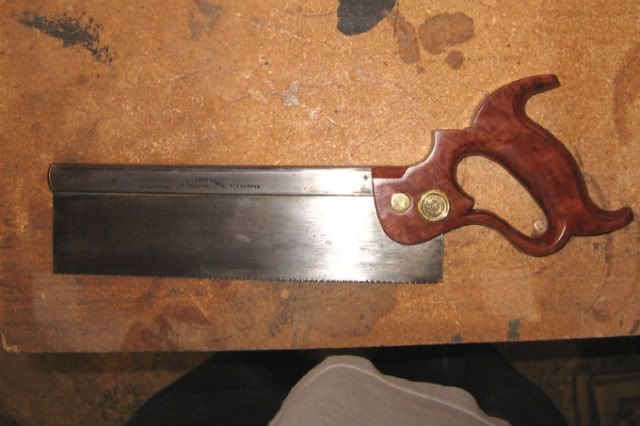
    Let me just start this thread out by saying that I am very excited to have this old Disston backsaw back and in better shape than it probably has ever been in. I filed off the old teeth, then cut and set new ones. It's now a 15ppi rip blade that it dead straight. It now tracks perfectly, and starts the cut nicely thanks to the 8 degree teeth. I had a blast restoring this saw, and making the new handle. I'm hooked on old tools now, and will be looking for another saw to restore very soon.


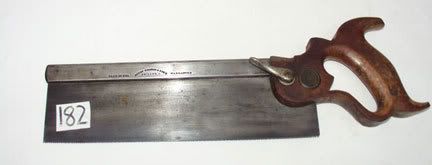
    Here's a picture of the saw when I bought it.


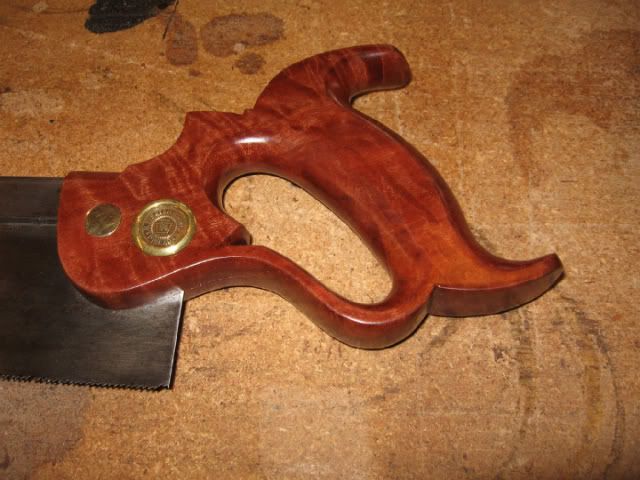
    Here is is with the new curly bubinga handle, and correct sawnuts.


  2. #2
    Join Date
    Apr 2006
    Location
    Escondido, CA
    Posts
    6,224
    Wow. Beautiful saw and that handle is just stunning. I'll bet it feels as nice as it looks. Best of all, the saw works. What a bonus!
    Veni Vidi Vendi Vente! I came, I saw, I bought a large coffee!

  3. #3
    Join Date
    Mar 2008
    Location
    Colfax, CA
    Posts
    50

    Your saw restoration

    Julien,

    What a nice job ! How long have you been doing tool restorations ?

    Louis

  4. #4
    Join Date
    Sep 2007
    Location
    Longview WA
    Posts
    27,473
    Blog Entries
    1
    Nice work, it is great to have a good working saw.

    That lever on the first picture looks similar to the one on my Bishop #10. I wonder if it came from a similar type of saw.

    http://www.sawmillcreek.org/showthread.php?t=110566

    jim

  5. #5
    Join Date
    Nov 2007
    Location
    Lansing, KS
    Posts
    335
    Julian,
    I agree with the others -- what a mighty fine looking handle. Wow!

  6. #6
    Nice job, Julian! Looks like you bought the saw at auction - did the bubinga cost as much as the saw?? That wood is beautiful - and really adds to the overall character of the saw.

    Personally, I am not much into tool restoration, but I certainly appreciate the effort others go to in saving and putting back into useful service some of these old saws. That is in stark contrast to the otherwise "disposable" mentality that permeates our society.

  7. #7
    Join Date
    Jan 2006
    Location
    East Central Illinois
    Posts
    532

    Saw

    Beautiful workmanship.

  8. #8
    Louis, this was my first attempt at restoring/sharpening a saw. I have had the bubinga laying around the shop for years now, and I finally decided to put it to good use. I have so far made a new tote, and handle for my stanley #7 with it, and this handle. I didn't pay much for the piece because it had quite a few inclusions in it. That said, I feel there is nothing wrong with using some nice wood on a tool that you will use everyday.


    John, I bought the saw from an antiques dealer for $30, and yes, I also paid $30 for the wood. The bubinga was 8/4x8x48.
    Last edited by Julian Nicks; 05-01-2009 at 7:56 AM.

  9. #9
    Join Date
    Feb 2004
    Location
    Marietta GA
    Posts
    1,120

    Envy..hurts but still a joy

    I'm so green! What a beautiful piece!

    It's gotta be like having a nice quiet friend in the shop. Classic!

  10. #10
    Join Date
    Dec 2003
    Location
    Benbrook, TX
    Posts
    1,245
    Very nice, Julian.

    What size file did you use for 15 TPI? Did you have a guide of some sort for filing the new teeth?

  11. #11
    I used a 4" 2x slim file that I ordered from www.toolsforworkingwood.com . I printed out the tooth layout and glued it to a piece of wood to use as a template for getting the teeth cut evenly. I also made a small jig to hold the file, so all I had to do was set the height of the blade in the vise, hold a small shopmade t square over the glued on template, and just hold the file holder against the t square and push it back and forth till it stopped cutting. It was tedious, but worked quite well. I should have taken pictures of the process, because it really helped in making an accurate tooth pattern.

    If I try this again, I will try making a jig using threaded rod to accurately set the spacing. It would basically be the same idea, but would have a 16x3/8 threaded rod. With the 16 tpi rod, I'd essentially get a 16ppi blade. Each revolution of the rod would be one tooth. If I get some extra cash, I'd love to try my hand at making a brass backed saw from scratch.

  12. #12
    Join Date
    Sep 2003
    Location
    Columbia, SC
    Posts
    702
    Julian,

    That's a beautiful restoration. It's hard to believe you've never done a saw before. That makes the end result that much nicer. Congratualtions on a very nice job.

    Hank

  13. #13
    Join Date
    Sep 2007
    Location
    Longview WA
    Posts
    27,473
    Blog Entries
    1
    Quote Originally Posted by Hank Knight View Post
    Julian,

    That's a beautiful restoration. It's hard to believe you've never done a saw before. That makes the end result that much nicer. Congratualtions on a very nice job.

    Hank
    If your going to do it, there has to be a first one.

    jim

  14. #14
    Join Date
    Dec 2003
    Location
    SF Bay Area, CA
    Posts
    15,332
    I'm not sure this is an appropriate word to use but that saw just looks delicious to hold! I love the handle...bet it fits like a glove!
    Wood: a fickle medium....

    Did you know SMC is user supported? Please help.

  15. #15
    Join Date
    Jan 2009
    Location
    Williamsburg,Va.
    Posts
    12,402
    Excellent work.I think you have done an extremely accurate job on that handle.

Posting Permissions

  • You may not post new threads
  • You may not post replies
  • You may not post attachments
  • You may not edit your posts
  •