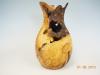
Very well done Steve. Love the form and am looking forward to thi finished piece...Bill..


 Member
Very well done Steve. Love the form and am looking forward to thi finished piece...Bill..
Contributor
That sure is purrrrty Steve.
If you can't fix it with a hammer, you've got an electrical problem
 Member
Really nice! Superb execution.
He who hesitates is lunch.
 Member
Steve, that's a slick piece and an even slicker idea!
Talent...what a cheap trick.
I'm just thankful it held.
 Member
Look great Steve! I have my first one drying, I hope it turns out a well as yours!
Steve
When all is said and done--more is usually said than done.
 Member
Very nice work Steve. I will have to try something like that some day.
Jack
 Member
Very beautifull work Steve
With the wings we see the trunk forking
The sorrowing fact when I hollow a birch crotch, is that there is a marvelous fern design that disappear when you go deeper...What to do to preserve ?
I' ve tried only a thin layer glued on top of a box (pict attached) it's very close to the core of the tree...which way to preseve this when hollowing ?
Congratulations Steve and so long
Lionel.
04_1W-crotch détail.jpg
Member
Thanks Steve, I'll work on that.Originally Posted by Steve Schlumpf

Tim
 Posting Permissions

 Reply With Quote