Page 1 of 2 12 LastLast
Results 1 to 15 of 24

Thread: Setting Up a Bevelled Box

  1. #1
    Join Date
    Feb 2008
    Location
    Flowery Branch, GA
    Posts
    729
    Blog Entries
    1

    Setting Up a Bevelled Box

    I've made a few bevelled boxes and I'm in the process of making another..... I know the first time that I saw one, I had no idea how to do it... so, I thought I'd drop a little "how to" in the hopes that it will help somebody else along the way....

    On a bevelled box, you'll start out with 3/4 or even 7/8" thickness all around.... so you have the meat to bevel off....For example, on this one, 3/4" starting thickness....

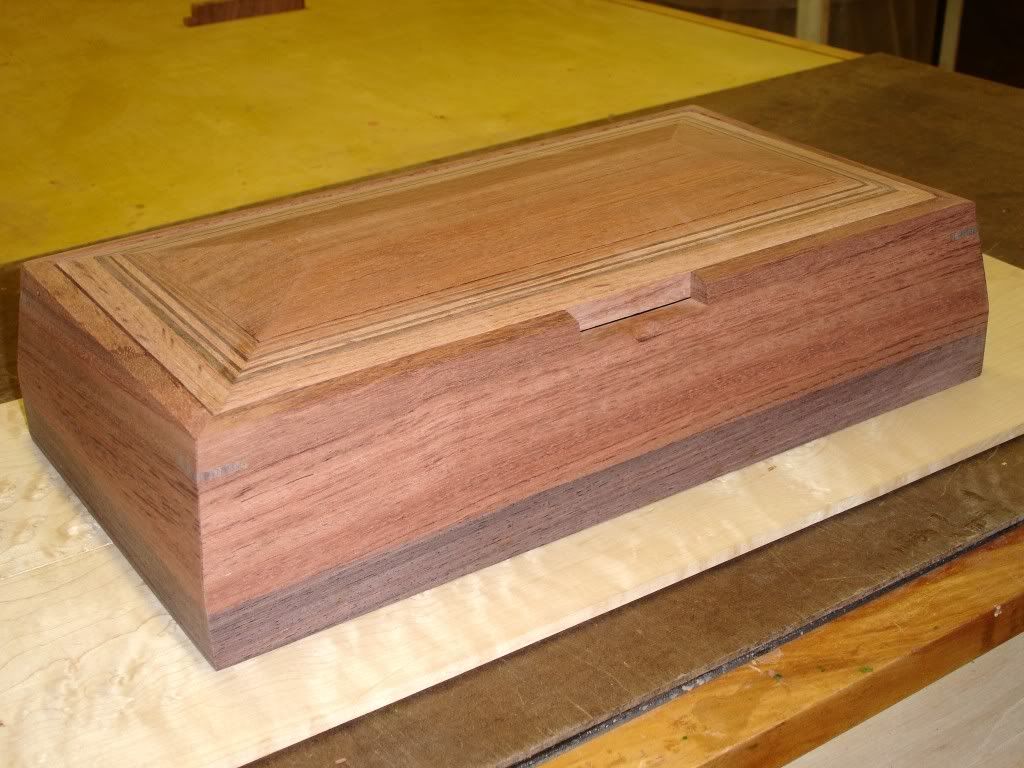
    You can see the lid's border sitting 1/4" proud of the box. I have the border sitting on ply spacers inside the box, with 7/16" of the border inside the box... the spacers will be in there when I drill the hinge pin holes. The border has a groove 3/8" deep centered. I used an outer border of Bubinga, 1/2" wide followed by alternating strips of Cocobolo & Bubinga 1/8", 1/16", 1/16", 1/8", 1/16th" and 5/16" respectivley to make an overall width of 1-1/4".

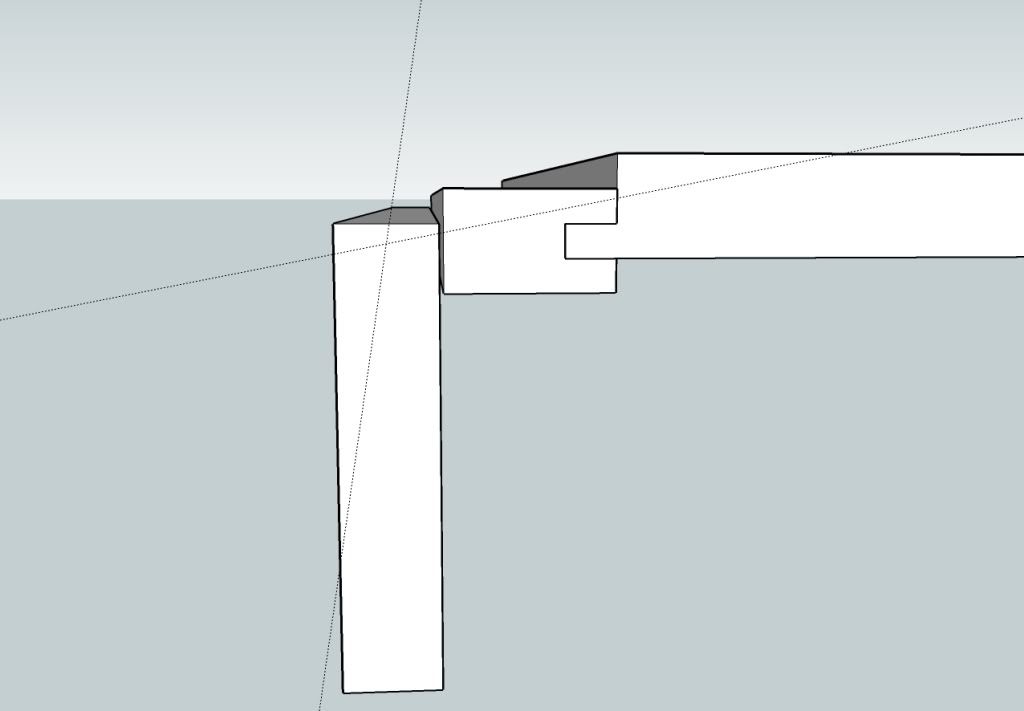
    The lid is mounted 1/4" proud of the border. I cut a 3/8" rabbett, 1/2" deep leaving a 1/4 inch "tongue" all around the bottom of the lid piece.

    This will allow an 11 degree bevel, the saw blade will just "kiss" where the angles meet on the lid. Should be a fun cut.... I'll post a picture after I make the cuts...

    The lid will be cut first, then the box will be turned on it's side to bevel the top edges 11 degrees to match the bevel on the lid.

    The side of the box, all the way around, will be bevelled at 9 degrees.... leaving 3/8" thickness at the top.


    I thought I'd throw this picture in just because I think it's cool.....


  2. #2
    nicely done, thanks for the drawing.

  3. #3
    Join Date
    Feb 2008
    Location
    Flowery Branch, GA
    Posts
    729
    Blog Entries
    1

    Follow Up

    Trimmed the fat off last night.... I'll post a picture of the completed project by the weekend.... Thanks for looking.


  4. #4
    Join Date
    May 2008
    Location
    Central NY
    Posts
    189
    Very nice!

  5. #5
    The secret revealed!! Ed, that is a neat tutorial, and I really like the high tech clamp you used

  6. #6
    Join Date
    Feb 2008
    Location
    Flowery Branch, GA
    Posts
    729
    Blog Entries
    1
    Quote Originally Posted by John Keeton View Post
    The secret revealed!!
    I better quit giving away my secrets....

  7. #7
    Join Date
    Mar 2006
    Location
    SoCal
    Posts
    22,514
    Blog Entries
    1
    Very nice Ed but you can't stop revealing the magic now; I'm learning too much from you.
    "A hen is only an egg's way of making another egg".


    – Samuel Butler

  8. #8
    Join Date
    Aug 2005
    Location
    Glenmoore, PA
    Posts
    2,194
    Very nice work there Ed. One question that I have wondered about seeing boxes with floating panels is how you prep for finish and finish the reveal around the floating panel.

    I tend to use a veneered top panel so I can completely encase it so I don't have to deal with that particular issue.

  9. #9
    Join Date
    Dec 2006
    Location
    Atlanta , Ga.
    Posts
    3,970
    And now I know why I can't find a case of tape local.. you scoundrel..


    You know who from down the road... ha.. ha...

  10. #10
    Join Date
    Jul 2003
    Location
    Winterville, NC (eastern NC)
    Posts
    2,367
    Nice work and nice, great trick. Another method to add to my arsenal. Thanks.

  11. #11
    Ed

    thanks for all the tips. I am amazed how fast you produce your boxes.

  12. #12
    Join Date
    Feb 2008
    Location
    Flowery Branch, GA
    Posts
    729
    Blog Entries
    1
    Thanks again to all.....

    Larry... I use spray lacquer and have not really had an issue with the reveal around the floating lid. It is, indeed visibile....but it has not got in the way of any finishing concerns...

    Sarge..... not sure what you mean about the tape... lol But, I'm sure you'll fill me in.

    Mike.... and then, on the other hand.... some of them seem to take forever. It all depends on what sort of "groove" is going on. On this particular box, I started Sunday around noon and the groove was definitely on! Plus... I have a deadline on this one, and two more ... by July 17th.

    The two more are to be made out of the scraps of this one. It's going to my niece as a display for her wedding photography biz... she's making a keepsake box as a menu item.... might be a nice little gig. The "scrap" boxes are going to be samples..... for the bridesmaid or flower girl... or brides mother.... suppose to be a matching thing all out of the same wood. We'll see how that goes.

    By the way... I'm going to "frame" a picture on the inside of the lid with Bird's Eye Maple.... ought to be fun.... I drew up how to cut that up too. The picture will be a 5x3.... and here's how that's going to be done...

    I forgot to draw in the dims for the width.... but, I'll tell ya... sketchup shure helped out on figuring this one out. The length of the piece represents the length of the hole that I have to fill. The guidelines represent the cuts that I have to make to obtain the width and center the 5x3 photo..... Gonna waste a little bit of BEM, but I'll find a use for it somewhere down the line. After all, the BEM that I'm using is resaw scrap left over from a project from about a year ago. Should look pretty cool when I get it in there.... I might work on that tonight... I don't feel like sanding this evening.....


  13. #13
    Join Date
    Feb 2008
    Location
    Flowery Branch, GA
    Posts
    729
    Blog Entries
    1
    Well... the Bird's Eye Maple wound up fitting rather nice... Now I'm thinking about chopping off an 1/8" all the way around it and put some ebony in there for a transition..... Think I'll do that tomorrow... The pic is Jayce, my niece's son.....


  14. #14
    Great thread, Ed. I'm gonna give it a shot!

  15. #15
    Join Date
    Feb 2008
    Location
    Flowery Branch, GA
    Posts
    729
    Blog Entries
    1
    Yup.... the ebony was a good idea.....


Posting Permissions

  • You may not post new threads
  • You may not post replies
  • You may not post attachments
  • You may not edit your posts
  •