Page 1 of 2 12 LastLast
Results 1 to 15 of 28

Thread: New Home For Precious Cargo.

  1. #1
    Join Date
    Mar 2007
    Location
    Stony Plain, Alberta
    Posts
    2,702

    New Home For Precious Cargo.

    Good Day To The Creek!

    With my Neander Haven project behind me its time for another cradle as our second grandchild will be here soon and she will need a home for the first few months.
    I made a cradle a little over a year ago and thought that it would go from daughter in law 1 to daughter in law 2.
    When gently asked we were told the tiger maple cradle made for our first grandson was not going to British Columbia.
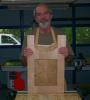
    Here are a couple of pic of the first one.
    Tiger maple with birds eye flat panels. Finished with tung oil and wax.

    cradle pictures 033.jpg cradle pictures 017.jpg

    cradle pictures 030.jpg

    After talking with daughter in law two I found out that she would prefer a darker cradle.
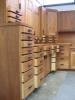
    Not a problem! Went to my lumber guy and picked up a bunch of 4/4, 8/4, and 10/4 walnut and went to work.
    After planing down some of it I had to call upon Mr. Keeton for his advice on walnut as he seems to be our resident expert on it...
    Having never really worked with it it was hard for me to figure out how much of the "light wood" should get into the project.

    IMG_0110.jpg

    Thanks John for helping me through the first phase.
    After careful picking and one more trip to my lumber guy I was ready for the two side and ends.
    Sides are straight forward mortise and tenon joints. Both spindles and rails are 3/4" so every thing will end up flush with each other.
    My machines can get every thing very close but to get that sweet fit all the tenons were hand fit. 15 spindles on each side. So a ton of M/T to do...
    Having so many parts all have been labeled with tape so they will go into there proper holes.

    IMG_0112.jpg

    With this phase done it is machining the parts for the two sides and getting the panels glued up.

    Thanks for taking a quick look.


    .
    Last edited by gary Zimmel; 07-03-2009 at 11:38 PM.

  2. #2
    Join Date
    Nov 2007
    Location
    NW Indiana
    Posts
    3,090
    I really like the light colored one and am certain that the walnut one will be just as nice.

  3. #3
    Join Date
    Dec 2006
    Location
    Atlanta , Ga.
    Posts
    3,970
    Beautifully done, Gary. I really like the simplicity of design and I have to do one soon. Question.. how wide is the foot base.. and how wide is the upright leg? I'm guessing 1 1/2" on the foot and about 2 1/4" x 2 1/4" on the leg... how close did I come?
    Sarge..

    Woodworkers' Guild of Georgia
    Laissez Les Bons Temps Rouler

  4. #4
    Join Date
    Mar 2007
    Location
    Stony Plain, Alberta
    Posts
    2,702
    Sarge

    The legs are 2 1/4" X 2 1/4" and the feet 1 1/2". Good call...
    Leg length is 35 1/4" and the feet 10" with a 3/4" tenon.

  5. #5
    Join Date
    Mar 2007
    Location
    Stony Plain, Alberta
    Posts
    2,702
    The panel I had little trouble with.
    Not that they were a bad glue up but I didn't like the way they looked joined.

    IMG_0129.jpg

    It was off to the lumber guy again and I found a great piece of walnut.
    About 14 inches wide....
    This is what was left after the two panels were made.
    IMG_0130.jpg

    Great piece for my panels. Ripped it in half, did a bit of machining and joined them back up. Panels are 3/8" thick.
    They look great in the ends.

    IMG_0135.jpg

    The ends are cut at a 5 degree angle which is not the end of the world.
    It's getting the tenons done so the shoulders fit snug against the stiles.
    As the top is rounded one would have to reset the miter gauge to 5 degrees a second time
    and getting both exact was very tough on the first one.
    A bunch of fiddling with a shoulder plane to get everything to fit just so.
    This time I opted to do loose tenons.
    Did grooves on all four pieces and popped a loose tenon in.
    Much quicker and a ton easier this time.

    And the ends and sides are ready to be joined...
    On the ends you may be able to see the loose tenons run a bit proud.
    The will be brought flush with a chisel.

    IMG_0123.jpg


    .
    Last edited by gary Zimmel; 07-04-2009 at 9:16 AM.

  6. #6
    Join Date
    Apr 2004
    Location
    Saddlebrooke, AZ
    Posts
    530
    Gary,
    Looks like you are on your way to another classic project! Nice job!

    Jim

  7. #7
    Join Date
    Mar 2007
    Location
    Stony Plain, Alberta
    Posts
    2,702
    I did a test fit with the sides and ends and didn't like the way everything looked.
    The first cradle was built around the mattress. and was about 32 1/2" long.
    Plans called for 36" and with one spindle gone the length will be a bit over 34".
    So now the sides and ends meet.
    2 1/2" screws hold everything together and will be hidden by buttons.

    IMG_0125.jpg

    End plants are installed on the top parts of the end to span across the joint.
    The cradle is sitting on the 10/4 which will end up being the legs and feet.

    IMG_0136.jpg

    Here is a shot of the loose tenon.
    That's not glue just a little spit to make it show up better...
    I added a extra screw on the ends. It's not that I am not confident in the joinery with the loose tenon
    but this will be the home for a few months for a very special person and it will be bomb proof...


    .

  8. #8
    Gary, glad you decided to share this with the creek! I felt like I was keeping some deep military secret knowing this was in progress

    The one thing you have failed to do is this - grandbaby production has a way of kicking in full steam. Perhaps doing these in pairs, threes, fours... might be wise

    Great job, and another chance to show off the neander corner in the background!! Which, BTW, is aging nicely!

  9. #9
    Join Date
    Dec 2006
    Location
    Atlanta , Ga.
    Posts
    3,970
    Thanks for the dimention confirmation and the added leg height. I would have guessed 37" on that which would probably be fine. I used to have a good eye out to around 1000 meters once upon a time when I weilded a sniper rifle but... age changes eye-sight and I would fall more into the 5 meter range at this point.

    Happy 4th to you and yours....
    Sarge..

    Woodworkers' Guild of Georgia
    Laissez Les Bons Temps Rouler

  10. #10
    Hi Gary,
    Very nice cradles. I love the curl. One question: Did you make a way to lock the cradle so it doesn't rock to the side when the little one moves to the side? A plan I followed from a magazine on a couple cradles used a sliding peg which would come loose sometimes. On subsequent cradles I made a spring loaded peg that was much more effective. Again, great work!

  11. #11
    Join Date
    Oct 2006
    Location
    Harvey, Michigan
    Posts
    20,804
    Gary - very nice work on the curly maple/birdseye cradle! I can understand why the family did not wish to part with it!

    The walnut cradle is going to be just as beautiful! Nice work! Looking forward to seeing it finished!
    Steve

    “You never know what you got til it's gone!”
    Please don’t let that happen!
    Become a financial Contributor today!

  12. #12
    Join Date
    Mar 2007
    Location
    Stony Plain, Alberta
    Posts
    2,702
    Bob
    The cradles have locking pegs from both ends.
    As nothing is perfect they seem to work a bit against each other and stay in place.
    Great idea with a spring loaded one though..

  13. #13
    Join Date
    Mar 2009
    Location
    Upstate South Carolina, USA
    Posts
    176
    Those are heirloom pieces. They will still be appreciated 100+ years from now. Good work.

  14. #14
    Join Date
    Mar 2007
    Location
    Stony Plain, Alberta
    Posts
    2,702

    Cutting Down on the Waste

    There was a bunch of pieces that I did not want to use in the
    main body of the cradle. Being new at this walnut stuff I ended
    up with a few boards that were not to my liking.
    The bottom was the best place to hide these pieces and cut down
    the amount of waste that I would have.
    Bottom is 1/2" thick.
    Making sure for wood movement it is 3/16" short end to end
    and 1/16" from side to side.
    The sides are cut on a 5 degree angle to give it a clean look.
    (Even though it is under the mattress)

    IMG_0126.jpg

    Kind of looks funky...
    Now its time to work on the legs and feet.


    .

  15. #15
    Join Date
    Mar 2007
    Location
    Stony Plain, Alberta
    Posts
    2,702
    Double shift in my shop this Saturday.
    A ton of work done on the legs and feet.
    Funny how my wife didn't say anything.
    I think see wants to see the cradle finished...

    The 10/4 stock go machined done to 2 1/4" and the legs were started.
    The second piece went threw the bandsaw and was cut down to just over 1 5/8'.
    Never now when I will need another thin piece.
    And too frugal to put all that stock into the dust collector.
    Final thickness of the feet are 1 1/2".

    And now I had something to work with.

    IMG_0127.jpg

    Holes were now drilled in the legs to accept the pegs and bolts.
    And all the mortices done where needed.

    IMG_0128.jpg

    A quick trip to the bandsaw and the feet had the curves put in.
    Spindle sander made easy work of cleaning up the bandsaw machine marks.

    IMG_0132.jpg

    With the legs and feet done I now can do the tenons on the blocks above the feet.
    After that the curves will be done on the small blocks.

    IMG_0133.jpg


    .

Tags for this Thread

Posting Permissions

  • You may not post new threads
  • You may not post replies
  • You may not post attachments
  • You may not edit your posts
  •