Cad plated steel is usually found in aerospace and some auto fasteners but not much else. Hardware round rod, if plated, is normally plated with zinc. At a decent hardware store, the steel is 307A which is generally referred to as Grade 2.


 Member
Cad plated steel is usually found in aerospace and some auto fasteners but not much else. Hardware round rod, if plated, is normally plated with zinc. At a decent hardware store, the steel is 307A which is generally referred to as Grade 2.
 [OP]
Member
[OP]
Member
I'll pick up some of the unthreaded round bar stock at one of the local home center stores and try some experiments with it. That'll be cheaper than ordering from McMaster-Carr anyway.
[OP]
Member
I've made a little progress on the infill rebuild.
Got the old burned wood excavated from the body and discovered I've got three pins to cut out.
IMG_1820.jpg
The fire seemed to have pretty much charred the entire infill. Here's one of the bigger pieces that came out that left a little of the original grain. It doesn't look like this plane originally had Ebony in it. It sort of looks like Rosewood, but that's just a guess.
IMG_1827.jpg
After cutting out the pins flush to the inside of the body, they were filled smooth.
IMG_1843.jpg
Now I'm debating on what to do for the infill. Either Mesquite or Cocobolo.
IMG_1832.jpgIMG_1861.jpg
While the Cocobolo has some really interesting face grain, none of that will be visible inside the body. Also, the Cocobolo's edge grain is pretty bland. The Mesquite has some interesting edge grain that I think would look nice in the body.
Member
I'm not familiar with mesquite, but I'll relate what is generally observed about infill planes. One of the reasons that they were filled with rosewood wasn't just aesthetics, though that certainly played a part - infill planes were enormously expensive compared to the wooden planes they replaced, and the later metal cast planes that they competed with, so the perception of quality was inportant to the success of the maker.
However, one of the aspects of rosewood and ebony that make them attractive to the infill maker is density and stability. The density was important because the intent was to make the planes quite heavy so that they would better work hard, dense wood. Stability is a relative thing - Karl Holtey has gone to entirely metallic construction in critical areas because he finds the slight expansion/contraction of the wooden infill and its effects on the squareness of the sole and sides to be unacceptable.
However, most other makers accept tropical dense hardwoods as perfectly acceptable, and other species are usually specified based on how well they compare to the traditional infills on density and stability.
Cocobolo would be a close match to Brazilian Rosewood on these terms, as would ebony and other species of rosewoods. I'm not sure about mesquite, as it's not native here in the East and I've not worked it.
[OP]
Member
Mesquite, in addition to being very pretty, works well and is also very stable.
Member
I just looked up rosewood and mesquite densities. Rosewood comes in at 54 lbs / cubic foot, compared with mesquite at 58 lbs / cu ft.
 Member
Wether the steel rods are zinc(which is probably correct,actually,now that I've thought about its appearence),or cadmium,the plating must be gotten rid of. Seeing if a cutoff sample rusts readily could be an easy way to determine if it is unplated. I seldom use that cheap steel because it is not a good turning grade of steel,so I forgot what color the plating is. Cadmium usually has a sort of yellowish cast about it,while zinc is plain gray.
Take a short piece and put it in a flower pot that is in use with a plant in it,and dirt. water the plant,and leave it for a few days,preferably on the porch,or somewhere out of doors.If it shows rust,it is not plated.
[OP]
Member
Cool! So if I go with Mesquite, I won't be losing anything in the way of mass.Originally Posted by Bruce Haugen

[OP]
Member
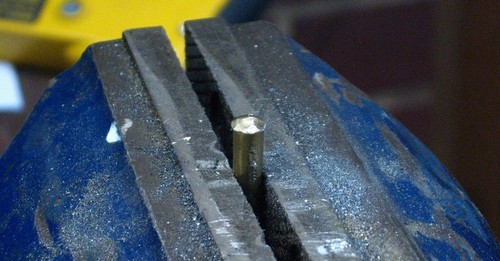
I picked up some round bar pieces today in both steel and brass. For the steel rod, I had a choice between "zinc plated" or "plain". So I got the plain.
I'll try some experiments with peening the brass and steel and see which I like the look of better.
Member
Unless the old holes are arranged in a pleasing way, symetrically laid out,etc. I'd go with the steel. I hope this makes sense. Not necessarily symetrical,but,say,at right angles to each other,or in a straight line,etc.,so they don't just look haphazard.
Member
I agree - and there's a really easy way to get rid of it for those reading the thread other than Michael (sounds like you got what you needed in "plain" steel). I use this to remove the ugly zinc coating off of straight-slotted wood screws, because that seems to be the only way you can buy them nowadays. Simply pull out the citric acid and mix up about 2 teaspoons in a pint of warm water (mason jar works well for this purpose) and dunk the zinc-plated steel parts. You will notice a lot of bubbles being formed on the parts within about 2 or 3 minutes. Leave this for about 45 minutes, then retrieve the parts and wash them off."Wether the steel rods are zinc(which is probably correct,actually,now that I've thought about its appearence),or cadmium,the plating must be gotten rid of. "
If all of the zinc plating isn't removed, it may be that all of the citric acid has been converted to zinc citrate, and the solution is no longer reactive. The easiest thing to do at this point is just add another teaspoon of citric acid and put the parts back in.
I used this method most recently on some hardware for a neanderthal tool box to hold molding planes. Though the chest is dovetailed (for strength), I figured it was inappropriate to put high-style (and expensive) brass hinges, hasp and loop, and chest lifts on it, and while I'd have loved to use wrought-iron hand forged hardware for the chest, that would've been really expensive. So I picked up a Brainard leaf hinge set, set of chest lifts, and a hasp and loop from the local Lowes - total cost was $10. All of them got the citric treatment - the shiny zinc plating said "garden gate" to me, not "old tool chest".
[OP]
Member
I had to read it a couple of times, but I think I got it. To put the whole thing another way:Use steel rod, if the original holes don't have a pleasing pattern to them, because the steel will be mostly hidden. If the original hole pattern is something aesthetically pleasing--using brass will accentuate that pattern.I did a test earlier with an old electrical wall box as it had holes in it that were all ready 1/4" in diameter. Using a Dremel tool and a cone shaped tool I counter sunk a couple of those 1/4" holes. In one I put a piece of the "plain" steel round bar stock and another the brass. The brass was definitely easier to peen and file down. The steel rod wasn't too bad, but took more work to get it peened and a bit more work to get it filed down.
Doing the above experiments also highlighted a potential issue when it comes time to do this on the plane body. When doing the experiments with the electrical box, I didn't care if the blows of my hammer missed or dented the box. But when I do this on the plane body, I'll want to minimize that as much as possible. Any tips on technique or words of wisdom on how to do this?
 Contributor
I didn't care if the blows of my hammer missed or dented the box. But when I do this on the plane body, I'll want to minimize that as much as possible. Any tips on technique or words of wisdom on how to do this?
Hi Michael
Three tips:
Firstly, pre-pein the one end of the rod. This will reduce the amount of hammering needed.
Secondly, on the other side, add blue tape to the body around the areawhich you will be striking to cushion any blows that miss the target.
Thirdly, focus the hammer blows by using a punch.
Regards from Perth
Derek
[OP]
Member
I like this one. Posting the picture, with that tip, made that completely clear.
I had sort of considered this one, but didn't think it would do much good. But done in combination with your third tip, that does sound useful.Secondly, on the other side, add blue tape to the body around the area which you will be striking to cushion any blows that miss the target.
I'll give this a try.Thirdly, focus the hammer blows by using a punch.
Thanks!
Member
Derek means a flat nosed punch,which is an excellent idea that I use myself. thanks for re wording my advice on hole patterns,Michael. when I'm tired I can't get the words right sometimes.
I do urge the use of steel pins.
 Posting Permissions

 Reply With Quote