Page 1 of 2 12 LastLast
Results 1 to 15 of 18

Thread: please help with my bookshelf--it looks like it came from the county fair

  1. #1
    Join Date
    Jun 2009
    Location
    Salt Lake City
    Posts
    1,506

    please help with my bookshelf--it looks like it came from the county fair

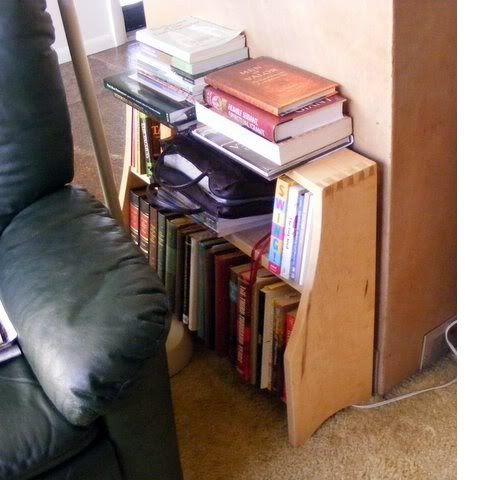
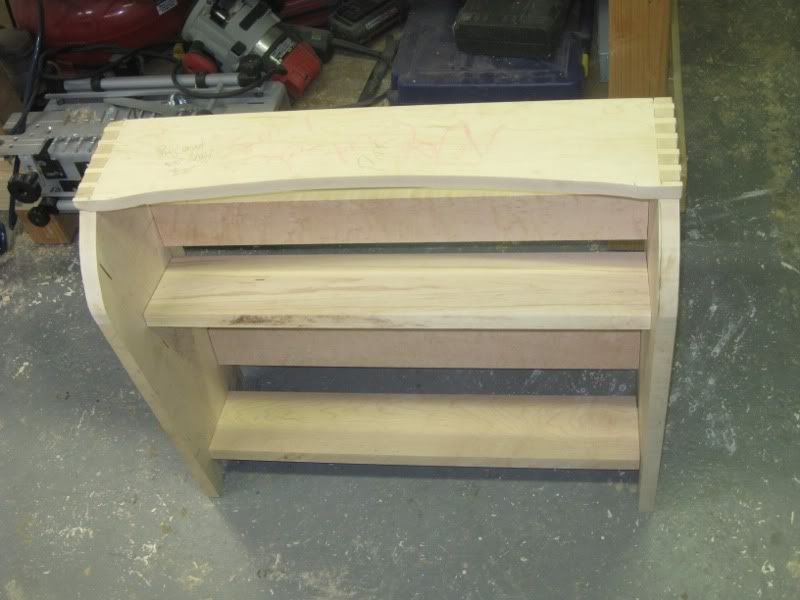
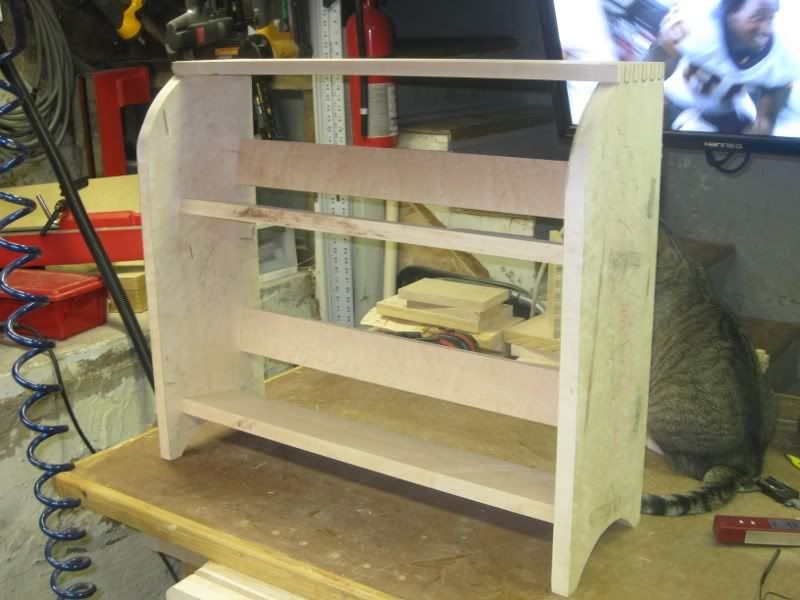
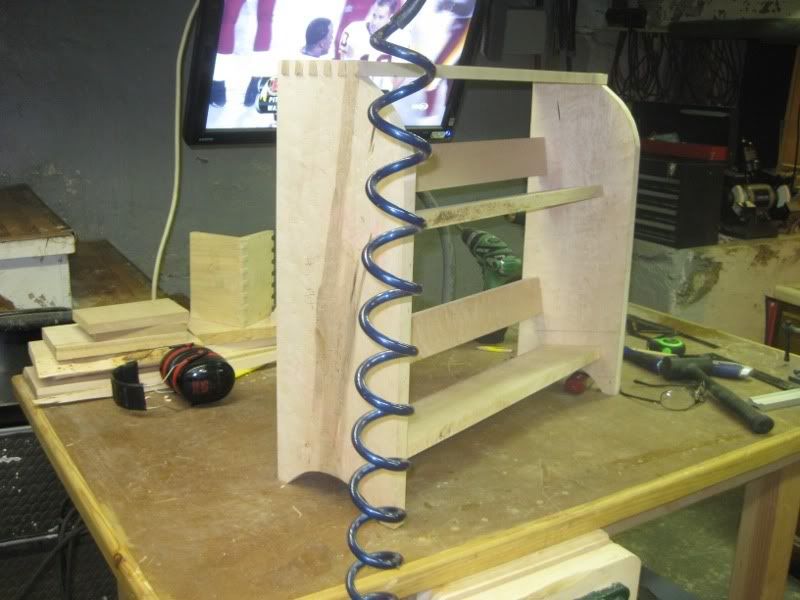
    This is still a relative beginner project. It is a gift for someone who likes contemporary Scandinavian-inspired furniture. I thought I could keep it in a similar vein with the curves, simple lines and the lightness of the maple, but instead I have something that looks like it came from a country boutique. Any suggestions of what I can do to make it feel a bit more modern? It has not been glued yet, so I still have some flexibility.

  2. #2
    Very good description - the country boutique, indeed! It's a nice design, but I entirely see what you mean.

    I don't even know enough to qualify as a "design" novice, but if I wanted to make this piece look more modern, I'd:

    1) Do away with the arch along the bottom/legs. Maybe just square that up so there are two square legs on each side.

    2) Extend the box joint groves in the sides farther down, so that the top of the arch meets the top of the top, rather that meeting the bottom of the top.

    I do really like the curve in the top, though. I think if you extended the groves so the top sets down farther, it will have a more modern look. More than anything, the position of the top is what gives me the "country" feel about this piece.

    Curious: How are the shelves attached to the sides?

  3. #3
    Join Date
    Jun 2009
    Location
    Salt Lake City
    Posts
    1,506
    Thanks. I think you are right about the curve on the sides. The shelves have tenons on the ends which are fitted into mortises in the side panels.

  4. #4
    The little details make all the difference. In this case you need to deal with the edges of the planks. A gentle radius on all the front edges would go a long way to unifying the piece. I see a router in the background there that would make this job pretty easy.

    Next, sand thoroughly and do a nice job on the finish. I would use clear shellac. Sand with 400 grit between coats, especially carefully after the first coat. Put on two or three thinned coats. One advantage of shellac is that it dries very quickly and you could do three coats in one day without any problem.

    After the last coat is dry sand with 400 grit again very gently, just to remove the nubs from dust. I would then put on some paste wax and buff it out with white scotchbrite, which has no abrasives. Rub it until you get an even sheen all over. This will give you a surface that is beautiful and a joy to run your fingers over. A good finish will lift it above county fair level.

  5. #5
    Join Date
    Jun 2009
    Location
    Salt Lake City
    Posts
    1,506
    I happened to have a picture of the bookshelf in action e-mailed to me today. I didn't have a chance to take a picture when I finished it. It is mostly covered up with my grandparents' books now, but I thought it turned out pretty well for one of my first projects and my first time with dovetails.


  6. #6
    Join Date
    Mar 2007
    Location
    Jacksonville, FL
    Posts
    733
    I think it could use a general "lightening up". Take some material off the front edge of the sides by making a nice graceful concave curve that blends right into the top shelf. The top shelf as it stands now looks too much like it was stuck on as an afterthought.

    You might also consider making the stock thinner if possible particularly on the sides. You can give the effect of thinner stock by cutting a deepish bevel on underside of the leading edges.

    Consider cutting some kind of curve in the back slats and maybe even the shelves themselves if you can do it and still have the shelves be functional.

    This looks like you've done a nice job with the construction so far, I hope this doesn't come across as too critical and might be of some help...
    "History is strewn with the wrecks of nations which have gained a little progressiveness at the cost of a great deal of hard manliness, and have thus prepared themselves for destruction as soon as the movements of the world gave a chance for it." -Walter Bagehot

  7. #7
    Join Date
    Dec 2006
    Location
    Tucson
    Posts
    5,001
    Blog Entries
    1
    I will give you credit, you executed the project with many good ideas. You just need to work on the flow of the lines and transitions from one piece to another. I always look at every project as practice for the next one. This is good for 2 reasons, 1, I'm never as good now as I will be next time and 2, I gt better at reflecting on the past. In your case here you might soften some edges. That could go a long way. Good luck.
    What you listen to is your business....what you hear is ours.

  8. #8
    Join Date
    Aug 2004
    Location
    Baltimore, Md
    Posts
    1,785
    Quote Originally Posted by Don C Peterson View Post
    I think it could use a general "lightening up". Take some material off the front edge of the sides by making a nice graceful concave curve that blends right into the top shelf.,,,

    My thoughts exactly. I would also get out the block plane and round over those edges (even the corners of the dovetails) I think the arches in the legs are good because of uneven floors, but you might want to 'oval' then _vs_ a spherical shape.
    "The element of competition has never worried me, because from the start, I suppose I realized wood contains so much inspiration and beauty and rhythm that if used properly it would result in an individual and unique object." - James Krenov


    What you do speaks so loud, I cannot hear what you say. -R. W. Emerson

  9. #9
    Join Date
    Jun 2009
    Location
    Salt Lake City
    Posts
    1,506
    Thanks. Just to clarify, the bookshelf in the bottom picture is the same one in the top pictures. It was finished and given away months ago.

  10. #10
    Join Date
    Oct 2006
    Location
    Bloomington, IL
    Posts
    6,009
    Can't help you on the design BUT After about the fifth look I saw the cat. LOL.
    Glad its my shop I am responsible for - I only have to make me happy.

  11. #11
    Join Date
    Jun 2009
    Location
    Salt Lake City
    Posts
    1,506
    Yeah, she likes to hang out down there. She only runs if I turn on something really loud like a router. Sometimes she will just sit and watch for hours.

  12. #12
    Join Date
    Feb 2003
    Location
    McKean, PA
    Posts
    15,662
    Blog Entries
    1
    I like the look of the finished shelf much more than the unfinished one. The end result looks very good.

    However, I noted some burn marks on the unfinished version which indicate that your TS could use some alignment. Aligning the saw will make it cut more efficiently and lessen the work you will face sanding out the burn marks.
    Lee Schierer
    USNA '71
    Go Navy!

    My advice, comments and suggestions are free, but it costs money to run the site. If you found something of value here please give a little something back by becoming a contributor! Please Contribute

  13. #13
    Join Date
    Oct 2009
    Location
    Frostbite Falls, VT & Westchester, NY
    Posts
    110
    Quote Originally Posted by Bill Wyko View Post
    I will give you credit, you executed the project with many good ideas. You just need to work on the flow of the lines and transitions from one piece to another. I always look at every project as practice for the next one. This is good for 2 reasons, 1, I'm never as good now as I will be next time and 2, I gt better at reflecting on the past. In your case here you might soften some edges. That could go a long way. Good luck.
    Great advice from a master of the craft. Check out some of his beautiful creations some day if you want to be truly inspired.

    Quote Originally Posted by Zach England View Post
    Thanks. Just to clarify, the bookshelf in the bottom picture is the same one in the top pictures. It was finished and given away months ago.
    I think the final profile is a huge improvement over your first attempt, reminds me a bit of some of the designs in an old set of books "Nomadic Furniture" that I've got in a box somewhere. Very nice jointery work so keep at it, the more pieces of wood you cut, slice, route, drill, sand and finish the better your finished pieces will become. There are some real artisans here on SMC so don't hesitate to ask them questions, explore their photo galleries, search for their advice, comments & suggestions. I can't imagine that there's much in woodworking this merry band of wood butchers haven't already done hundreds of times over.
    [SIGPIC][/SIGPIC]
    Winter's coming!

  14. #14
    Join Date
    Dec 2006
    Location
    Atlanta , Ga.
    Posts
    3,970
    You've already gotten advice on the curves flowing and the edges softned so I won't comment. But... I wanted to comment that the finished product is a major improvement over the proto-type design. The original has an outside curve on the sides and you did a make-over to an inside curve which put it in a different league look wise. Major improvement and you should be proud as a first piece IMO. Always room for improvement but... I can say the same for mine after butchering pieces for 39 years now.

    Keep on and you will see yourself progress as you learn new things every time you do project.

    Regards...
    Sarge..

    Woodworkers' Guild of Georgia
    Laissez Les Bons Temps Rouler

  15. #15
    Personally, I like your finished bookshelf. I wouldn't change a thing. I agree that the 1st pic could do with some adjustment, but your finished piece looks great. The dovetailed shelf is executed well and nods subtly to quality. I like the curves of the sides and the arches.

    It 'feels' proper and not in need of modification IMHO.

Posting Permissions

  • You may not post new threads
  • You may not post replies
  • You may not post attachments
  • You may not edit your posts
  •