Results 1 to 13 of 13

Thread: Second Attempt at Splined Box (Bubinga Ambrisia Maple)

  1. #1
    Join Date
    May 2009
    Location
    Denver, CO
    Posts
    97

    Second Attempt at Splined Box (Bubinga Ambrisia Maple)

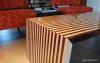
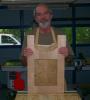
    Made from Bubinga and Ambrosia Maple, w/ BB PLy for the bottom. Some progression pics from the beginning:

    Bubinga & Ambrosia Maple Box (July 2009) 001.jpg

    Bubinga & Ambrosia Maple Box (July 2009) 002.jpg

    Bubinga & Ambrosia Maple Box (July 2009) 004.jpg

    The splines and top cut, glued and sanded in prep for finishing:

    Bubinga & Ambrosia Maple Box (July 2009) 006.jpg

    Bubinga & Ambrosia Maple Box (July 2009) 007.jpg

    Finished with General Seal-A-Cell & 6 coats of General Arm-R-Seal Gloss; hinges and a top coat of paste wax
    Please try to explain what you think you don't understand!!

  2. #2
    Join Date
    May 2009
    Location
    Denver, CO
    Posts
    97
    Submitted the last thread w/o the attachments of current progress:

    Bubinga & Ambrosia Maple Box (Sept 2009) 002.jpg Bubinga & Ambrosia Maple Box (Sept 2009) 003.jpg Bubinga & Ambrosia Maple Box (Sept 2009) 004.jpg Bubinga & Ambrosia Maple Box (Sept 2009) 005.jpg Bubinga & Ambrosia Maple Box (Sept 2009) 006.jpg

    Plan to folck the bottom only (black) and add a small Bubinga frame on the front for a picture.

    More to come.

    Thanks for checking it out.

    T
    Please try to explain what you think you don't understand!!

  3. #3
    Join Date
    Mar 2006
    Location
    SoCal
    Posts
    22,513
    Blog Entries
    1
    I think that came out very, very nice. Cool figure.
    "A hen is only an egg's way of making another egg".


    – Samuel Butler

  4. #4
    The box is beautiful. Really nice job on the finish too.

    One question though. I know the construction of the top is somewhat standard on boxes as I have seen it often. I was just wondering, what will happen to the miters when the maple wants to move a bit? I'm not trying to bust your chops but I have been hammered over and over again through out my woodworking education to always work with the movement of the wood.

    It seems as though some woodworkers just ignore it all together and everything is just fine.

    I visited with Sam Maloof about 2 months before he passed away. I was in his sitting area off of his dining room and noticed that the dining room table top was screwed and plugged into the apron across the grain. I say "Sam, how do you account for woodmovement when you build your pieces and this table for that matter?"

    Sam laughs " I just build it and dont worry about that silly stuff. That table is over 50 years old and looks pretty good to me."

    I agreed the table looked fantastic but I was a bit confused.
    Fullerbuilt

  5. #5
    Nice looking box. I like the spacing of the splines. Great finish.

  6. #6
    Join Date
    May 2009
    Location
    Denver, CO
    Posts
    97
    Eiji, that's a great question about the wood movement and really one I should have asked myself before moving forward.

    To be honest, I really hadn't planned for the wood movement when building the top. I know I should have, though. I don't have to much experience in knowing how wood will move and to what degree, so I'll probably just have to see how it does move and put that in the memory bank for future projects. I'm learning mostly by trial and error. Keeps me humble.

    I would've loved to have met Sam Maloof.

    Thanks looking and for the comments guys.

    T
    Please try to explain what you think you don't understand!!

  7. #7
    Join Date
    Dec 2006
    Location
    Atlanta , Ga.
    Posts
    3,970
    Very nice Todd. And I would tend to think you should take Sam Maloof's take on wood movement as stated by Eiji. I think that it has been over-promoted much as .000 tolerances on machines. Especially on a small item as this and the wood is basically sealed from moisture.

    I do mainly large carcass and if I were worried about every way a piece of wood can move in joinery and assembly.. I would probably design every project where is was made from one board. But.. not much would get made as it leaves little room to create with imagination of what if...

    BTW.. I do make provisions on larger table tops but for the remainder of the carcass I agree with Mr. Maloof on so what... in 38 years I have only had one failure and admittedly I used a piece of wet wood in a table top as it was on hand after I decided to enlarge the top from my original plan. So.. I had to build a new top which took about two days... So What!
    Sarge..

    Woodworkers' Guild of Georgia
    Laissez Les Bons Temps Rouler

  8. #8
    Join Date
    May 2009
    Location
    Denver, CO
    Posts
    97
    Thanks John. I really didn't ever think about the wood movement when designing it.

    I'm still in the learning stages of box making so if it did move to the point where it threw the whole thing out of whack, I'd just chalk it up to experience and go on to the next one.

    My main focus at this point is that I want to get some different technique's down, see which ones work/look better both visually and functionally, which are more efficient time wise, build better jigs as I go and work with different woods to cut my teeth and get some time under my belt in building these.

    My next few boxes I want to try some different degree splines (rather than 90*), hidden splines in the miters, adding different style bases (as opposed to dado's w/ ply) and trying lids with rabbets.

    T
    Please try to explain what you think you don't understand!!

  9. #9
    Join Date
    Dec 2006
    Location
    Tucson
    Posts
    5,001
    Blog Entries
    1
    This one is a real beauty as well. Bubinga is one of my favorite woods to work with despite the fact that it's a 9 on a 1 to 10 scale in hardness.
    What you listen to is your business....what you hear is ours.

  10. #10
    Join Date
    May 2009
    Location
    Denver, CO
    Posts
    97
    I hear ya there. The couple of splinter's I got from some minor chisel work on the hinge areas felt like it was a 10 on that scale!!!

    I thought I read somehwere that Bubinga could give you some headaches with finish (or maybe it was gluing issues) due to gum pockets, but I really didn't have any issue with finishing.

    If it was gluing issues that the gum pockets created, I didn't run into any, but that could be due to a smaller amoount of glued area on a smaller piece.

    I love the looks of Bubinga.

    T
    Please try to explain what you think you don't understand!!

  11. #11
    Join Date
    May 2009
    Location
    Denver, CO
    Posts
    97
    Here's more pics after I added the picture frame to the front, taped the inside and flocked on the inside base for the tin/urn to set on.

    It's a memorial box for Bodie - our 105# Lab/Shephard mix that died in May of 06. It's only taken me 3+ years to get this done.

    Box dims are 11" x 11" x 6". Made it that tall to accomodate the tin/urn, his old collar and also for the frame on the front.

    Final pics on the next post.

    T
    Please try to explain what you think you don't understand!!

  12. #12
    Join Date
    May 2009
    Location
    Denver, CO
    Posts
    97
    Finished Box with contents. Still learning do's and don't as I go along.
    Probably could've moved the vodka bottles out of the background in the middle picture.

    Thanks for checking it out. Comments welcome.

    T
    Please try to explain what you think you don't understand!!

  13. #13
    Join Date
    Jun 2004
    Location
    KC, MO
    Posts
    2,041
    Nice work Todd!

    The joints are tight and Bubinga is certainly beautiful.....a great tribute!

Posting Permissions

  • You may not post new threads
  • You may not post replies
  • You may not post attachments
  • You may not edit your posts
  •