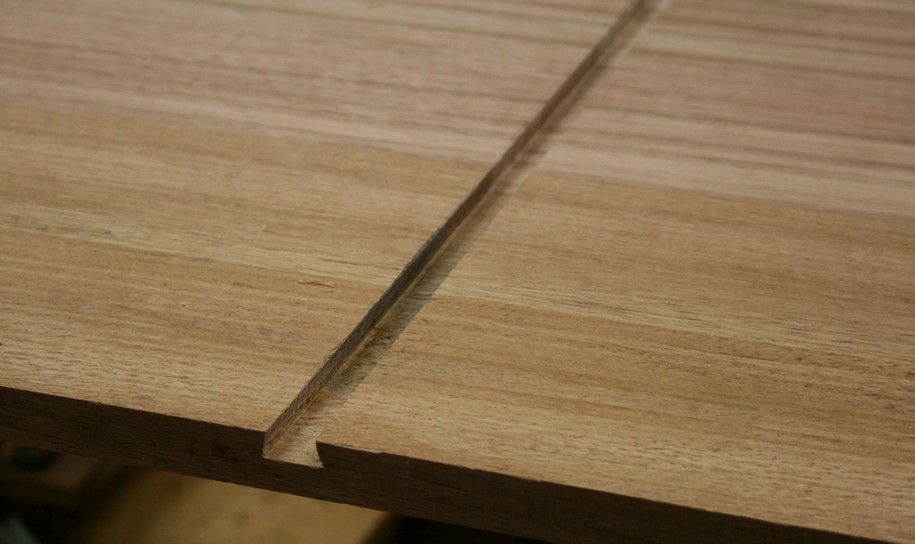
Further to recent posts on sliding dovetails ....
I have updated the article on my website ..
http://www.inthewoodshop.com/Furnitu...lsbyhand1.html
Always interested in critique.
Regards from Perth
Derek


 [OP]
Contributor
[OP]
Contributor
Further to recent posts on sliding dovetails ....
I have updated the article on my website ..
http://www.inthewoodshop.com/Furnitu...lsbyhand1.html
Always interested in critique.
Regards from Perth
Derek
Member
Derek, you make it look entirely too easy.
I really love the look/idea on the sliding dovetails and I guess I'll need to work on some of those guides to try it out.
Thanks for the pics/how-to
 Contributor
Thanks Derek. I have been looking for an article like this for years.
I have tried to do sliding dovetails with little success a couple times. It is the repeatability of the operation that matters I guess.
jim
"A pessimist sees the difficulty in every opportunity; an optimist sees the opportunity in every difficulty."
- Sir Winston Churchill (1874-1965)
 In Memoriam

very nice tutoral Derek, the only thing I do different is test the female part with a short tail section to see if it slides thru all the way and to check for tight spots.
Jr.
Hand tools are very modern- they are all cordless
NORMAL is just a setting on the washing machine.
Be who you are and say what you feel... because those that matter... don't mind...and those that mind...don't matter!
By Hammer and Hand All Arts Do Stand
 Contributor
Wow - That looks really difficult. Makes you appreciate powered routers.
Mike
Go into the world and do well. But more importantly, go into the world and do good.
 Contributor
Whew!! I am worn out just reading thru the article!! Can't imagine doing a bunch of those by hand - just don't guess I am dyed in the wool neander
 Member
Derek,
Looks just the way I was taught.
The only thing I have to add, is that I was taught to use a chisel as a scraper on the male dovetail to adjust the fit. Darn things expand unequally and there is always a high spot to remove just before glue-up.
Mike
From the workshop under the staircase, Clinton Township, MI
Semper Audere!
 Moderator
nice write up as usual. I always enjoy reading your tutorials. So do you apply glue at final assembly
The means by which an end is reached must exemplify the value of the end itself.
In Memoriam
Mike, I made a tool to do that with, LOL
Last edited by harry strasil; 09-22-2009 at 9:39 PM.
Hand tools are very modern- they are all cordless
NORMAL is just a setting on the washing machine.
Be who you are and say what you feel... because those that matter... don't mind...and those that mind...don't matter!
By Hammer and Hand All Arts Do Stand
[OP]
Contributor
The only thing I have to add, is that I was taught to use a chisel as a scraper on the male dovetail to adjust the fit. Darn things expand unequally and there is always a high spot to remove just before glue-up.
Hi Mike
Harry has made so.me amazing tools to tuning sliding dovetails (among the vaste number of creative tools he has made).
I need to add in a few items that I take for granted that now I see others would benefit from knowing about. For example, it pays to chase the base of the tail (the male section) with a sharp knife to get rid of any sides not cleanly cut by the nicker. For fine tuning I will use the dovetail plane or the #79.
Harry has a modified depth stop for the #79. .... Harry, does your mod include an angle (for the dovetail - this is what I plan to make), or is it square?
The other point of note is that I leave the pin/tail intersection at the front of the cabinet a little tight. This gets punched in to make a tight fit. I plan to plane it all down later as well. Zahid, you asked about glue - I do use glue: the front end is the important area to do.
Regards from Perth
Derek
Last edited by Derek Cohen; 09-23-2009 at 1:33 AM.
In Memoriam
Derek, I got my 79 with no depth stop with mine, so I made A depth stop from stainless steel angle and then made the 20 degree guide from 12 ga SS sheet, if you vigorously brush it with a wire wheel, it looks similar to stanleys castings that are nickel plated. the screws were turned on a lathe from SS rod.
Hand tools are very modern- they are all cordless
NORMAL is just a setting on the washing machine.
Be who you are and say what you feel... because those that matter... don't mind...and those that mind...don't matter!
By Hammer and Hand All Arts Do Stand
Member
Harry, what does that tool look like from the other side? What's holding the blade in?
In Memoriam
If you look closely at the keeper, its split in the middle, its a 1/4 in rod split down the middle and formed around the blade, the other end is threaded and its got one of my shopmade, rams horn wing nuts to tighten it.
I love those type wing nuts, so I make them for all my homegrown tools.
I looks just like this one on my little Thumb Router.
Last edited by harry strasil; 09-23-2009 at 5:32 AM.
Hand tools are very modern- they are all cordless
NORMAL is just a setting on the washing machine.
Be who you are and say what you feel... because those that matter... don't mind...and those that mind...don't matter!
By Hammer and Hand All Arts Do Stand
Member
Thank you! Now it makes sense what I'm looking at. That's an interesting idea for holding a blade in place.Originally Posted by harry strasil

 Posting Permissions

 Reply With Quote