Page 1 of 2 12 LastLast
Results 1 to 15 of 30

Thread: HELP!!! : Handcut dovetails

  1. #1
    Join Date
    Mar 2005
    Location
    New Lenox, Illinois
    Posts
    709

    HELP!!! : Handcut dovetails

    I spend most of my time in General Woodwoorking. From time to time I stop in to see the work here in NH.

    I just had the VERY hummbling experience with my first attempt at hand cutting. In short, I have created firewood with a Craftsman Dovetail Saw. ( Of course, it's probaly the finest fire wood on the planet )

    Do you guys have any insite that could help me out. I've been looking at all the videos I can find. I know it takes practice, but what am I supposed to be wporking on first????

    I guess I'm aksing, "What is the basic"????Thanks, Ken
    If you can't fix it with a hammer, you have an electrical problem.

  2. #2
    Join Date
    Feb 2009
    Location
    Whitehorse, Yukon, Canada
    Posts
    1,148
    Sawing to a line... that is to be able to cut to a staight line and to be able to stop at the right place(to the line that deffine the bottom of your DT). and practice, practiceand some more practice!!

  3. #3
    What is it you are trying to do? Blind dovetails in drawers?

    In general, you should master through dovetails first so the spacial relationship between pins and tails becomes routine for you instead of something you have to think about and then draw every time you do them.

    Build some boxes and chests or drawers with through dovetails first. And even learn to cut them on the table saw, band saw and coping saw.

    Other than that whether blind or through it's mostly about accurate layout and cutting on the correct side of the mark. Use knives and awls rather than pencils, and scribe fairly deep to prevent chipping. Those knife marks are part of a well-made joint. And while you don't need special chisels, you do benefit from thin ones with beveled edges. And they must be exceptionally sharp.

    Machine Cut Through Dovetails, with Layout
    http://www.sawmillcreek.org/showthread.php?t=13905


    Last edited by Bob Smalser; 10-02-2009 at 1:45 PM.
    “Perhaps then, you will say, ‘But where can one have a boat like that built today?’ And I will tell you that there are still some honest men who can sharpen a saw, plane, or adze...men (who) live and work in out of the way places, but that is lucky, for they can acquire materials for one third of city prices. Best, some of these gentlemen’s boatshops are in places where nothing but the occasional honk of a wild goose will distract them from their work.” -- L Francis Herreshoff

  4. #4
    My advice from recently beginning down the same road you are on:

    1. Always chisel to the line. The saw (at least my LN DT saw) is not precise enough to cut a finished joint.

    2. Build pairing blocks similar to the ones that Tommy MacDonald (Grand Slam Tools) sells. I'm made some oversized blocks from purpleheart. They make it MUCH easier to maintain the correct angle, as well as ensure you are using the same angles for both pins and tails.

    3. I started using a utility knife for marking, and it works great. Very precise...

  5. #5
    Join Date
    Mar 2005
    Location
    New Lenox, Illinois
    Posts
    709
    Great advise!! Also, I'm using a Craftsman Dovetail saw that was in a box of stuff i bought at an auction. I think I got my money's worth for the$8.00 I paid for the box!!

    What kind of saws are you guiys using??? I was looking at an Adria (sp) made in Vancouver BC.
    If you can't fix it with a hammer, you have an electrical problem.

  6. #6
    Join Date
    Nov 2008
    Location
    Southern Illinois
    Posts
    172
    I recently got an old Diston off ebay, my first back saw, it helped some. Practice on through dovetails first, as others have said. I find a marking gauge and dovetail marker handy. Very sharp chisels, and sneaking up on the mark is probably most important for me at this point.
    Are you making the tails and useing them to mark out the pins? That will help prevent mismatch.

    Jim

  7. #7
    Join Date
    Sep 2007
    Location
    Longview WA
    Posts
    27,481
    Blog Entries
    1
    Ken,
    I am also trying to perfect my dovetail cutting. My past efforts have been less than perfect. Most of them have held together, but the gaps leave a bit to be desired.

    I have been cutting a bunch of practice dovetails in an attempt to improve my skills. It has been helping, but still not there. One thing that came to mind was to try cutting them pins first instead of tails first. That was a shock as the first time this was tried they looked much better along one face.

    There are some who will argue for weeks on end whether tails first or pins first is better, but what ever works for you is the best way.

    There was a link was in another thread here on SMC that lead me to a group of articles on dovetails > http://sandal-woodsblog.com/2008/09/...first-results/ < There are a few links at the bottom that add to the dovetail making tutorial. I have not read the whole thing yet, but will likely do so in the next hour or so.

    jim
    "A pessimist sees the difficulty in every opportunity; an optimist sees the opportunity in every difficulty."
    - Sir Winston Churchill (1874-1965)

  8. #8
    I'm finding that maybe the most important aspect of the saw doesn't have much affect on the end result, and that is comfort. Honestly, as long as the saw is stiff, straight and sharp, I feel like it would do the job. Again, your just removing waste, which is not a particularily precise operation.

    I've done this on a bandsaw, both pins and tails, with very good results (particularily on smaller projects).

    Before you go out and spend $125 on a DT saw, be sure that you have all of the other tools that you need. In addition to a saw, I would say you need a couple of chisels, dovetail layout tool, marking knife (utility knife works well), marking gauge and coping saw or fret saw (unless you want to remove the waste with chisels, which I don't recommend).

  9. #9
    Another tip I learned the hard way:

    If you cut the tails first, when you are trimming the pins to fit, once the tail board just starts to fit onto the pin board, be sure you don't remove any more material from the tops of the pins, and just work to ensure that they are square. The paring blocks are very helpful for final fitting...

  10. #10
    Quote Originally Posted by Ken Shoemaker View Post

    What kind of saws are you guys using???
    A prewar Disston 68. Nice ones can be had for 20 bucks and up.


    But it ain't the saw.
    “Perhaps then, you will say, ‘But where can one have a boat like that built today?’ And I will tell you that there are still some honest men who can sharpen a saw, plane, or adze...men (who) live and work in out of the way places, but that is lucky, for they can acquire materials for one third of city prices. Best, some of these gentlemen’s boatshops are in places where nothing but the occasional honk of a wild goose will distract them from their work.” -- L Francis Herreshoff

  11. #11
    Its been said already but I'll go ahead say it again, Practice.......with a little extra practice thrown in for good measure.

    I started out by practicing laying out and cutting a few through DT's. I then realized that my sawing technique need refinement. So, I'd lay out lines for tails on a 3.5 x 3/4" pine board spacing them about 1/8" apart right side slopes from center to right edge of the board, and left slopes from te center to the left edge. Then I practice following the line to a scribed base line keeping it at a right angle with the top, yadda yadda yadda. The second practice was with the chisels, making sure they were as sharp as I could make them (I use a 1/8 1/4 and 1/2) the most. Then chopping and paring to a line with out damaging it.

    The bottom line for me was solidifying the sawing and chiseling skills first, then laying out and cutting practice joint after practice joint. I tried to make time to do one 3 1/2" joint each time I was in the shop, sometimes more, till my confidence was up to where I could use one in a project. Its a very rewarding learning process!


    HTH!
    Matt


    Oh, the saw I use is one I made from information from The Norse woodsmith's blog. Leif is a true craftsman with excellent skills at tutoralizing it in a way that a bone head such as myself can follow it

  12. #12
    Join Date
    Sep 2007
    Location
    Longview WA
    Posts
    27,481
    Blog Entries
    1
    Quote Originally Posted by Bob Smalser View Post
    But it ain't the saw.
    I will agree with that to a point. Maybe what should be said is the points of the saw. A 5 ppi rip saw will not make good dovetails in smaller stock.

    I have used a Craftsman Gent's saw, a Disston, a Bishop and a few others. The difference of the saws was mostly handle comfort and the smoothness of cut due to the set or ppi.

    My current efforts are with a Bishop saw with teeth cut at 15 ppi by my own hand. Yes, the saw cuts well. No, the teeth do not look professionally cut. There is some unevenness that will be taken out over time with future sharpening. Even a saw that is not sharpened to perfection will do a good job if it will track straight. A saw's tracking is controlled by the set of the teeth and not the hand(s) working it.

    jim
    "A pessimist sees the difficulty in every opportunity; an optimist sees the opportunity in every difficulty."
    - Sir Winston Churchill (1874-1965)

  13. #13
    Ken,

    I had to learn handcut DTs on my own and the Rob Cosman video was a great help. He naturally leans towards Lie Nielsen tools and gives a thorogh demonstration on the difference between a good DT saw like the Lie Nielsen and a cheap one.

    He also covers and shows you the proper sawing techniques to start out with.

    I'm discovering that there are many ways to use handtools - in those many ways, there are right ways and not-so-right ways. Technique in how you hold a tool, your body position, etc. all play small roles in the final result. Having someone show you those things before you create bad habits can be a great benefit.

    I'm in no way close to mastering a hand-cut DT, I have a loooong way to go. But, good tools and a couple videos sure help get you on the right path.

  14. #14
    For the money, there is not much better than the Veritas dovetail saw at $65. Rob Cosman makes a superb saw, but it is $250. I started with the Veritas, and it does a fine job. I prefer the Cosman for the balance and heft, but starting out (or for the long run) the Veritas is a great saw.

    The Cosman DVDs are how I started, and once you absorb them, keep the shopbook and sell the set of DVDs in the SMC Classified forum. They will sell quickly. Or, post a want to buy (WTB) ad to see if someone has a set they will sell.

    But, regardless of the saw, or the method, if you do not have properly ground, and extremely sharp chisels with beveled shoulders, getting a clean dovetail will be difficult.

    Good luck! And, practice, practice, practice!!

  15. #15
    Join Date
    Aug 2003
    Location
    extreme southeast Nebraska
    Posts
    3,113
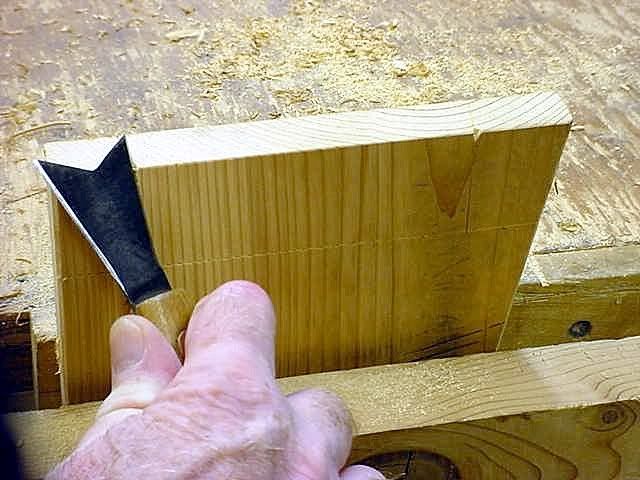
    Don't strangle the saw handle, hold it loosely with your index finger straight out along the top like you are pointing at something, and let the saw do the work, that's what its made for, a little tip for starting in the proper place is to cut out a little V with your marking knife for the saw to start in on the waste side of the line.

    The notch on the right is complete and ready for the saw to start.

    And always saw from the side that is going to show just in case you go a little below the depth line on the back side.

    Last edited by harry strasil; 10-02-2009 at 7:21 PM.
    Jr.
    Hand tools are very modern- they are all cordless
    NORMAL is just a setting on the washing machine.
    Be who you are and say what you feel... because those that matter... don't mind...and those that mind...don't matter!
    By Hammer and Hand All Arts Do Stand

Posting Permissions

  • You may not post new threads
  • You may not post replies
  • You may not post attachments
  • You may not edit your posts
  •