Page 1 of 2 12 LastLast
Results 1 to 15 of 22

Thread: Table saw setup - help needed

  1. #1

    Table saw setup - help needed

    I need some "where do I go from here" advice. I am setting up my Grizzly G0661 table saw. I am using my 12" Starrett combo square to check everything. The blade, an Infinity Super General, is 90 degrees to the table and shows almost no run out using a dial indicator. I checked the miter slot to blade parallel using a block of wood clamped to my miter gauge with a screw in the end of it (saw that tip on here). The head of the screw just touches the same tooth at the front and back locations. My miter gauge, Osborne EB-3, was checked and set to 90 degrees. So, I'm going to say that my miter slot is parallel to my blade and my miter gauge is 90 degrees to my blade. And yet, I cannot make a 90 degree cut when checked with the combo square. So I did a little test. I kept adjusting my miter gauge until the cut came off a perfect 90 degrees. I then checked the angle from the blade to the miter gauge and it is between 91 and 92 degrees. This makes me think my miter slot is not parallel to my blade, but everything above says otherwise. Could the Starrett combo square be that off? I finally had to put everything away last night since I was so frustrated. Frustration + table saw = bad idea! Any suggestions? Anyone in Chicago want to trade some "set up knowledge" for a big helping of smoked carnitas?

  2. #2
    Starrett should be accurate. It's surprising it's off by a whole 1-2degs.

    Try cutting a rectangle out of solid stock. Set yr miter gauge @ 90 deg, cut an edge off a 12" square piece, rotate 90degs, and keep repeating until you have a rectangle. Then test all 4 angles and test the distance between opposite corners.

    Also, do you clamp your piece to the miter gauge? Is there slop in the slot? I know when I free hand thicker stock on my Incra gauge, I can occasionally wander. In the extreme, besides fouling yr cut, it can kickback and scare or hurt you (DAMHIKT).

  3. #3
    Join Date
    May 2006
    Location
    Poland
    Posts
    637
    Hi Dave

    Your initial check of the blade-to-miter slot alignment is very good...

    First, small correction...The miter gauge should be at 90º to the miter slot (or the runner) and not to the blade...

    The fact that you can cut square with the miter gauge, means that your miter gauge scale is not adjusted properly...

    I don't belive that your blade is off by 1º~2º, if it was, any crosscut with the miter gauge would end-up with very bad cut quality and burning marks...

    And if we are already here; for accurate cuts, the rip fence should be aligned parallel to the blade and not the miter slot...

    I'm usually setting the blade like you do (I call it static check) and then, I make a "dynamic check" with the blade at full speed for fine tuning..

    Regards
    niki

  4. #4
    Join Date
    Feb 2003
    Location
    McKean, PA
    Posts
    15,664
    Blog Entries
    1
    Since you have a dial indicator, attach the dial indicator to the block of wood you attached to the miter gauge and use the body of the blade to check that the blade is set parallel to the miter slot, you'll get a more accurate reading than with the screw touching a tooth method.

    Check your square by using a factory edge on a piece of plywood or mdf and draw a line along the length of the blade of the square. Flip the base 180 so the square is on the other side of the line you just drew and teh same edge of the blade is toward the line. If the edge of the square doesn't line up with the line your square is off.
    Lee Schierer
    USNA '71
    Go Navy!

    My advice, comments and suggestions are free, but it costs money to run the site. If you found something of value here please give a little something back by becoming a contributor! Please Contribute

  5. #5
    Quote Originally Posted by Nissim Avrahami View Post
    Hi Dave

    First, small correction...The miter gauge should be at 90º to the miter slot (or the runner) and not to the blade...
    I'm a little confused by this statement. Why would the miter gauge not be 90 degrees to the blade. Does it have something to do with the way the teeth are angled? I will need to try the gauge 90 degrees to the slot and see how that works. Thanks for any and all suggestions!

  6. #6
    Join Date
    Jan 2009
    Location
    Mosby's Confederacy
    Posts
    657
    Quote Originally Posted by Nissim Avrahami View Post
    ...the rip fence should be aligned parallel to the blade and not the miter slot...
    Thank you.

  7. #7
    Join Date
    May 2006
    Location
    Poland
    Posts
    637
    Quote Originally Posted by Dave Hasson View Post
    I'm a little confused by this statement. Why would the miter gauge not be 90 degrees to the blade. Does it have something to do with the way the teeth are angled? I will need to try the gauge 90 degrees to the slot and see how that works. Thanks for any and all suggestions!
    Hi Dave

    Sorry if it's confusing a little bit so, let me try to explain it in different way....

    Instead of the saw blade, let's install a router bit...the router bit doesn't have "length" and is cutting only in one point, around itself and you cannot "align" it to the miter slot - it's always aligned...

    Now, turn ON the saw (the router bit) and using the miter gauge, cross-cut some piece of wood....if, your miter gauge is at 90º to the miter slot (or the miter gauge bar or runner), the cut will be exactly 90º....any deviation of the miter gauge from 90º to the miter slot, will result in other angle - miter....

    Now, just imagine that the saw blade is at 2º to the miter slot and you are cross-cutting with the miter gauge (to visualize it, draw a line that represents the miter slot and another line at an angle to represent the blade - you can draw the blade at a 5 or 10º just to see it better...

    Let's say that the blade is "toed-in" at the far side (the side near you is wide and the side far of you is narrow).

    What will happen when you will cross-cut with the miter gauge is, the beginning if the cut will hit the wide side but than, the space will get narrower and, or your work will be pushed by the blade to the left or, if you clamp the work, you'll get strong blade marks, burn marks and/or the motor will bog down...yeap, it can also give some nice kick-back...

    And, that will happen at any miter gauge angle not only at 90º...

    Oh, by the way, if you have one of those Digital Angle gauge, you can set your miter gauge to 90º - or any other angle...

    Clamp the miter gauge bar to bench vice while it stands vertically...."click" the Digital gauge (magnet) to the bar and reset it to zero.....now, move the Digital gauge to the miter fence and adjust if to any angle...

    Regards
    niki
    Last edited by Nissim Avrahami; 10-21-2009 at 3:26 PM.

  8. #8
    Join Date
    Feb 2003
    Location
    McKean, PA
    Posts
    15,664
    Blog Entries
    1
    Quote Originally Posted by Nissim Avrahami View Post
    And if we are already here; for accurate cuts, the rip fence should be aligned parallel to the blade and not the miter slot...
    I disagree, One feature of any table saw that cannot be moved is the miter slot. They are factory machines and hopefully the factory did a good job on them. They should be parallel to each other as they were machined by the factory.

    If the blade is parallel to the miter slot then the miter slot is parallel to the blade. However you have to adjust the blade alignment to the miter slot not the other way around. With that being said, it is far easier to align a 30+ inch fence to the length of a 20" miter slot than it is to get it parallel to the 9" of blade exposed above table height. Attach a dial indicator to the miter guage and check the fence all along the length of the miter slot. This will get you parallel and also tell you if the fence face is flat.
    Lee Schierer
    USNA '71
    Go Navy!

    My advice, comments and suggestions are free, but it costs money to run the site. If you found something of value here please give a little something back by becoming a contributor! Please Contribute

  9. #9
    Join Date
    Mar 2006
    Location
    SoCal
    Posts
    22,514
    Blog Entries
    1
    I can only speak from my experiences. I just recently went through a whole re-setup of my saw as I had mostly disassembled it to relocate it within the shop. I will ignore tilting the blade or any fence relationships for the sake of expediency.


    • I set the blade parallel to the miter slot that my miter gauge will be run in (in case the miter slots are not parallel to each other).
    • I put some 320 grit sandpaper on the face of my miter gauge to avoid any "slip" of my material.
    • I use a square to get the miter gauge eyeballed as close to 90* as I can.
    • I perform the five cut method to finalize my gauge setting.

    The five cut method is clearly explained here. Your gauge fence would replace the diagram element labeled as the crosscut fence. I use this method on all my gauges and sleds; never fails. The sandpaper may be more important than you think. Once I finally took a moment to stick some on, I was very surprised how much easier it is to reliably hold material to the gauge fence.
    Last edited by glenn bradley; 10-21-2009 at 5:09 PM.
    "A hen is only an egg's way of making another egg".


    – Samuel Butler

  10. #10
    Glenn, my miter gauge came with some sandpaper, but I just remembered I never applied it.

    Thanks to everyone for the suggestions made. I will give them a try tonight and see what happens.

  11. #11
    First - is your square ... square? Test it. Don't trust it until you test it. Ever. I don't care who's name is on it.

    Next - set your miter gauge square with the bar that rides in the miter slot. Then make a test cut. I prefer the absolute test over any measuring test - then you don't have to care if your square is accurate. Make a cut in a piece of straight stock with parallel edges about 4" wide or so - make it maybe 6" in from one end.

    Then, take your offcut and flip it fore-to-aft - that is the edge that was riding on the miter gauge fence should be flipped so it is facing out. Slide the two freshly-sawn ends together, referencing the miter gauge fence, or any other straight reference surface. If the cut is square, there'll be no gaps along the cut. If it isn't square, you have some tweaking to do.

    Once you do find square, keep it - devise a means to repeat square everytime.
    Jason Beam
    Sacramento, CA

    beamerweb.com

  12. #12
    So I set my miter gauge 90 degrees (and checked that my square was square) to the miter slot and did the 5 cut thing. My piece was 8" long and the difference from one end to the other was 0.135" 
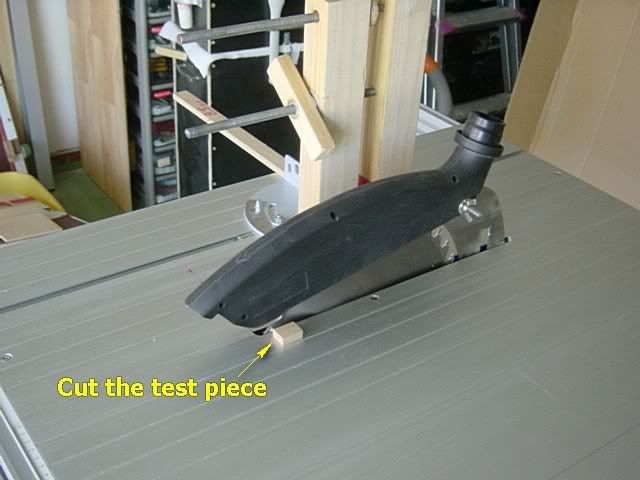
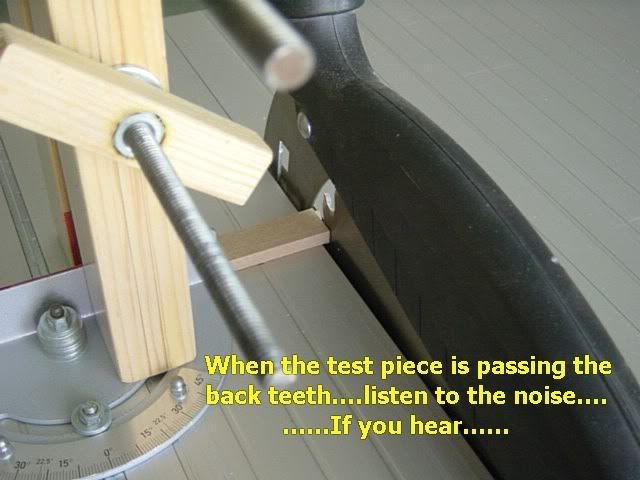
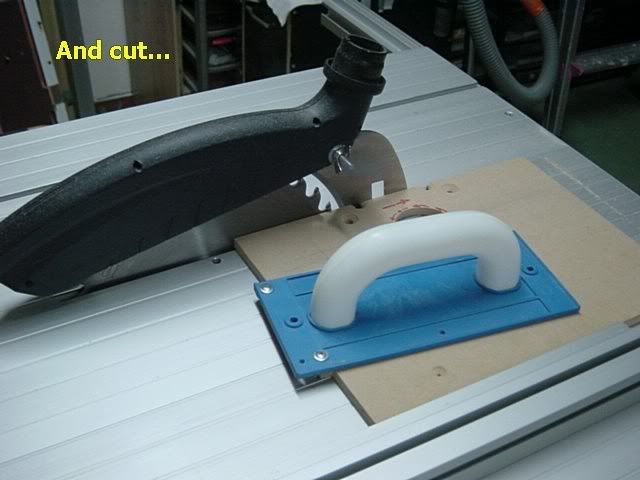
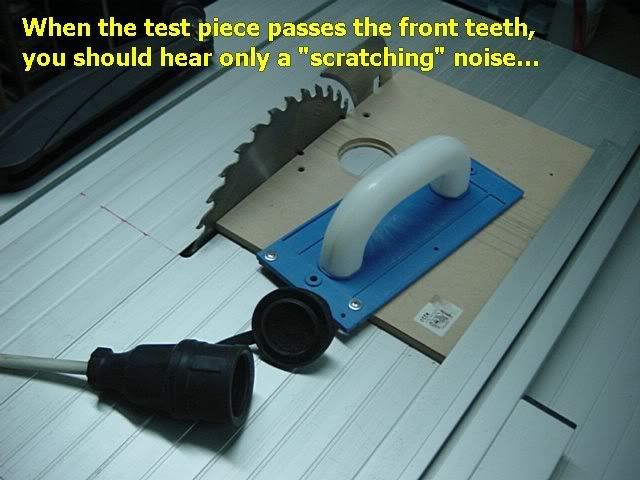
I clamped the wood to the miter gauge each time and noticed something. I pushed the wood all the way thru the blade and after cutting with the front teeth, the back teeth also made a small cut. I'm going to say that this means the blade is not parallel to the miter slot. Before cutting anything I used my dial indicator, as stated above, and the difference from front to back was .003. Would that really make that much of a difference? I was really hoping that wasn't the problem since it looks like a pain to loosen six bolts under the table top. How do you get small, accurate adjustments?

    I think I'm going to take a break for a couple of days and redo everything this weekend. I feel like I'm missing something very obvious!

  13. #13
    I'm by no means an expert here, but went through all of this as well. When you are measuring the distance from the mitre slot to the blad, be sure you are measuring to the same tooth on the blade. So measure the front, slide the dial indicator and rotate the blade to the back and measure again - compare those numbers.

    To make small adjustments a "dead blow" hammer is your best friend. Just loosen the bolts and tap the necessary corner to get things aligned - will take patience and some thought, but its not too bad.

    I would also 2nd the other's comments on aligning to your mitre slots. They are machined in so take advantage of that. Doing this is the best foundation and where all accuracy starts.

  14. #14
    Join Date
    May 2006
    Location
    Poland
    Posts
    637
    Quote Originally Posted by Dave Hasson View Post
    I pushed the wood all the way thru the blade and after cutting with the front teeth, the back teeth also made a small cut. I'm going to say that this means the blade is not parallel to the miter slot.
    I was really hoping that wasn't the problem since it looks like a pain to loosen six bolts under the table top. How do you get small, accurate adjustments?

    I think I'm going to take a break for a couple of days and redo everything this weekend. I feel like I'm missing something very obvious!
    Hi Dave
    On one of my posts, I've said that after checking the "Static" alignment of the blade/slot, I'm fine tuning and checking the "Dynamic" alignment and I don't think that any measuring equipment can bit it...

    The test piece should be of MDF and be sure to lift the blade to "Full high"...

    Regards
    niki


    On this pic (and the next one), I'm showing the blade stationary which is not the case.
    You should push the test piece past the blade while the blade is running at normal speed and listen to the sounds...


  15. #15
    Niki, thank you. Your pictures and descriptions are wonderful (I also understand the dynamic/static argument a little better). I used to have a Ryobi tablesaw but never bothered to set it up properly. I will not make the same mistake twice and keep wondering why everything is "almost right".

    Thank you to everyone here. I refuse to use paypal, so the check will be in the mail soon to become a contributor to this wonderful site!

Posting Permissions

  • You may not post new threads
  • You may not post replies
  • You may not post attachments
  • You may not edit your posts
  •