Page 12 of 21 FirstFirst ... 28910111213141516 ... LastLast
Results 166 to 180 of 302

Thread: Show us your Bench

  1. #166
    Quote Originally Posted by Greg Millen View Post
    ..
    That particular list is usually shown on hardwood flooring websites. What's annoying about it is that everywhere you see exotic woods retailed or products made from them with the claim that they offer woods from hard (LV) to soft (cocobolo), and then quoting that. Be willing to bet that most of them aren't making any products out of lignum vitae, just as none are selling cocobolo products that are barely harder than cherry.

    What most people refer to as cocobolo is dalbergia retusa. It's possible that there was a flooring importer or retailer who was trying to pass something brown and soft off as cocobolo or that whoever was denting wood one day thought they had something that was cocobolo and is not.

    Dalbergia retusa is over 3000, and specific gravity is probably around 0.9-1. Official list? Don't know. A lot of the domestic woods are variable - in density and hardness (suspect the two are correlated quite closely if dryness is the same), which makes a list like that spurious to begin with unless the results are averages.

    The problem with errors like that is when people rely on them to make decisions. If you ordered some cocobolo for a project expecting it to work like other woods in that range, you'd be in for a rude lesson, even without the silica. It makes you wonder how many of the sellers who use that for a guide on their sites have ever even done anything with the wood, or if it doesn't occur to them why cocobolo never seems to dent in handling.

    I should add, I'm not trying to slight anyone on here, it's just something that trips my trigger. A mistake one time is no big deal. When it becomes almost universal, though, it gets quoted and becomes like an old wive's tale. Randy Sohn had a good outlook on those.
    Last edited by David Weaver; 08-19-2010 at 11:12 AM.

  2. #167

    My Holtzapfel

    Seeing as this thread has been revived, thought I would go ahead and post a few pics of my first bench - finished a few weeks back. Pretty much followed the Schwarz article - opted not to include the deadman.

    Specs:
    6' x 24"
    3" top - Ash
    Base - SYP
    Face vise - Veritas Twin Screw w/24" on center, Ash chop w/suede leather face
    Tail vise - Jorgensen 12" quick release
    Walnut drawbores
    Watco Danish Oil finish

    Still need to add the shelf on the bottom - will probably use walnut or SYP w/Walnut dowel accents


  3. #168

    Another Holzthapffel version

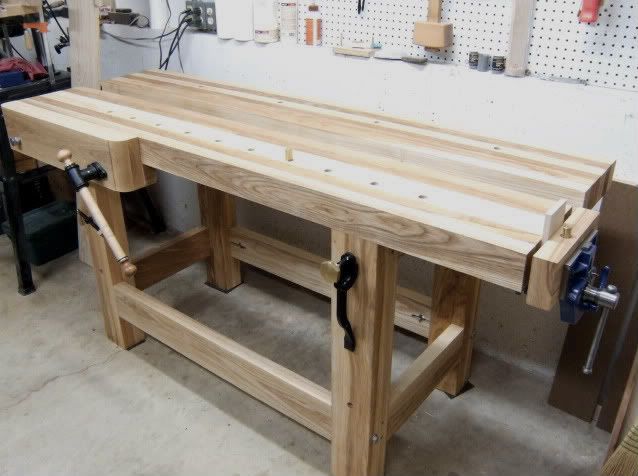
    This one is all ash with the Lie-Nielsen twin screw vise. It also is made to be easily moved and reassembled. The top is two slabs with a tray in between.

  4. #169
    Join Date
    Nov 2009
    Location
    Ellsworth, Maine
    Posts
    1,810
    How do you like your Lie Nielsen Twin Screw Vise? I have been contemplating purchasing this over the LV version as I think it is cleaner in looks and I love to buy locally whenever possible. But in reality it all comes down to function hence my question. I suppose you really can't ever go wrong with LN but I suppose a review on the vise would be more reasuring.

  5. #170
    I'm very happy with the L-N vise. It is not perfect, but the overall quality and function are excellent. A quick series of comments since I can refer you to FWW magazine, current issue for a review:

    I much prefer twin screws to a single screw because of the panel holding ability.
    The single handle function is preferable to the LV two-handle, or two independent screws (wood screws). Others may disagree.
    Having the chain enclosed in the vise chop is genius. I made my chop and bench from ash, but you can buy maple ones.
    I find the screw operation slower than I would like.
    There is no adjustment for the timing of the vise screws. That means that you can't move one end of the jaw in or out to make it parallel with the bench top. You have one chance to get this right.

  6. #171
    Join Date
    Aug 2008
    Location
    Portland, OR
    Posts
    528

    Re: Show us your Bench

    I have lurked for a couple years, so I figured my first post should be here, since I recently finished my workbench. I am getting back into woodworking and this time trying to mostly work with hand tools; however I borrowed the use of a couple friends jointers, planers, etc to help build the workbench.

    My workbench is basically the Schwarz Roubo, adding the sliding leg vise of what Roubo called the German bench. Similar to what Jameel Abraham did on his original version, but without the parallel guide rollers. I designed mine to break down for moving.

    The wood is old growth douglas-fir from reclaimed construction lumber via the Rebuilding Center (local remodeling salvage), mostly riftsawn and quartersawn. The vise chops are oregon white oak from Urban Hardwood Recovery, one of the local guys who salvages trees being cut down. Vise screws are ash, from Big Wood Vise. Finish is Sutherland Welles Botanical Polymerized Tung Oil.

    Quite a learning experience, especially the things I did by hand. It's my first workbench so I don't really have anything to compare it to, but it sure beats working on sawhorses and B&D Workmate.
    Attached Images Attached Images

  7. #172
    Join Date
    Apr 2007
    Location
    Mebane NC
    Posts
    1,020
    Nice looking, Andrae. How did you attach the top? If I make one it will have to be knock down. Thanks, Paul

  8. #173
    Join Date
    May 2009
    Location
    Philadelphia, PA
    Posts
    97
    +1 on Paul's question, Andrae.

    I'm toying with building a small Roubo-inspired bench (Small = 20"x36") for my new tiny apartment and knock-down would be required. Strangely, I never thought to wedge the tenons in a knock-down piece (just showing how green i still am behind the ears; or in this case, behind the chisels...). Do you experience any racking or such from it?

    Thanks!
    jake
    Please Pick One of the Following:

    Built Correctly & Within Budget / Within Budget & Done Quickly / Done Quickly & Built Correctly

  9. #174
    Join Date
    Aug 2008
    Location
    Portland, OR
    Posts
    528
    Quote Originally Posted by Paul Saffold View Post
    Nice looking, Andrae. How did you attach the top? If I make one it will have to be knock down. Thanks, Paul
    Well, that's a bit of a story...

    The top is four separate sections of glued up boards. I drilled 3/4" holes in the bottom of the front section, and in the top of the front legs, and used short dowels to hold that section in place. It holds just fine, but if you don't drill your holes straight or in the right place it may not end up flush with the legs. The front edge could be planed down to match afterward though. I ended up with about 1/16" proud, which doesn't really bother me.

    To hold the other sections in place, I used a system of wedges in the back. See second photo, explains it better than text. Well... that idea didn't work as well as I had hoped. You'll never believe this, but wood actually expands and contracts with changes in humidity... crazy, right? I expected to have to re-tighten the wedges periodically, but what I found was that the sections twisted and buckled, undoing all the work I did planing the top flat.

    So I added stopped sliding dovetails on the underside. That helped a lot, but, being my first time with sliding dovetail joints, they weren't an absolute piston fit. So there still was some movement I could see or at least feel on the top.

    Therefore as a last resort, I bought some long lag screws and screwed each section to the one in front of it. The dowels are still necessary to hold the top in place, and I left the wedges and sliding dovetails as well. Then I planed the top for about the fourth time.

    After my various experiments, I recommend gluing the entire top together if possible. I wanted to be able to assemble / disassemble the bench by myself, but the sectional top really created extra work and less-than-ideal results. If not gluing the top altogether, I think lag screws, or threaded rods running all the way through, or some similar mechanical fastening is the way to go.

    As far as holding the top down on the workbench, I really think a couple dowels in front is all you need. I'm sure others will disagree, including Roubo apparently, what with those massive tenon/dovetails attaching the top to the legs. There's nothing wrong with overkill on a workbench but, I think that's overkill. It is worth noting, however, that my design added top stretchers between the front and back legs (to hold the sections of the top, otherwise the middle ones would just fall). Part of the reasoning for mortise and tenoning the legs into the top is to use the top as upper stretchers to prevent racking. If the top is sufficiently heavy, I say the dowels are enough. An alternative would be to assemble the tenons without glue.
    Attached Images Attached Images

  10. #175
    Join Date
    Aug 2008
    Location
    Portland, OR
    Posts
    528
    Quote Originally Posted by Jake Rothermel View Post
    +1 on Paul's question, Andrae.

    I'm toying with building a small Roubo-inspired bench (Small = 20"x36") for my new tiny apartment and knock-down would be required. Strangely, I never thought to wedge the tenons in a knock-down piece (just showing how green i still am behind the ears; or in this case, behind the chisels...). Do you experience any racking or such from it?

    Thanks!
    jake
    Just posted a longer reply to Paul, but to address your question: the tusk tenons are working quite well. So far, only once was I doing some rough planing and the bench was racking a little. I grabbed a mallet and gave each key a good whack, and that took care of it. So I'm sure periodically I will have to do that, but it's not a big deal.

  11. #176
    Join Date
    Jan 2009
    Location
    Williamsburg,Va.
    Posts
    12,402
    The wooden threads on the vise screws look very nice. Good,big threads the way they should be for wood. How did you make them? Usual commercial tap and die sets make the threads too small.

    We had a 1960's vintage German tap and die set at Williamsburg that made 2" screws with 3 threads per inch. the threads were large and appropriate,but the new commonly available sets make threads too small.

    I did see some good German sets in the Dick catalog,but they were something like $1500.00 per set.

    I generally make a tap out of drill rod,and for the threads I'd hold a router at a 45º angle in the metal lathe,and cut beautiful,perfect wood threads. Fortunately,the old wood threads were 90º rather than 60º like metal threads,so feeding the router in at 45º worked perfectly.

    For many antique reproduction spare parts,I'm always having to make a special tap up,so have several on hand by now in smaller sizes,for things like embroidery frames,spinning wheels,etc..

  12. #177
    Join Date
    Aug 2008
    Location
    Portland, OR
    Posts
    528
    Quote Originally Posted by george wilson View Post
    The wooden threads on the vise screws look very nice. Good,big threads the way they should be for wood. How did you make them? Usual commercial tap and die sets make the threads too small.

    We had a 1960's vintage German tap and die set at Williamsburg that made 2" screws with 3 threads per inch. the threads were large and appropriate,but the new commonly available sets make threads too small.

    I did see some good German sets in the Dick catalog,but they were something like $1500.00 per set.

    I generally make a tap out of drill rod,and for the threads I'd hold a router at a 45º angle in the metal lathe,and cut beautiful,perfect wood threads. Fortunately,the old wood threads were 90º rather than 60º like metal threads,so feeding the router in at 45º worked perfectly.

    For many antique reproduction spare parts,I'm always having to make a special tap up,so have several on hand by now in smaller sizes,for things like embroidery frames,spinning wheels,etc..
    I did not make the vise screws, I bought them from bigwoodvise.com, $330.00 for a pair. They are 2" diameter with about two threads per inch, and they look to be 60º. He did a great job, there is just enough space that they turn smoothly, but not so much that they wobble. Unfortunately he is not taking new orders currently (I bought mine over a year ago), but there are at least a couple other makers.

    I really like the wood screws, they open and close fast and the holding power is more than enough. Plus they look cool.

  13. #178
    Join Date
    Feb 2010
    Location
    Ringgold, GA
    Posts
    30

    Thumbs up Show us your bench thread

    Thanks for starting this thread! I acquired american beech for a workbench to build Matt Kenney's monster bench, but by the time it acclimated and got rough milled, some of the top strips had warped, so that my top was going to end up less than the 3" thickness I wanted. Went through Christopher Schwarze's workbench book, visited the creek, visited all of the FWW listings, the workbench page on the web, and several other places. I have both of Jameel's vises, but he has subsequently upgraded the nut on the leg vise. They are still sitting in the box, pending construction of said bench. After a year of study, I finally decide to use 4" x6" SYP lamination for the top, and 6" x6" SYP for the legs. Visited my local sawmill, and have all the pieces in the rough, acclimating. I still have the beech, and will probably still build the Matt Kenney monster bench, as most of the pieces are cut and milled, but decided that the pine bench will get built first, and it will have the Benchcrafted vises installed.
    All of the posts on the creek have been of tremendous help in ending my paralysis. Thanks again.

  14. #179
    Join Date
    Oct 2005
    Location
    Rochester, NY
    Posts
    143

    Bench with vise upgrade

    Here is the bench I built. The top is yellow pine (from an old bowling alley)surrounded by maple. The Noden Adjust a Bench base is awsome, and really helps lessen the back pain when spending long hours in the shop. I just upgraded the face vise with a LN twin screw that has 24 inches between the screws. I built the jaw out of 2 pieces of maple and glued them together like the instructions show. Installation wasn't as bad as I was expecting, getting the screws timed took alittle messing around. I just kept moving the chain on one of the sprockets, link by link, until the screws were timed properly and then mounted it to the bench. The bench is a couple of years old and the top shows no real signs of wear. The top is about 33 inches wide and 72 inches long. I made it that wide since I also use it as an assembly table and have access on all sides. The tail vise is also from LN and is the small tail vise which I don't think they sell anymore. Thanks for looking.
    Attached Images Attached Images

  15. #180
    Join Date
    Nov 2009
    Location
    Ellsworth, Maine
    Posts
    1,810
    Great bench Tom. Great use of reclaimed wood, really isn't even noticably worn at all. And I am super envious of your LN twin screw vise and your adjusta base. That base would be a huge help for me, especially when switching from sawing, chopping, planing, etc. Just seems like the answer to all my back pain.

Posting Permissions

  • You may not post new threads
  • You may not post replies
  • You may not post attachments
  • You may not edit your posts
  •