Page 1 of 2 12 LastLast
Results 1 to 15 of 18

Thread: Layout Tutoral - Circle

  1. #1
    Join Date
    Aug 2003
    Location
    extreme southeast Nebraska
    Posts
    3,113

    Layout Tutoral - Circle

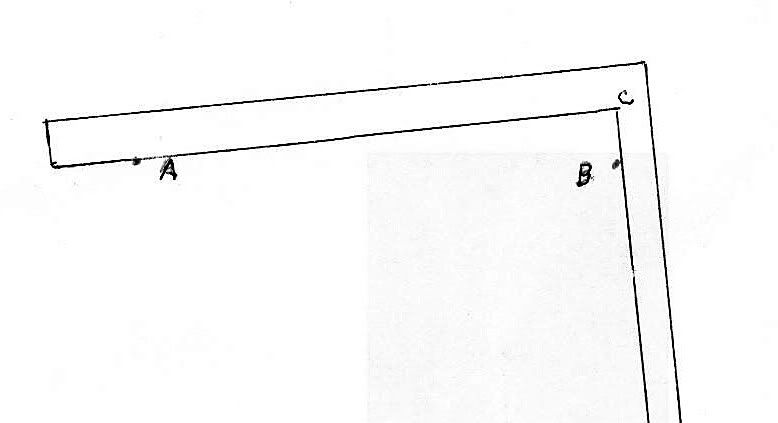
    To Layout a Circle using a square:


    1. Drive small brads the Diameter of the Circle, points "A" and "B".

    2. Place the body of your Square across the points as shown.

    3. Holding the point of your Pencil at Point "C" where the Tongue and the Body meet, slowly move the square, keeping the Square touching points "A" and "B".

    You can draw up to a 14 inch Circle this way and a Larger one by flipping the square and drawing from both sides.
    Jr.
    Hand tools are very modern- they are all cordless
    NORMAL is just a setting on the washing machine.
    Be who you are and say what you feel... because those that matter... don't mind...and those that mind...don't matter!
    By Hammer and Hand All Arts Do Stand

  2. #2
    Join Date
    Feb 2009
    Location
    Whitehorse, Yukon, Canada
    Posts
    1,148
    Realy interesting Jr., I will have to try it some day. I guess the bigger the square the larger the circle?

  3. #3
    Join Date
    Sep 2007
    Location
    Longview WA
    Posts
    27,505
    Blog Entries
    1
    So, this must be the answer to how do you square a circle...

    jim
    "A pessimist sees the difficulty in every opportunity; an optimist sees the opportunity in every difficulty."
    - Sir Winston Churchill (1874-1965)

  4. #4
    Join Date
    Aug 2003
    Location
    extreme southeast Nebraska
    Posts
    3,113
    No, to do that you put some mean looking ex football stars all hopped up on steroids in a circle after they have gone to wrastling acting school and let them bang against the circle.

    It helps if you tie a flag where you want the corners to be too. Gives them an aiming point.
    Last edited by harry strasil; 12-27-2009 at 5:47 PM.
    Jr.
    Hand tools are very modern- they are all cordless
    NORMAL is just a setting on the washing machine.
    Be who you are and say what you feel... because those that matter... don't mind...and those that mind...don't matter!
    By Hammer and Hand All Arts Do Stand

  5. #5
    Join Date
    Apr 2008
    Location
    Covina, CA
    Posts
    16
    Maybe it's me but I don't see how you move the square if it stays in contact at points A and B at the same time. Can someone tell me what I'm missing?
    TIA

  6. #6
    Join Date
    Aug 2003
    Location
    extreme southeast Nebraska
    Posts
    3,113
    You move the square thru its arc, but keep the body and tongue touching the points.
    Jr.
    Hand tools are very modern- they are all cordless
    NORMAL is just a setting on the washing machine.
    Be who you are and say what you feel... because those that matter... don't mind...and those that mind...don't matter!
    By Hammer and Hand All Arts Do Stand

  7. #7
    Join Date
    Apr 2008
    Location
    Covina, CA
    Posts
    16
    Quote Originally Posted by harry strasil View Post
    You move the square thru its arc, but keep the body and tongue touching the points.
    Ok. I was taking it literally. You move the square while keeping it in contact with A and B. That would mean at some point C would be at A and then at B during the movement. Got it.

  8. #8
    Join Date
    Apr 2008
    Location
    Dayton Ohio
    Posts
    975

    Another trick

    Jr's failed to mention one important fact. In order for this trick to work, the square must be square. If you make the square yourself this could work to your advantage.

    If instead of making the square square, you can make it less square and draw elipses/ovals. The pins would represent the longest part of the arch.

    Eric

    PS: Thanks JR, keep em coming!

  9. #9
    Join Date
    Mar 2007
    Location
    Jacksonville, FL
    Posts
    733
    Quote Originally Posted by Eric Brown View Post
    Jr's failed to mention one important fact. In order for this trick to work, the square must be square. If you make the square yourself this could work to your advantage.

    If instead of making the square square, you can make it less square and draw elipses/ovals. The pins would represent the longest part of the arch.

    Eric

    PS: Thanks JR, keep em coming!
    Actually, that's not correct. Any angle of 90 degrees or less will create a portion of a circle between the two points. A 90 degree angle will create a half circle between the two, a less acute angle will scribe a correspondingly smaller portion (larger diameter) of a circle between the points.

    By using an angle greater than 90 degrees you can get a continuously changing arc, but this method starts to break down as the angle increases and you get closer to the line intersecting the two points.

    Scribing an oval can be accomplished by tying a string between the two points and scribing a line using the string as a guide. The degree of slack in the string will determine the shape. Note that using this method the ends of the oval will be outside of the two points used to scribe it. So it takes some experimentation to get an oval of the right size and shape.

    If you want to make more accurate ovals you could always build a jig like this:

    http://books.google.com/books?id=-9k...20oval&f=false
    "History is strewn with the wrecks of nations which have gained a little progressiveness at the cost of a great deal of hard manliness, and have thus prepared themselves for destruction as soon as the movements of the world gave a chance for it." -Walter Bagehot

  10. #10
    Quote Originally Posted by Don C Peterson View Post
    ... Any angle of 90 degrees or less will create a portion of a circle between the two points. ...
    You can use this to draw a circular arc through any three points, as long as the angle between the two straight edges is more than 90 degrees.

    1. Draw the points A, B, and C
    2. lay out the two straight edges as shown and tape or glue them together
    3. Put pins or brads at points A and B
    4. Draw the arc as described in Harry's post.
    Attached Images Attached Images
    Last edited by Wayne Morley; 12-30-2009 at 11:30 AM. Reason: Changed less than 90 to more than 90

  11. #11
    Join Date
    Aug 2003
    Location
    extreme southeast Nebraska
    Posts
    3,113
    To Layout an ellipse with a square you will need a wooden yardstick, to push pins and a pencil.

    1. First draw 2 crossed lines that are 90 to each other and cross in the middle.

    2. mark the minor diameter on the up and down line equadistant from the center crossing on each side.

    3. mark the major diameter on the crossways line equadistant from the center.

    4. cut a very small notch in one end of the yardstick on an end that starts with the 1 inch mark for your pencil to rest in while you move the yardstick.

    5. stick a push pin in the yard stick at half the minor diameter. Just so it sticks thru almost the thickness of the square body.

    6. stick a push pin in the yard stick at half the major diameter. Just so it sticks thru almost the thickness of the square body.

    7. clamp the square firmly to the work piece at both ends so it can't move.

    8. lay the yard stick so that the pins touch the body and tongue of the square.

    9. place your marking instrument in the little notch at the end and move the yardstick in an arc keeping the two pin protrusions in contact with the square.

    10. repeat the procedure for all 4 quadrants of the ellipse.
    Jr.
    Hand tools are very modern- they are all cordless
    NORMAL is just a setting on the washing machine.
    Be who you are and say what you feel... because those that matter... don't mind...and those that mind...don't matter!
    By Hammer and Hand All Arts Do Stand

  12. #12
    Join Date
    Nov 2006
    Location
    Trussville, AL
    Posts
    3,589
    JR, you should collect all the wisdom you pass along to us into a book and call it a shop survival guide. All these sound, tried and true techniques are vanishing from common knowledge...

  13. #13
    Join Date
    Mar 2007
    Location
    Wawickshire, UK
    Posts
    94
    This is a long compass. That the angle need be 90° or less just isn't so. Any fixed angle will describe an arc of a circle.
    I don't remember the name (school was a long time ago) but there is a standard geometrical theorem which covers this - something to do with subtended angles and chords maybe.
    This is commonly used to lay out (or cut, with a powered router) arcs of large radius - putting a pencil or router on the end of a 30' wire or rod isn't always practicable.

  14. #14
    Join Date
    Apr 2008
    Location
    Dayton Ohio
    Posts
    975

    I was not right - sort of.

    Yes, I agree that if the square is not square you would only get an arc.
    However, my point still stands, you do not get a half or full circle if your square is not square with just two points of reference.

    Eric

  15. #15

    Oops

    Quote Originally Posted by Steve Hamlin View Post
    This is a long compass. That the angle need be 90° or less just isn't so. Any fixed angle will describe an arc of a circle.
    I don't remember the name (school was a long time ago) but there is a standard geometrical theorem which covers this - something to do with subtended angles and chords maybe.
    This is commonly used to lay out (or cut, with a powered router) arcs of large radius - putting a pencil or router on the end of a 30' wire or rod isn't always practicable.
    You are correct that any angle will describe an arc of a circle. In my original post I said that the angle between the two legs should be less than 90 degrees when I meant to say more than 90 degrees. With an angle less than 90 degrees you will get something like the image below, and it would generally be easier to use a different method to generate the arc.

    I edited my original post.
    Attached Images Attached Images

Posting Permissions

  • You may not post new threads
  • You may not post replies
  • You may not post attachments
  • You may not edit your posts
  •