hey guys, i just used the router by hand, now i want to build some table to get more control and to use some jigs. after search i found like 50 diferents tables, can someone please recommend me some model? i really dont know which will be better


 [OP]
Member
[OP]
Member
hey guys, i just used the router by hand, now i want to build some table to get more control and to use some jigs. after search i found like 50 diferents tables, can someone please recommend me some model? i really dont know which will be better
Member
I bought my router table top and fence from Woodpeckers. Here is the link http://www.woodpeck.com/index.html I built a cabinet close to Norms but made it taller here is a picture not the best but gives you the height to other objects.
http://i799.photobucket.com/albums/y...304/shop14.jpg
They have the insert plates and the rings to match to your bits.
Contributor
Everyone here has their PET *needs* in a router table set-up. You will discover what you really need (and don't use) with actual use. Something along the lines of Norm's Table covers most needs very well.
Many need every factory fixture and doo-dad! Others do quite well with a nice straight fence with a T-track for attachments. A router lift is a nice (expensive) addition which is not absolutely necessary but very convenient. A T-slot in the tabletop allows attachment of other hold-downs or featherboards. Good dust collection is a MUST. About 90% of the chips are collected above the table; 10% below.
[/SIGPIC]Necessisity is the Mother of Invention, But If it Ain't Broke don't Fix It !!
 Member
Jose,
As Chip pointed out, everyone has their own needs/wants. When my want for a router table turned into a need, I made myself a close copy of the table design in FWW #195, pg 66. And to make the deal sweeter, I recycled a similarly sized table as my base. I beefed up the top with 3/4" MDF, made a fence out of 3/4" birch ply and the router plate out of 1/2" birch ply.
While it's nothing fancy, it does what I need for now and gives me the flexibility to figure out what I want/need down the road. If my math is correct, I have 8 hours and less than $30 (US) into it.
My vote is to find yourself something simple to start and add to it the things that *YOU* want. Just remember to have fun.
While Genuis may be handicapped by limits, Stupidity does not suffer the same affliction - Let's be careful out there!
 Contributor
Originally Posted by Jose Luis

Depending on your needs and cash, you can go several ways. You can start with nothing but a board, or a cheap commercial metal table, or a fancy one.You can buy a very good one from Rockler or Benchdog. You can build from simple to complicated.
I'm attaching photos of "tables" (I use the word loosely) I've built since the 1960's, ending with my version of the AWW/Norm table (modified to suit me). Every one of them worked for me at the time.
My most recent version is shown in thread http://www.sawmillcreek.org/showthre...1131555&page=2
John
Repeating theme here; each of us has things that are important to them in a router table. I have a pretty good motor and a very nice lift but, my fence is a very basic Rockler version. I make frequent use of a miter slot and others wonder why you would want one on a router table.
I would start very basic with something you plan to discard. Use this long enough to figure out what features are important to you. The go for a more formal workstation. JMHO.
"A hen is only an egg's way of making another egg".
Samuel Butler
Member
Jose,
The best way is to do just what you are doing. Look around, get ideas, then build just what you want -the one that will fit your needs the best. You can start with your router mounted under a board, for a basic version.
On my table, I wanted storage for router bits, and fixtures used a lot. Also did not want to waste any space with large open areas, so here is how mine ended up. It was built 20 years ago before there were router lifts, but this is still easy to adjust and change bits.
 Moderator
The New Yankee Workshop version (the updated one) is what I'd suggest, but with a 4" DC port on the lower chamber if that wasn't included in the update.
--
The most expensive tool is the one you buy "cheaply" and often...
 Member
As you said there are 50 + different ones and there are 60 + answers to your question.
When I went looking for a table and fence I read for weeks on what did what and how people thought it was the best one, then I really started looking.
I decided on the things I wanted the most from the table.
What I got was the Jessem table, left and fence.
The table is flat, strong and smooth.
The fence is built like a battle ship and mounts on the ends of the table, no slots.
The left is very good and worka great.
I bought some 3/4 in ply and made a cabinet for it, its not a Norm's cabinet but it works really great for me and what I needed.
I use a small shop vac and it sets under the table.
So I think it has to be what you need, what you want to spend and if you want to make it your self. My cabinet and stand are really easy to make and cheap. It took me one or two evening after work to make it.
Step-1.jpg Step-2.jpg
Step-3.jpg
[OP]
Member
i really like your version! will do something similar to your!..
Thanks for your support.
My mnain problem are the plate, i will made my own from aluminium or acrilyc. i have an chinese 2HP router, and 1hp B&D. i think that this will be OK for my hobby, here in argentina is hard to find good tools, and are really expensive too!
 Member
I will second that motion. I have built a few jigs and things with expensive materials, thinking they would be permanent fixtures for the shop only to find that they did not work the way I needed them to.
 Member
I suggest just buying the top because it's going to take some time and effort to make it perfectly flat, and installing the T-tracks perfectly.
A router lift system is nice, but not mandatory.
Then once you have a top, just designing a simple cabinet base with dust collection is all that's left.
Then add some wheels. You don't really need plans, just figure a good height and lay the cabinet compartments out for your liking.
I used 3/4" mdf for mine which is good for handling vibrations and sound. It's also heavy which makes the base stable.
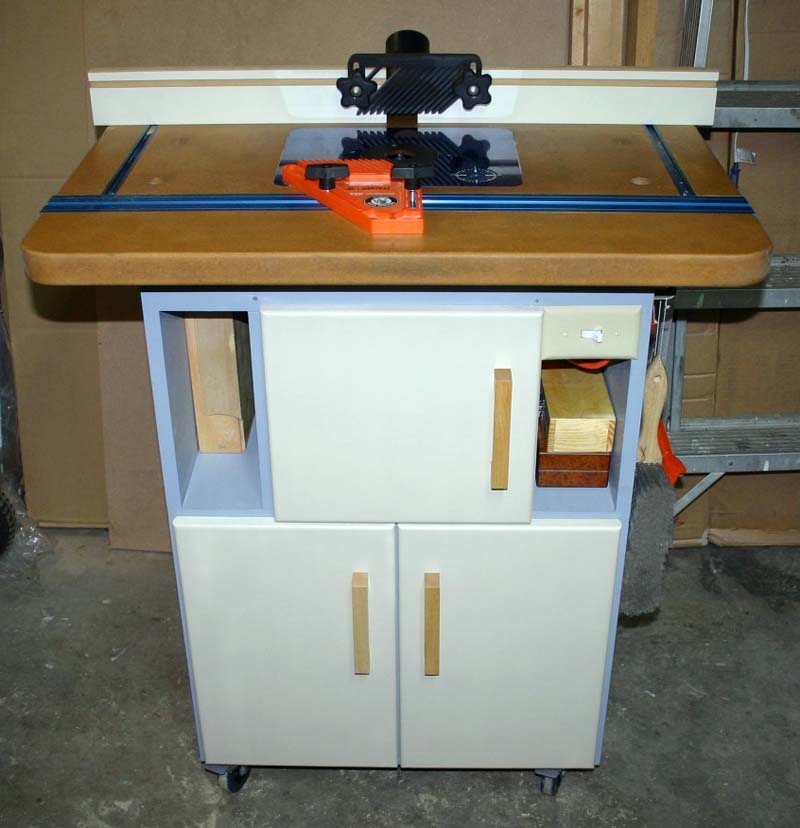
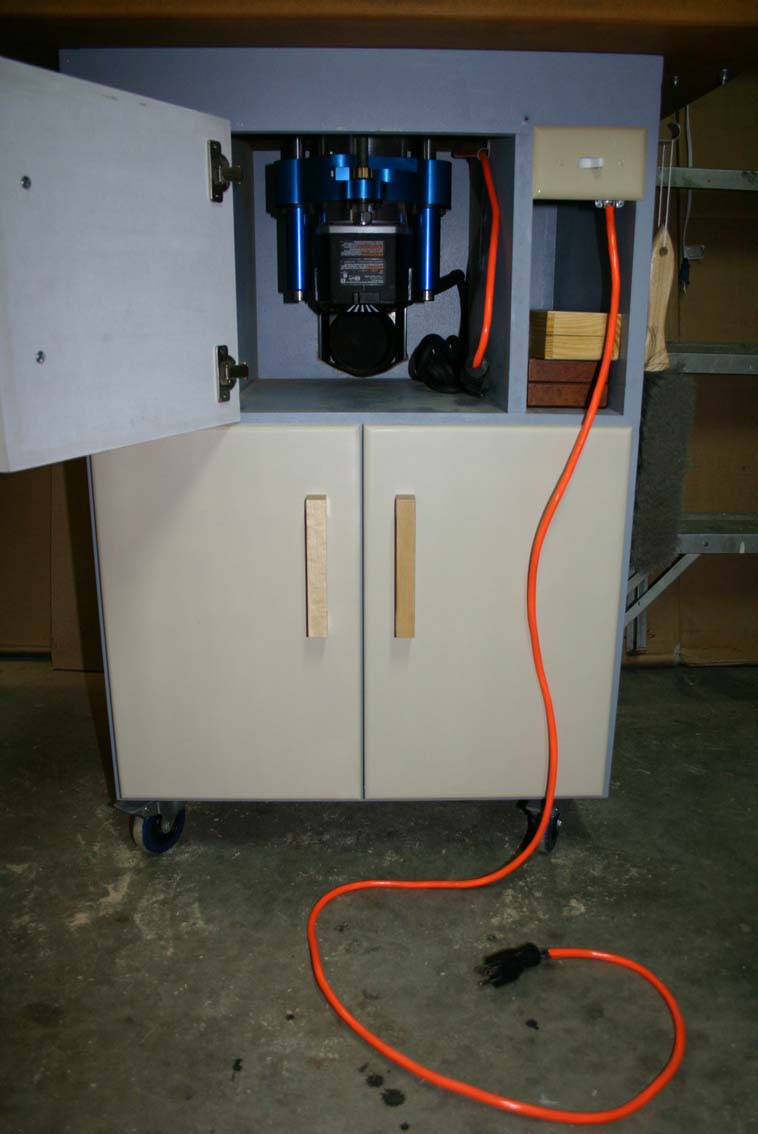
The best part of my RT is the basic $2 light switch that I added which makes turning the router on and off a breeze.
This picture is about a year old and I've since added custom router bit storage boxes for the side compartments because my collection of individual router bits has been slowly growing.
Everything is MDF, including the doors and top on my table. The hardware and fence is from Rockler. The casters and power cord is from harbor freight.
Member
I like the design from American Woodworker a few years back. It's basically a NYWS style with a clever shop made lift. If I were going to have a standalone table (instead of table saw extension) that's the way I'd go.
Member
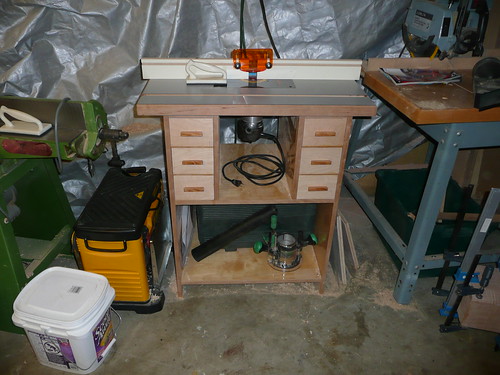
I built mine from an issue of wood magazine, sometime in 2009. Still need to put on the router door and the two lower doors but you get the idea. HF insert and $30 fence from rockler. If i was doing it again i probably wouldn't build drawer boxes, maybe just one or two as boxes and the rest the way norms are. other than that i'm very happy with it. 1 sheet of plywood, and some mdf, hardboard, 1/2 ply, and cherry that i had laying around
[OP]
Member
remember wich month of Wood Magazine?
 Posting Permissions

 Reply With Quote