Results 1 to 6 of 6

Thread: fun with Inlays

  1. #1
    Join Date
    Mar 2007
    Location
    Central Vermont
    Posts
    1,081

    fun with Inlays

    made a batch of these drink coasters today from Peruvian walnut and curly maple. The inlays turned out perfect, with exception to the end of the stems on a few of them which didn't make it. I think this happened when cutting off the backing, and I am planning on using less aggressive methods the next time.

    Got to test out my new precision collets from precise bits as well and I noticed an improvement over previous inlay attempts, previous attempts being imperfect, current ones being for the most part perfect. Don't know if it was the collets, or something else I might have changed, but I am sure they helped.

    I used the V-Carve/Tapered inlay method using a 60 degree v-bit to machine both the pockets, and inlays. The coasters were cut out using a 1/4" up cut spiral bit.

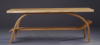
    The jig shown on the table was a setup I used to hold the coasters while machining the 1/2" thick maple backing the inlay off. Next time I will just make a jig to do this on the bandsaw. A bit of work with a low angle block plane and card scraper saves allot of Fe$$tool sanding discs, and time sanding with the ROS.

    Note, I did lock the back half of the jig down with a screw after tightening up the clamp, since the pressure of the clamp would tend to pull that half of the jig up.

    DSC01375.jpg

    DSC01372.jpg

    DSC01367.jpg

    DSC01376.jpg
    Last edited by Michael Schwartz; 01-24-2010 at 3:04 AM.
    Hardware - Shopbot PRSstandard 48x96 with PC router.
    Software - Aspire 2.5, Partworks, Cut 3D, Photo V-Carve
    Open Source/Free - Inkscape, Open Office.

  2. #2
    looks like some pretty good work to me, clamp is a great idea!

    jim

  3. #3
    Join Date
    Oct 2009
    Location
    Rockbridge, Ohio (in the sticks)
    Posts
    247
    Maybe you could make a tool path to plane the maple back down close to the walnut with an end mill and then you could just pop them back in your clamp assembly on the router table??? Would save on setting up on the band saw and a few sanding discs!

    Just a thought,
    Nick

  4. #4
    Join Date
    Mar 2007
    Location
    Central Vermont
    Posts
    1,081
    Quote Originally Posted by Nicholas Bukky View Post
    Maybe you could make a tool path to plane the maple back down close to the walnut with an end mill and then you could just pop them back in your clamp assembly on the router table??? Would save on setting up on the band saw and a few sanding discs!

    Just a thought,
    Nick
    that would work and is almost what I am doing now. I used a 1.25" bit on the shopbot to plane the backing down to within a few hundredths of an inch. I have a bit of a neanderthal background, but the block plane followed by the card or a cabinet scraper is surprisingly fast and has a very low almost non existent risk of causing damage.

    The only problem I had was the end of the stem portion of the inlay seemed to get torn off by the bot 25%-50% of the time. The pocket is very shallow so there is not much glue holding it. For future batches I am going to mess with the vectors in my drawing and shorten/enlarge it a bit and maybe play with supporting it with epoxy before I machine the backing off.
    Last edited by Michael Schwartz; 01-24-2010 at 10:19 AM.
    Hardware - Shopbot PRSstandard 48x96 with PC router.
    Software - Aspire 2.5, Partworks, Cut 3D, Photo V-Carve
    Open Source/Free - Inkscape, Open Office.

  5. #5
    Join Date
    Nov 2006
    Location
    Southern California and China
    Posts
    122
    Do you have a drum sander? Many people that cut Abalam will glue it to masonite backer board then put some lowtack tape on the front after cutting the inlay parts. Then you can flip the assembly over and sand the backer board off. Zero chipout that way.

    Also, to get more robust inlays maybe do a small corner overcut at the sharp corners of the pocket. This would be part of a finish pass with a small (.020 - .031) router bit. Then the inlay itself can be full thickness and the pocket full depth. Much better glue surface and processing survivability.

    -James
    Last edited by James Leonard; 01-25-2010 at 1:20 PM.
    Liberty CNC / Sherline / Mach3 / SheetCAM / CorelDraw V12, X3 and X4 / EZ Smart System / DragonCNC / DXFTool

  6. #6
    Join Date
    Mar 2007
    Location
    Central Vermont
    Posts
    1,081
    Quote Originally Posted by James Leonard View Post
    Do you have a drum sander? Many people that cut Abalam will glue it to masonite backer board then put some lowtack tape on the front after cutting the inlay parts. Then you can flip the assembly over and sand the backer board off. Zero chipout that way.

    Also, to get more robust inlays maybe do a small corner overcut at the sharp corners of the pocket. This would be part of a finish pass with a small (.020 - .031) router bit. Then the inlay itself can be full thickness and the pocket full depth. Much better glue surface and processing survivability.

    -James
    suggestions noted I will keep them in mind. I do have a 26" Wood Master drum sander. I will also likely re-saw the material the inlay is cut from since I realized I could have at least doubled my yield from the board I used, hate seeing figured woods get sucked up the dust collector.
    Hardware - Shopbot PRSstandard 48x96 with PC router.
    Software - Aspire 2.5, Partworks, Cut 3D, Photo V-Carve
    Open Source/Free - Inkscape, Open Office.

Posting Permissions

  • You may not post new threads
  • You may not post replies
  • You may not post attachments
  • You may not edit your posts
  •