Results 1 to 14 of 14

Thread: How do I deal with small cracks in a burl?

  1. #1
    Join Date
    May 2005
    Location
    Gainesville, Florida
    Posts
    81

    How do I deal with small cracks in a burl?

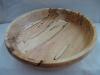
    I have a piece of Gmelia Burl from SE Asia that’s been sitting in the workshop for well over a year now. I’ve prepped it to make two small change bowls, about 4.5” dia by 1.25” high. My question is: How do I deal with all the small open cracks in it. I’d like to turn these bowls thin, about 1/16” at the rim, but I'm afraid that the wood won’t hold up. Before I do something I’ll regret and ruin an expensive chunk of wood, I wanted to get some advice on how to stabilize it. The current idea is to rough turn to about 3/8” and allow it to set for a few days, then work clear epoxy into the cracks and all over the surface. The wood is very hard and grey with light brown highlights. I think the epoxy will fill the cracks, provide strength, and the clear will hide better than a contrasting color. After the epoxy cures, finish turn the outside, adding epoxy if I expose new cracks. Then turn the inside close to final thickness, work more epoxy into the surface, and gently scrape down to the wood after it sets. Final finish would be Minwax AO. Does this sound like it will work? Is there a better way?

    Thanks,
    ---Scott

  2. #2
    Join Date
    Jan 2004
    Location
    Fredericksburg, TX
    Posts
    2,576
    Scott,

    I recently turned a large Sweet Gum bowl from a section that had a lot of checks as an experiment. I made a mixture of sanding dust wet with DNA and mixed that with 5 minute epoxy. The resulting mix was much thinner than the straight epoxy and filled the checks/cracks easier and deeper than a mix of epoxy and dust or even straight epoxy. You could add some instant coffee or other colored powder to darken the mix if you want to make a better blend or contrast. The result is hard to detect in the marbled Sweet Gum. I liked the result as well or better than using shavings and CA to fill cracks. Somewhere there is a reference to using an Epoxy Manhattan (epoxy and DNA mix ) to fill cracks in old posts here at SMC.

  3. #3
    Join Date
    Jan 2005
    Location
    Goodland, Kansas
    Posts
    22,605
    I use the epoxy cocktail. I mix 5 minute epoxy and sanding dust. I then mix DNA in the mix so it is the consistancy of milk. If the cracks are all the way thru I will put some blue painters tape on the outside then fill the crack. I will sand on the roughed bowl to get some dust if I don't have any. It will work fine as I have used this method for 3 yrs now.
    Bernie

    Never put off until tomorrow what you can do the day after tomorrow.

    To succeed in life, you need three things: a wishbone, a backbone and a funnybone.


  4. #4
    Join Date
    Feb 2008
    Location
    Reside on a farm south of Churchbridge, Saskachewan, Ca
    Posts
    38

    Acetone??

    Hi
    Would acetone work as the a substitute for the DNA in your epoxy cocktail's???

    Denis

  5. #5
    Join Date
    May 2005
    Location
    Gainesville, Florida
    Posts
    81
    Thanks for the epoxy DNA cocktail idea and confirmation that this will work. I'll give it a test with and without sanding dust on the cutoffs. That way I should be able to see if I like the clear or the dust version before turning the real thing.

  6. #6
    Join Date
    Feb 2009
    Location
    Chatsworth, GA
    Posts
    2,064
    I'm working on an Oak Burl now with cracks in it. I'm using CA and saw dust from the bowl itself.So far it's working great. I will post pics when I get it finished.
    Donny

  7. #7
    Join Date
    Jul 2007
    Location
    Central Indiana
    Posts
    955
    Why fill them?

    Unless they are large cracks they might not be a problem.

    Toney

  8. #8
    For years I have used sawdust and glue to fill places on flatwork, and I have done the same on bowls. However, I have just been using Titebond, with some fine dust. Seems to fill the cracks very well, and I don't get the shiny areas of filled grain around the crack as with CA. Those seem to be more difficult to sand out. Could be that I filled the cracks toward the end of my sanding cycle, too.

    Interesting cocktail with the epoxy - may have to try that.

  9. #9
    Join Date
    Nov 2007
    Location
    Texarkana,Ar
    Posts
    43
    If your piece has any spalting or dark spots you can use charcoal rubbed in the crack then use thin CA over it. Sometimes shavings don't look that great to me for filling cracks. It looks like you put a peice of partacle board in the crack.

  10. #10
    Join Date
    Jul 2009
    Location
    Long Beach, Ca.
    Posts
    199
    Sone people just leave the cracks.....but it's only really acceptible if it's burl.

    This is how I deal with cracks, I buy some colorful gemstones like malochite or turquiose put them inbetween a few bags crush them to bits
    use the finest crystals to initially fill the crack
    then thin ca glue
    then startpacking the bigger of the crushed pieces in
    then thin ca glue
    wait an hour then sand

    not only does the common person not know it was a cover up, but they think it was some difficult inlay or something.
    “The key to change... is to let go of fear.”

  11. #11
    Join Date
    Feb 2003
    Location
    Richland Wa.
    Posts
    784
    Brian,

    Do the crystals sand at the same rate of the wood?

  12. #12
    Join Date
    May 2005
    Location
    Gainesville, Florida
    Posts
    81
    Quote Originally Posted by Toney Robertson View Post
    Why fill them?

    Unless they are large cracks they might not be a problem.

    Toney
    There are lots of them. Some very narrow and short, others longer and wider. Nothing wider than a couple 1/100's of an inch. As a block, the wood is quite strong (and hard). But I want to turn this burl thin and am afraid that it will loose structural integrity resulting in spontaneous disassembly of the turning in progress.

  13. #13
    Join Date
    Jul 2009
    Location
    Long Beach, Ca.
    Posts
    199
    Quote Originally Posted by Ray Bell View Post
    Brian,

    Do the crystals sand at the same rate of the wood?
    Different crystals vary, but all are MUCH harder than wood, so you might want to use those cylander round sanders and put it in your jacobs chuck, drill press, or drill, those cylander rubber sanding drums work well when you need to sand in a line.........the're almost perfect for it. Or a proxxon merlin would take care of it in a sec.....

    or just crush up the stones to where they're so fine that there is little overflow, but with some, usually very colorful crystals, when you smash them very thin the color doesn't show thru as well as the slightly bigger pieces, so it's really about improvisation. turquoise shows up nicely finely crushed and craft supply sells 4 different crushed crystals in 1oz bags.......so you're paying alot more than if you just bought some stones off of ebay, or your local neighborhood Hippie, where you could get 5x that for $10.
    “The key to change... is to let go of fear.”

  14. #14
    Join Date
    Dec 2006
    Location
    Lubbock, Texas
    Posts
    914
    I use fiberglass resin and coffee grounds or whatever to add some color and texture. I have been known to use chalk crushed up if I want some odd colors or multitude of colors added to the piece. Turquoise color chalk with a little deeper green really works well with wood. Let you imagination run wild with color options. Nice thin with the fiberglass resin is that it sands at the same rate as most woods that are medium to hard.
    Be a mentor, it's so much more fun throwing someone else into the vortex, than swirling it alone!

Posting Permissions

  • You may not post new threads
  • You may not post replies
  • You may not post attachments
  • You may not edit your posts
  •