Results 1 to 15 of 15

Thread: My 1st finished bowl!

  1. #1
    Join Date
    Aug 2007
    Location
    Fort Smith AR
    Posts
    187

    My 1st finished bowl!

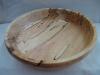
    I have been roughing out green bowls for a while now and this week I got my hands on some dried chunks of maple and I turned and finished my 1st bowl. The blank looked like it had a little curl in it but as I got into it all kinds of surprises popped up. Its roughly 4 1/2 by 6 1/2. The base just kinda of happened and my wife has claimed it for a candy dish at the office already! I finished it with 3 coats of General salad bowl finish and sanded it to 600 grit and did 0000 steel wool between coats. Its not as shiny as the pictures look I am still learning how to use my new DSLR and flash. I couldn't figure out how to take pictures as well as some of you guys. The biggest frustration was trying to get the sanding striations out. I went from 150, 220, 320, 400, 600 and no matter how light of a touch or how long I used each grit I couldn't get them completely out, in the right light at the right angle you can still see them . Alright give it to me what do you like or dislike and if you can help me with the sanding or photo problems that would be great too! Thanks in advance guys!
    Attached Images Attached Images
    Those who dream by day are cognizant of many things which escape those who dream only by night
    -Poe

  2. #2
    James,

    I like the bowl a lot. The foot is very interesting. Your first bowl, you have already raised the bar. Looks like #2 already has severe competion.

    Bob

  3. #3
    James,

    I was told when i started is to keep the sand papper moving from side to side this really helped me out alot. Hope it helps you too.
    It looks great!!
    Eric
    Last edited by Eric Kosanovich; 03-08-2010 at 6:34 AM.

  4. #4
    James, you certainly hit the jackpot on that piece of maple - gorgeous!! The bowl form looks very nice. Some might say it needs less of a foot/base, but I think what you have done makes a very interesting piece.

    On the sanding, a power sander really makes the difference, though with maple, I can usually get a good surface by hand sanding up to 400. I do it very lightly, and I constantly move the sandpaper back and forth at a fairly fast rate. Also, I think the tendency is to not sand enough at the lower grits - 80 and 150, or 120 would be even better. For me, it seems that I need to take my time on the lower grits, and then I can move through the finier grits a little faster.

  5. #5
    Join Date
    Jan 2010
    Location
    Lewiston, Maine
    Posts
    1,506
    That sure is a very nice piece of maple and you certainly did a nice job turning it. I don't have answers to your sanding issues, as I have the same problems. This is certainly the forum to get some feedback though.

  6. #6
    Join Date
    Jan 2009
    Location
    sLower Delaware
    Posts
    5,464
    James, I think it looks very nice. The large base looks ok to me because you tapered it in before going out and I think it fits the shape of the bowl well. As for getting sanding marks, I usually have trouble when I don't spend enough time on one of the lower grits or when I don't change to a fresh piece before moving up to the next grit. The power sanding speeds things up but what I said previously still seems to hold true for me.
    Beautiful piece of wood and you did a good job!

  7. #7
    Join Date
    Oct 2006
    Location
    Harvey, Michigan
    Posts
    20,804
    James - beautiful piece of wood! Looks like you managed to get a chunk of Maple burl! The form is fitting for a candy dish - flowing curve and a functional foot area.

    Sanding by hand can be very challenging to get rid of all the small scratch patterns. I use the cheapest corded drill I can find along with Vince's blue sanding disks. Works for me but as already mentioned - you have to keep the sandpaper moving if you are doing it by hand. Here is a link to Vince's products: http://www.vinceswoodnwonders.com/

    Photos can be frustrating and it will take awhile before you find what works for you. Your backdrop seems to work well and your shots are all in focus - so, I would recommend experimenting with fill lighting so you do not have to use the flash. Means you will need a tripod and also use the self-timer on the camera.

    Neal Addy put together a great tutorial that really gets into how to photograph turnings. Check it out here: http://www.nealaddy.org/node/16
    Steve

    “You never know what you got til it's gone!”
    Please don’t let that happen!
    Become a financial Contributor today!

  8. #8
    Join Date
    Mar 2007
    Location
    Stony Plain, Alberta
    Posts
    2,702
    Very nice bowl James.
    You can't beat the feeling of standing back and looking at ones first completed bowl..

  9. #9
    very nice...

  10. #10
    James,

    This is a very nice first bowl! You can use it as a reference for all the bowls to come. I use power sanding on bowl with an angle drill and 2" hook and loop sanding disks, and find it much easier than holding the sandpaper and moving it. I do hold the disks by hand on some spindle projects, and it is vitally important to keep the paper moving side to side.

    Steve
    When all is said and done--more is usually said than done.

  11. #11
    Join Date
    Oct 2007
    Location
    Horsham, PA
    Posts
    1,474
    Good looking bowl James. Nice form and a beautiful piece of wood

  12. #12
    Join Date
    Sep 2009
    Location
    Enid, Oklahoma
    Posts
    6,741
    Great looking first bowl! I think the form follows it's intended function. I agree with the others about power sanding... It makes all the difference. Looking forward to #2!

  13. #13
    Join Date
    Jan 2005
    Location
    Goodland, Kansas
    Posts
    22,605
    Really nice looking bowl. Interesting form. As was already mentioned a light touch and keeping your paper constantly moving.
    Bernie

    Never put off until tomorrow what you can do the day after tomorrow.

    To succeed in life, you need three things: a wishbone, a backbone and a funnybone.


  14. #14
    looks kinda like a trophy/loving cup, to me...very nice wood and nicely finished.

  15. #15
    Join Date
    Feb 2009
    Location
    Chatsworth, GA
    Posts
    2,064
    Anyone would be proud to have that as a candy dish.That is a nice piece. Let's see some of your rough out bowls.Those are nice to look at too.
    Donny

Posting Permissions

  • You may not post new threads
  • You may not post replies
  • You may not post attachments
  • You may not edit your posts
  •