Results 1 to 10 of 10

Thread: Lee Valley Spokeshave Kit

  1. #1
    Join Date
    Jan 2009
    Location
    Lawrence, KS
    Posts
    594

    Lee Valley Spokeshave Kit

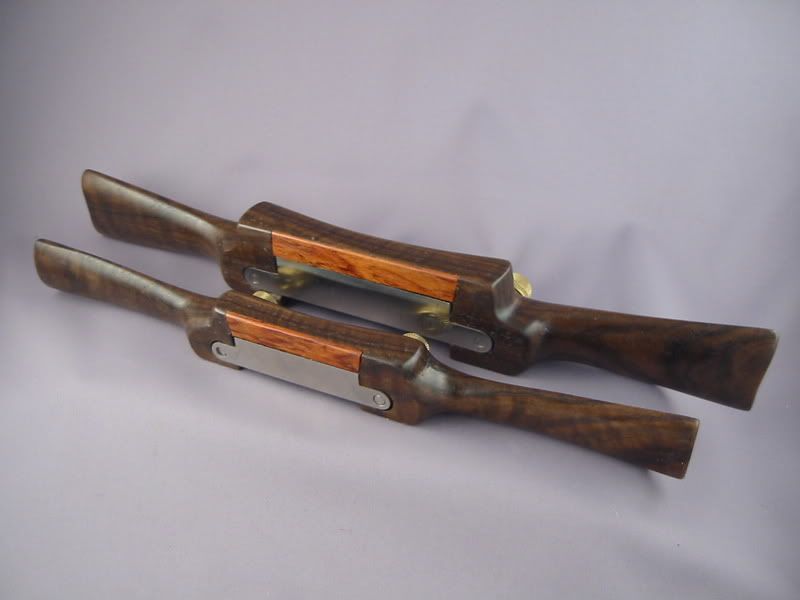
    I bought the large, low angle, spoke shave kit from Lee Valley as one of my Xmas gifts using a universal gift card from my parents (Xmas cash). The kit has been setting on the counter for a while and I decided today was the day to try and assemble it. Lee Valley supplies the blade, posts, adjuster nuts and some brass plate. I supply the wood and elbow grease.

    Well, this time I did use some power tools. Pretty much just the table saw to rough a blank to width and length, the drill press to get the shank holes square and an oscillating drum sander to clean up some on the handles.

    But the blank was prepped for thickness by hand (1" down to 7/8") and that went easily. Actually prepped four blanks just in case I screwed up... The wood is "hububalli" otherwise known as snakewood. Not the easiest stuff to work with, it can be both chippy and stringy in the same piece! But for the most part is is reasonably hard and seems to work well with hand tools.

    Cutting the "ware" (that's the deep pocket under the blade) was done by hand and the rough shaping of the body was done by hand with a back saw and chisel. The oscillating drum sander was used just to clean down to the line. After that I went back with a card scraper to get finial surface. The finish is "Maloof Magic", just equal parts BLO, turpentine and beeswax. I'll dunk it a few more times later but one coat for now so I could wipe it down and play. I like the way beeswax feels and it doesn't seem to get slippery like paste wax.

    So far it works reasonably well. Since I've never really used a spoke shave very much I'm not entirely sure how it is performing. I can take a thick shaving in a controlled fashion and I can take a thin shaving but I don't have the feel yet so I loose the attack angle. Just takes practice I guess.

    The Sharpie marker is for scale.
    Attached Images Attached Images
    Don't sweat the petty things and don't pet the sweaty things.

  2. #2
    Join Date
    Apr 2006
    Location
    Escondido, CA
    Posts
    6,224
    Very nice tool Rob. Keep the blade sharp and have fun!
    Veni Vidi Vendi Vente! I came, I saw, I bought a large coffee!

  3. #3
    Join Date
    Feb 2009
    Location
    Whitehorse, Yukon, Canada
    Posts
    1,148
    Real nice! Was it an easy build?

  4. #4
    Join Date
    Jan 2009
    Location
    Lawrence, KS
    Posts
    594
    Dave -

    Yes, pretty easy build. Just have to watch out for a few critical dimensions.

    I think it took me a bout 6 hours including stock prep (4 blanks just in case) by hand.
    Don't sweat the petty things and don't pet the sweaty things.

  5. #5
    Join Date
    Feb 2009
    Location
    Spring Hill FL.
    Posts
    1,133
    Blog Entries
    8
    Looks great to me! I have been wanting to pick up one of these kits for a while now. I just need to sell a piece of furniture so I can supplement the tool fund.
    Andrew Gibson
    Program Manger and Resident Instructor
    Florida School Of Woodwork

  6. #6
    Join Date
    Apr 2006
    Location
    Kansas City, MO
    Posts
    833
    Looks great Rob. I have one of those kits I need to get moving on as well. Thanks for the motivation.

  7. #7
    Great job on your spoke shave. I have made a few of them to use in my shop, both the small and regular kit. getting the holes laid out is the critical thing.

    These two are my favorite, made of curly claro walnut


    I also replace the brass plate with rose wood.

    Take care,
    Jim

  8. #8

    Wow beautiful spokeshaves

    Heh Rob congrats on the nice spokeshave. Jim also great work on yours as well. Haven't ventured into the spokeshave making yet, but you have both certainly got it.

    I have a much greater appreciation now about spokeshaves and how they are supposed to work since I bought some from Dave's Shaves. Maybe someday I'll venture into making one too.

    Thanks for posting yours and the six hour process time is impressive.

    Best wishes on your tool making.

    Jim

  9. #9
    Join Date
    Mar 2007
    Location
    Fayetteville, GA
    Posts
    437
    Beautiful work, gentlemen! I happen to look at the two exact kits and wonder the same thing. The timing of this thread is perfect.

    Are there much difference in use between the regular & the small kit?

  10. Wow, those tools are beautiful. Both the snakewood and the claro walnut/rosewood. I might have to get one of those kits....

    Patrick

Posting Permissions

  • You may not post new threads
  • You may not post replies
  • You may not post attachments
  • You may not edit your posts
  •