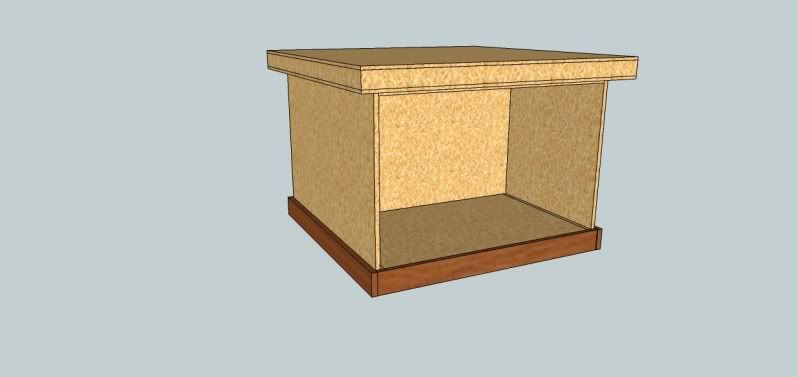
My sketch up outfeed table. Any ideas for improvements?
The large open area in back will have shelves for short wood cut offs


 [OP]
Member
[OP]
Member
My sketch up outfeed table. Any ideas for improvements?
The large open area in back will have shelves for short wood cut offs
America is great because she is good. If America ceases to be good, America will cease to be great.
Alexis de Tocqueville
You don't have a soul. You are a Soul. You have a body.
C. S. Lewis
Member
Going to continue miter slots from saw side into the top?
 Member
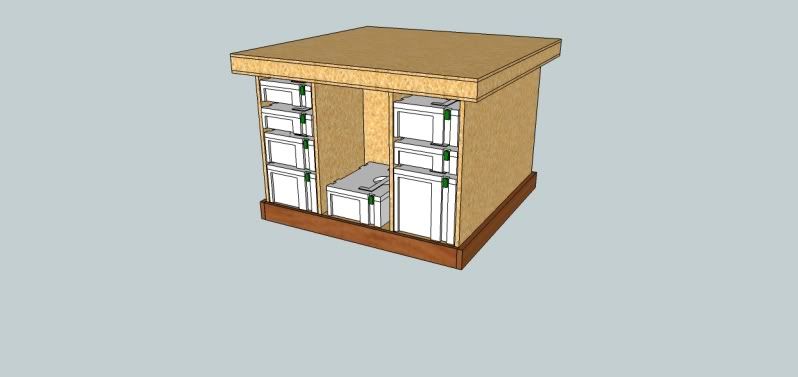
Mini fridge????
.
"I love the smell of sawdust in the morning".
Robert Duval in "Apileachips Now". - almost.
Laserpro Spirit 60W laser, Corel X3
Missionfurnishings, Mitchell Andrus Studios, NC
Member
Mobility? Will you ever need to move it, if so might want to think about wheels.
 Contributor
You might want to checkout the wood whisperers assembly table base video at http://thewoodwhisperer.com/episode-...y-table-stand/. Even if you don't use this plan, I think you will find it a good source for some extra ideas.
I have had open shelves in my shop forever. I am in the early stages of a total remodel, and new shop made stands, cabinets and assembly tables, etc. will have doors with pull out shelves and drawers - at least that's my plan.
[OP]
Member
Thanks for the inputs guys. This is a growing plan. I am thinking about the center section between the systainer stacks having drawers. Should I put doors over the systainers?
I am going to put it on leveling feet, but I really do not want it to be mobile since it will sit behind a non mobile cabinet saw. my plan is to set it about 10 in back from the saw so I will not have to put slots in the top.
The wood whisperer is one of the best websites out there and he was the inspiration for the project. The top is a torsion box and will be skinned with hardboard as in his design.
I am looking for any and all ideas to make it better since I do not want to build another one for a long time.
America is great because she is good. If America ceases to be good, America will cease to be great.
Alexis de Tocqueville
You don't have a soul. You are a Soul. You have a body.
C. S. Lewis
Member
Here is what a good friend of mine uses. No wheels, but its got two Uni-saws.

Mike Harrison
Member
Mine is simiar to that except that instead of storage bins, I fastened "runners" to the side walls of the sections and suspended plastic restaurant bus trays for drawers (the big grey tubs they use for dishes when they clear tables). The outer rim on the top of the tray rides on the runners. The bus trays can be found online pretty cheap. IIRC I got 15 of them for less than $50 shipped. Since there is no top on them, I put doors on the front of the cabinet to keep the dust out. Got the idea out of a magazine a few years back.
[OP]
Member
Brad
I like that idea. Where did you find them?
America is great because she is good. If America ceases to be good, America will cease to be great.
Alexis de Tocqueville
You don't have a soul. You are a Soul. You have a body.
C. S. Lewis
Member
http://www.cooksdirect.com/product/e...ssing-suppliesOriginally Posted by James Phillips

Member
It has been soooo long that I have no idea where I got them. But as Brian said, Google them and you will find many sources.
Member
Do you REALLY need to have daily access to Systainers? I'd put drawers there to hold whatever's in the systainers and save the fiddling around with loading/unloading them. They're cool, but a PITA.
"I love the smell of sawdust in the morning".
Robert Duval in "Apileachips Now". - almost.
Laserpro Spirit 60W laser, Corel X3
Missionfurnishings, Mitchell Andrus Studios, NC
 Member
I'd build a grid of shelves on the back side to better organize the cutoffs. I did this under one of my benches and it has worked great. Each bin is about 27" deep, 16" wide and 6" tall. The top bin is full width for small sheet goods. I more or less organize it by species. Anything too small to be found again on the shelves goes into the firewood pile. Anything too long goes into the vertical storage bin. I find that I use the cutoffs much more frequently since I can easilly find what I need.
 Member
Do you already have storage for your crosscut sled(s)? I am planning both and outfeed table and a cabinet for under the wing, and a shelf for the sled is top priority. Just one more thing to think about.
Lee
Member
Instead of having it 10 inches away consider making it 3/4 lower than your TS and butt it up to the TS.
Unless it's a wide and long piece, the lower table will not effect the wood. You may need to raise the blade a bit more to compensate.
I have this type of setup and it's not a big deal.
 Posting Permissions

 Reply With Quote