Page 1 of 4 1234 LastLast
Results 1 to 15 of 50

Thread: NE BLM Burl Lidded Dish - Pedestal

  1. #1
    Join Date
    Oct 2007
    Location
    Central KY
    Posts
    17,593

    NE BLM Burl Lidded Dish - Pedestal

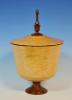
    Big Leaf Maple burl, with walnut pedestal and finial. Finish was BLO, shellac, and several coats of lacquer, then triple buffed with Ren wax. I apologize for the glare in the pics. I worked with the lighting, but the finish on this piece is deep and very reflective.

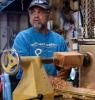
    I will post a couple of additional pics of the beginnings of this piece. I love turning the BLM burls, but this one apparently wrapped around a limb. There were evident growth rings in the center, accompanied by a knot. Made it a little challenging at times, but not bad.

    The first finial just didn't suit me, so this is the second one. Actually, it is the third one. I had the first redo just about done. I was looking it over, and thought.....you know, I think I need to make that undercut just a little deeper. First of all....never make that last cut....and, NEVER try it with a less than very sharp detail gouge!!! Amazing how quickly one can destroy a piece of walnut that is .09" thin.

    Dimensions are 9.5" wide x 9.5" tall to tip. Height from base to lid shelf is 4.5", and the height of the lid and finial combined is 4.75".

    All comments, good and bad, are welcome!
    Attached Images Attached Images

  2. #2
    Join Date
    Oct 2006
    Location
    Harvey, Michigan
    Posts
    20,804
    Excellent John! Beautiful turning, wood, finish, colors and form! Great photos as well! Very impressive work!

    I do think this finial is a marked improvement over the original! Glad you took the time!
    Steve

    “You never know what you got til it's gone!”
    Please don’t let that happen!
    Become a financial Contributor today!

  3. Your best piece to date?

    John,

    You have certainly raised the bar once again. While it is a hard call to make with all that you have posted previously, and their quality of form, finish and skill; in this observers opinion, this turning reaches just a bit up the scale in workmanship, form, finish and a display of skill.

    One can only surmise that you have a gift for this type of artisan work. It is evident in all your pieces that you put a lot of thought and attention in planning, and in how you will take the sequential steps to accomplish your project.

    This one is just stunning! A truly gifted artisan you are.....I run out of superlatives....I don't believe in flattery, but I do believe in acknowledgment of fine work, because I being a fellow wood worker and wood turner know when work comes to a point of excellence...... you have hit the bullseye with this one! Congratulations!

    I just had to add this: what an eye for form you have! I hope to develop mine to your level.... I am working on it!
    Last edited by Roger Chandler; 07-23-2010 at 11:19 AM. Reason: additional

  4. #4
    Join Date
    Nov 2006
    Location
    Southwest Missouri
    Posts
    185
    John,

    Without a doubt, one of the most creative and beautiful pieces I have seen. This piece exemplifies what I consider to be turned wood art. Simply magnificent!

    George
    Last edited by George Clark; 07-23-2010 at 11:21 AM.

  5. #5
    Join Date
    Oct 2007
    Location
    Central KY
    Posts
    17,593
    Steve, on the finial - it was worth the effort - twice!! But, the practice is always good, and while I know that sharp tools are a must, it is good to know what happens when a moment of laziness hits. I had been working with that detail gouge through the entire finial, and knew better than to attempt a critical cut without touching up the edge.

    Roger, thanks so much for your kind words. They go beyond the usual comments, and I appreciate them.

    George, thanks so much!

    This is the block of burl I started with.
    2010_07180004.JPG
    I keep a variety of waste tenons. If I am careful, I can reuse them several times. I glued one to the bottom of this piece, chucked it, and rough turned it. I flattened an area on the top face, and glued on another waste tenon to use to turn the lid. Then I parted off the top of the burl.
    2010_07180006.JPG
    It was a simple matter to flip it and turn the lid.

  6. #6
    Join Date
    Mar 2010
    Location
    Vestal, NY
    Posts
    908
    Yay, he's baaaack!

    John, how long do you wait before buffing lacquer? And am I correct in thinking you're using spray lacquer? What's your procedure to keep from orange peel?

    And, while I'm asking questions, how do you attach the base? a tenon and some glue?
    Finally, did you do something to emphasize the bark on the rim, or is that just the blo?

    BTW, it's absolutely gorgeous. Of course.
    Last edited by Cathy Schaewe; 07-23-2010 at 11:56 AM.

  7. #7
    Join Date
    Feb 2006
    Location
    Mason Michigan
    Posts
    1,949
    Excellent John!

    Which shellac and lacquer do you use?
    A few hours south of Steve Schlumpf

  8. #8
    Join Date
    Jan 2008
    Location
    Bangor, PA
    Posts
    1,853
    If I were at a show of the finest, most artistic turners in our fine country and saw that piece it would be one that I would come home and talk about as among the best of the best. Really a delight to the eye.
    fmr

  9. #9
    Join Date
    Jan 2004
    Location
    Lewiston, Idaho
    Posts
    28,566
    John,

    For someone who bought his first lathe last September, wasn't it? You are one quick student and gifted artist!

    I really like the way your base, and finial have a slow gradual taper from the foot to the top.

    The overall NE form is great. The finish couldn't be better IMHO.

    My friend.............this doesn't look like any spindle turning for a piece of furniture.

    I think you have found a craft to express some natural artistic talents born within you.

    Very, very nicely done!
    Ken

    So much to learn, so little time.....

  10. #10
    John,

    Great job. The pedistal and finial are perfect, love the color combo as well.

  11. #11
    Join Date
    Feb 2009
    Location
    Raleigh,NC
    Posts
    525
    Amazing, this must mean that Mrs. Keeton's project is complete?

  12. #12
    Join Date
    Mar 2007
    Location
    Eureka, Mo.
    Posts
    2,363
    Ahh, the bookcase must be done!? Beautiful piece John, as a matter of fact I think it is the prettiest piece I have seen on the web....Bill...

  13. #13
    Top notch work, like usual John. I expecially like the pedestal and burl part. Although I think it is just fine as is, I will say that from the burl down it is fantastic by itself and I wonder if a short simple topper wouldnt suit it better. I am just thinking that the base and burl are just so darn nice, I wouldnt want to distract anyones eyes by having the thin and tall finial on top. Just a thought.

    Great work, and if you need my address for a storage place for this piece, just let me know!

  14. #14
    Join Date
    Oct 2007
    Location
    Central KY
    Posts
    17,593
    Thanks to all for the comments!!

    Yes, Gary, Ms. Keeton's project is done, and she agreed to be in charge of painting!!! She is a great woman! I hate painting.

    Ken, it has been a steep downhill slide for me!! And, I owe much of that to you and a few of the others in the "gang" that sucked me in!

    I have to single out Steve Schlumpf - my "go to" design committee. Steve tolerates my constant emails about little decisions along the way, and has been patiently helpful. Thanks, Steve!

    Quote Originally Posted by Cathy Schaewe View Post
    Yay, he's baaaack!

    John, how long do you wait before buffing lacquer? And am I correct in thinking you're using spray lacquer? What's your procedure to keep from orange peel?

    And, while I'm asking questions, how do you attach the base? a tenon and some glue?
    Finally, did you do something to emphasize the bark on the rim, or is that just the blo?

    BTW, it's absolutely gorgeous. Of course.
    Cathy, the first 4-5 coats were Deft brush on lacquer. After those, I flattened with 400 and then 600 sandpaper (waited overnite.) Then, I buffed with Tripoli, wiped it down, and sprayed on a few coats of Deft. Within an hour, I flattened again with 600 lightly, then rubbed lightly with 0000. Yes, I know, this breaks all the rules, but I immediately triple buffed. It shouldn't work, but it does for me. At Steve's suggestion, I keep the speed on the buffing to about 700 rpms - a little higher (1200?) for the bowl buffs to do the dished area.

    When I turn a finial, I leave a 1/4" stub (short) tenon on it and saw it off the stock. The underside of the base is under cut with a pulling shear cut with the detail gouge similar to what you would do on the outside of the surface of a bowl. When I do the lid, I use a tailstock jacob chuck and drill a 1/4" hole in the center of the lid to receive the finial. It is glued with 5 minute epoxy.

    On the pedestal base, the top is coved/undercut, and where the tailstock center mark was, I drilled a small hole to receive a small section of a #3 finish nail. On the bottom of the bowl portion, the tailstock mark was still present, and I barely touched it with the same drill bit. I applied the 5 minute epoxy to the top surface of the pedestal, inserted the nail section, and joined the bowl by lining up the nail in the center mark. It is critical to get these pieces aligned, else the lid will not sit level, and any deviation will show in the finial.

    On the rim, there is some bark left, and there were a couple of places where the NE was missing and saw marks were present. With a knife and sandpaper, I formed those section to conform with the undulations in the rim, mixed some black and brown dye, and wiped most all of the rim to darken it. It was actually not dark at all under the bark and I wanted the contrast to match the areas of bark inclusions.

    Hope that answered all of them, Cathy!

    Quote Originally Posted by Pete Jordan View Post
    Excellent John!

    Which shellac and lacquer do you use?
    Pete, the shellac is Zinsser Seal Coat, and the spray can was used on the finial and base.

  15. #15
    Very nice John!

Posting Permissions

  • You may not post new threads
  • You may not post replies
  • You may not post attachments
  • You may not edit your posts
  •