Wow Tom. Thanks so much for the generous offer. The Bondhaus hex wrenches from your last giveaway get used all the time, and I am really excited to get to use a quality rule for a change. This is much appreciated.
Lee


 Member
Wow Tom. Thanks so much for the generous offer. The Bondhaus hex wrenches from your last giveaway get used all the time, and I am really excited to get to use a quality rule for a change. This is much appreciated.
Lee
Member
Tom this is GREAT! I am very excited and also very grateful. I sent you a PM.
Member
How did you swing this?Originally Posted by Sanjeev Agarwal

Member
I'm hoping that Woodpeckers will post the conversion instructions for the PRLv2 on their website. I would like to see what the conversion process entails before making the purchase.
Contributor
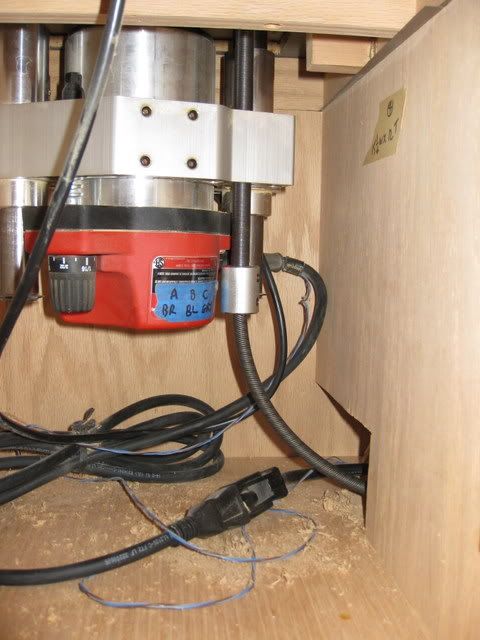
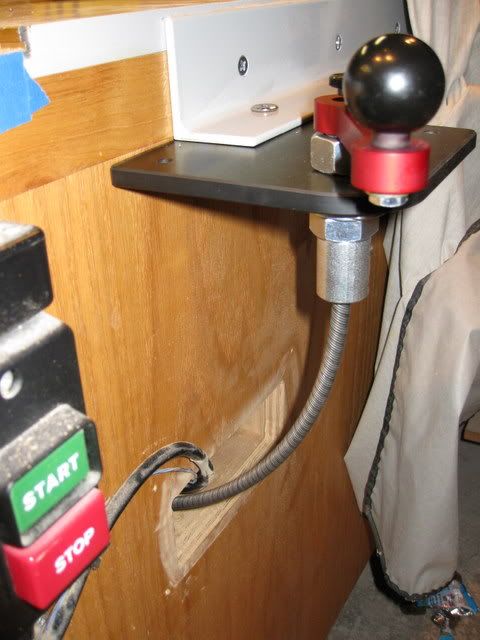
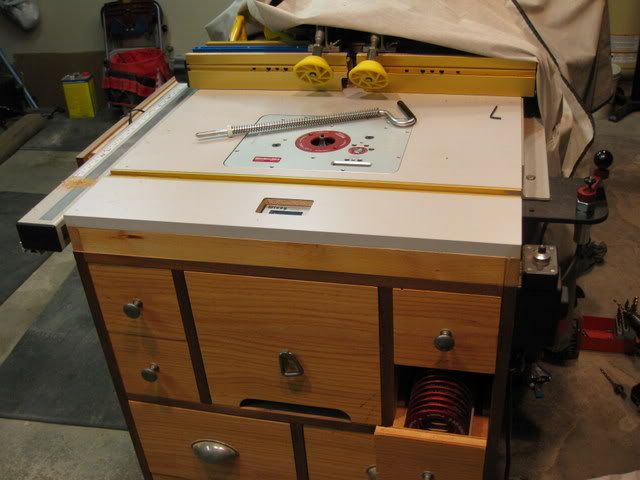
I caught this post just in time to be a "beta" tester. I have my router table built into the right wing of my TS. Mine like probably many others will NOT adapt to the stock mounting option. It only took 90 min. to attach including cutting the cable and changing my mind on where it would be best positioned. In my case I will only need to modify my plastic dust adapter for the cable otherwise I can change back to the thumb-wheel if wanted. Here are a couple final pics. If there is a lot of interest I can give a step/step:
Contributor
You should wait for the official instructions from Woodpeckers but here is the first shot Richard Hummel sent me with a few edits by me - pretty easy but you need the right size hex wrenches and make sure they are seated deep because the screws take quite a bit of torque to loosen (I included my pics at the end):
1. Adjust lift to approximate middle of range.
2. Remove four screws holding gear box to plate (3/32" hex).
3. Remove the screw holding the post nearest the gear box (3/16" hex). You may need to hold the far end of the post to keep it from rotating to remove the screw..
4. Slide the carriage along with the gear box away from the plate.
5. Pivot the gear box end of the carriage so it is clear of the plate.
5.1 Remove the spring from the lift wrench. Use a 2mm hex wrench to loosen the set screw in the white plastic spring retaining collar. Remove the collar and slide the spring off. (This will make the next step much easier)
6. Insert the lift wrench through the gear box and into the carriage. Turn the wrench to release the lift rod. Slide the lift rod with the gear box attached out from the carriage.
7. Remove the wrench and set aside the gear box.
8. Carefully rotate the carriage until the lift nut slides out. You may need to help the nut out by applying tape to the end of the nut through the access hole and pull it out.
9. There are three curved washers behind the lift nut that need to remain in the hole.
10. All three need to be nested with the convex side facing the opening.
11. Drop in the new brass lift nut and turn it so the hole in it and the carriage line up.
12. Insert the lift wrench into the carriage, turn it so the lift nut is pushed back and insert the new lift rod.
13. Position the lift rod about midway in and remove the lift wrench.
14. Pivot the carriage until the post lines up with the recess and hole in the plate where it was originally located.
15. Re-install the screw and tighten firmly.
16. Set the lift into your table opening and follow the Side Crank Accessory instructions.
http://img.photobucket.com/albums/v2...d/IMG_1388.jpg
http://img.photobucket.com/albums/v2...d/IMG_1389.jpg
http://img.photobucket.com/albums/v2...d/IMG_1390.jpg
http://img.photobucket.com/albums/v2...d/IMG_1391.jpg
http://img.photobucket.com/albums/v2...d/IMG_1392.jpg
http://img.photobucket.com/albums/v2...d/IMG_1393.jpg
http://img.photobucket.com/albums/v2...d/IMG_1394.jpg
http://img.photobucket.com/albums/v2...d/IMG_1395.jpg
http://img.photobucket.com/albums/v2...d/IMG_1396.jpg
http://img.photobucket.com/albums/v2...d/IMG_1397.jpg
http://img.photobucket.com/albums/v2...d/IMG_1400.jpg
http://img.photobucket.com/albums/v2...d/IMG_1401.jpg
http://img.photobucket.com/albums/v2...d/IMG_1403.jpg
http://img.photobucket.com/albums/v2...d/IMG_1404.jpg
http://img.photobucket.com/albums/v2...d/IMG_1406.jpg
http://img.photobucket.com/albums/v2...d/IMG_1409.jpg
http://img.photobucket.com/albums/v2...d/IMG_1411.jpg
http://img.photobucket.com/albums/v2...d/IMG_1412.jpg
http://img.photobucket.com/albums/v2...d/IMG_1413.jpg
http://img.photobucket.com/albums/v2...d/IMG_1414.jpg
http://img.photobucket.com/albums/v2...d/IMG_1415.jpg
http://img.photobucket.com/albums/v2...d/IMG_1416.jpg
http://img.photobucket.com/albums/v2...d/IMG_1417.jpg
http://img.photobucket.com/albums/v2...d/IMG_1418.jpg
http://img.photobucket.com/albums/v2...d/IMG_1419.jpg
http://img.photobucket.com/albums/v2...d/IMG_1420.jpg
http://img.photobucket.com/albums/v2...d/IMG_1421.jpg
http://img.photobucket.com/albums/v2...d/IMG_1422.jpg
http://img.photobucket.com/albums/v2...d/IMG_1423.jpg
http://img.photobucket.com/albums/v2...d/IMG_1424.jpg
http://img.photobucket.com/albums/v2...d/IMG_1426.jpg
Member
I would really like to see how the conversion process works. I notice the adjustment thumbwheel on your lift is gone. Is there anything that replaces it or does it just become a hole in the top of the lift?
As mentioned earlier it would be nice if Woodpeckers would post the instructions on their website.
Contributor
I think the instructions I have above are close to what will be published by WP (they will probably add pics). Yes, the thumbwheel is gone and the slot for the wheel is now void.
The router is just as easy to move as it was with the wheel but it now has a 32 pitch lead screw so it's a bit easier to fine adjust.
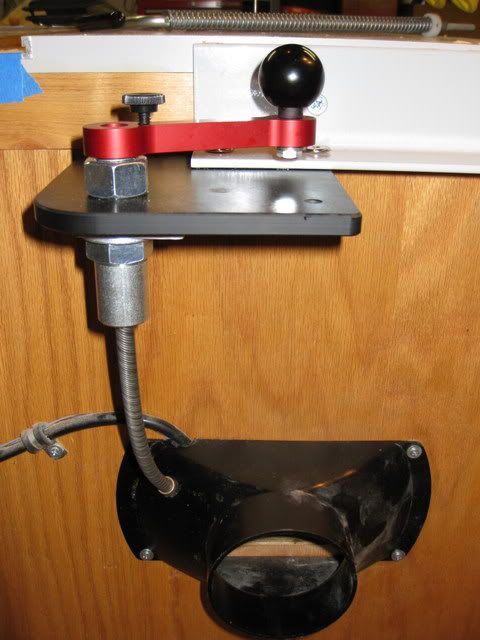
Here is a pic of my final mod to my dust port. I was able to put the brass guide bushing in a drilled hole - I'm happy:
Member
Mike, thanks for the photos. It sounds like I'll be converting mine this week or next. I like the way you mounted yours as an alternate if it doesn't fit on the front or side of my table.
 Friend of The Creek
You are all very welcome.
Honest, intelligent feedback from real users is incredibly valuable to those of us who make and sell tools. No matter how much we test and run focus groups the real world is always different.
Praise is more fun, suggestions are golden but having somebody point out a flaw or a way a tool could be improved is extremely important.
In all honesty, I am not sure how much credit I can take here. When you sell a top end product line like Woodpeckers it just feels natural to treat people really well.
Tom Walz
I'm a Creeker, yes I m.
I fries my bacon in a wooden pan.
 Member
I got my 24" ruler yesterday. It looks really nice, can't wait to put it to use.
thanks again!
Gary
 [OP]
Contributor
[OP]
Contributor
My thanks too. I got my stainless steel gauge block today in the mail. It will be very handy. It's already found a home in my drawer of set up tools under the extension table on the saw.
I know there is a new thread that some are posting to that their items have arrived. Just thought I'd pop this back up to the top for those that didn't see it originally so they know the quality of people we have as Friends of the Creek, and the excellent tools they sell from USA manufacturers. Thanks again Tom!
Coolmeadow Setters...Exclusively Irish! When Irish Eyes are smiling....They're usually up to something!!
Home of Irish Setter Rescue of North Texas.
No, I'm not an electrician. Any information I share is purely what I would do myself. If in doubt, hire an electrician!
Member of the G0691 fan club!
At a minimum, I'm Pentatoxic...Most likely I'm a Pentaholic. There seems to be no known cure. Pentatonix, winners of The Sing Off, s3.
Member
Well, I FINALLY got mine converted. The router table I built last year would have taken major modifications to accommodate the cable so I finally just bought a Kreg stand last weekend. Conversion of the PRLV2 was actually quite easy--probably didn't take me more than 20 minutes. Running the cable was quite a challenge. Apparently the length is quite critical. I've had it together and apart probably 15 times shortening the cable a little more and a little more. I think I'll proabably also add a small bracket to stabilize the cable at its low point--something like the bracket on crank.
I ran into one other issue. Apparently a bit of something got into the the tube where the shaft for the crank slides. It worked fine for a while, then suddenly siezed up. I had to tap it apart with a hammer, then deburred the edges of the tube and the shaft. I then reassembled with some heavy grease. Seems to be OK now.
Overall it seems pretty good. I think it would be significantly improved if they added a small gearbox on the bottom of the shaft allow the cable to exit the side rather than the bottom. That would require significantly less room for installation and probably work a little smoother. Of course it would also drive the price up.
Contributor
Matt... I had the same problem with the crank seizing up before I even installed it. I did the same thing as you - deburred and oiled with machine oil. Mine is hooked up to the original PRL and I could not be happier with it. I love being able to bring the bit up into the work. The accuracy of the lift screws means I only have to count the turns. It would be nice, though, if the shaft and tube came polished. Woodpeckers usually does a better job.
 Posting Permissions

 Reply With Quote