Page 1 of 2 12 LastLast
Results 1 to 15 of 17

Thread: Questions on using the Wolverine grinder and the vari-grind accessory

  1. #1
    Join Date
    Aug 2007
    Location
    North Central Wisconsin, and Antioch, IL
    Posts
    808

    Questions on using the Wolverine grinder and the vari-grind accessory

    Ok, so I have a wolverine base, and the vari-grinder accessory. Not the vari-grinder 2.

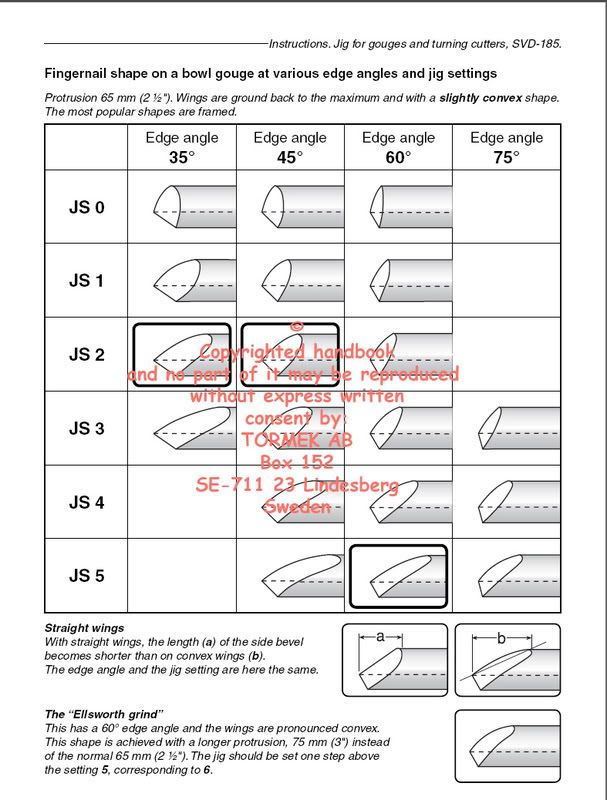
    I want to put a 60 degree bevel on my bowl gouge.

    So, I insert my gouge such that it sticks out of the vari-grind by 1.75 inches. Next I insert the stem, into the wolverine pocket...and away I go.

    Questions:

    How far out do I pull the wolverine base? How far away from the wheel am I to have the pocket? Seems like that distance will also determine the degree bevel I grind.

    That stem on the vari-grind adjusts up and down, to set my bevel degree. How do I know which knotch to set it in, to achieve 60 degrees? There's no markings on the vari-grind.

  2. #2
    Join Date
    Jul 2007
    Location
    Pleasanton, California
    Posts
    730
    The angle of the bevel is set by how far out from the base you pull the pocket. Farther out the more "flat" you get the tip of the gouge. The angle of the vari-grind determines how far back your wings go when you rotate the tool.

    If you want to exactly match what you have then you have to go with trial and error: push/pull the base until the bevel at the tip of the tool matches your wheel. Then rotate the tool 90 degrees and see if it matches the wings. If not you have to change the angle of the varigrind, reset the depth of the pocket to match the tip, and try again.

    If you want a grind that works well you can download the instructions from Thompson Lathe Tools (http://www.thompsonlathetools.com/sharpening.asp) and follow what they say. you will probably have to do a lot of regrinding the first time to get your tools to match their grind but after that it will be 30 seconds per resharpening.

  3. #3
    Join Date
    Jan 2004
    Location
    Lewiston, Idaho
    Posts
    28,569
    Dirk,

    Download and watch the videos from here: http://www.oneway.ca/multi-media/wolverine_videos.htm
    Ken

    So much to learn, so little time.....

  4. #4
    Join Date
    Aug 2007
    Location
    North Central Wisconsin, and Antioch, IL
    Posts
    808
    Quote Originally Posted by Greg Ketell View Post
    The angle of the bevel is set by how far out from the base you pull the pocket. Farther out the more "flat" you get the tip of the gouge. The angle of the vari-grind determines how far back your wings go when you rotate the tool.

    If you want to exactly match what you have then you have to go with trial and error: push/pull the base until the bevel at the tip of the tool matches your wheel. Then rotate the tool 90 degrees and see if it matches the wings. If not you have to change the angle of the varigrind, reset the depth of the pocket to match the tip, and try again.

    If you want a grind that works well you can download the instructions from Thompson Lathe Tools (http://www.thompsonlathetools.com/sharpening.asp) and follow what they say. you will probably have to do a lot of regrinding the first time to get your tools to match their grind but after that it will be 30 seconds per resharpening.

    Greg, are you saying that the angle of the vari-grind, does not determine the angle of the bevel? The bevel angle is set by the length of the wolverine pocket from the wheel?

  5. #5
    Join Date
    Aug 2007
    Location
    North Central Wisconsin, and Antioch, IL
    Posts
    808
    Quote Originally Posted by Ken Fitzgerald View Post
    Dirk,

    Download and watch the videos from here: http://www.oneway.ca/multi-media/wolverine_videos.htm

    I have, Ken, and they don't answer my questions.

    If I have to keep adjusting the distance that the wolverine pocket is from the wheel, by trial and error, each time I grind, I don't see any advantage to the vari-grind.

  6. #6
    Join Date
    Nov 2009
    Location
    Erie, Pa.
    Posts
    147
    Once you have achieved the grind you are looking for make markings on your vari-grind and the pocket so you can duplicate that grind every time you sharpen. A little pencil mark on the shaft of the pocket jig and on the vari-grind pivot is all you need. Makes touch ups a snap.

  7. #7
    Join Date
    Nov 2007
    Location
    Fort Pierce, Florida
    Posts
    3,498
    Quote Originally Posted by dirk martin View Post
    Greg, are you saying that the angle of the vari-grind, does not determine the angle of the bevel? The bevel angle is set by the length of the wolverine pocket from the wheel?
    That's correct. It DOES affect the angle, but not as much as it affects the wings.

    Many recommend fixing the angle on the vari-grind once you determine the extent of sweep you want on your wings and leaving it. Some go so far as to weld it. Use something to measure from the face of the wheel rather than just marking the stem of the wolverine. A block of wood or the raptor setup gauge. The raptor specifies the angle of the vari-grind in order for the angle marked on the raptor to be true.


    The gauges also set the angle on the platform in relation to the diameter of the wheel. Remember that the diameter changes every time you use the wheel. While it may not seem noticeable from grind to grind - it will be when you replace the wheel!!!
    Retired - when every day is Saturday (unless it's Sunday).

  8. #8
    Join Date
    Aug 2007
    Location
    North Central Wisconsin, and Antioch, IL
    Posts
    808
    Quote Originally Posted by Paul Singer View Post
    Once you have achieved the grind you are looking for make markings on your vari-grind and the pocket so you can duplicate that grind every time you sharpen. A little pencil mark on the shaft of the pocket jig and on the vari-grind pivot is all you need. Makes touch ups a snap.

    But the wheel keeps reducing in diameter, thus the distances change.

  9. #9
    Join Date
    Mar 2009
    Location
    Chevy Chase, Maryland
    Posts
    2,484
    Well since the length of your gouge keeps getting slightly shorter and the diameter of your grinding wheel keeps getting smaller, adjustments are inevitable. It takes me about 4 seconds to set the length of the pocket piece each time. This is because once you have the grind you want, you can just hold the gouge in place to set the length.

  10. #10
    Join Date
    Jul 2007
    Location
    Pleasanton, California
    Posts
    730
    Quote Originally Posted by dirk martin View Post
    Greg, are you saying that the angle of the vari-grind, does not determine the angle of the bevel? The bevel angle is set by the length of the wolverine pocket from the wheel?
    Correct. Think about it. Pick any angle for the varigrind. Now move the pocket out: your tool drops lower on the wheel and you get a flatter tip; move the pocket in: the tool moves up the wheel and you get a more angled tip.

    The varigrind angle is to control the length/sweep of the wings. If you have it "flat" then you will have very short wings like a traditional spindle gouge or roughing gouge. If you have the varigrind tilted all the way then you will end up with very swept-back wings like a detail gouge.

    Once your tool is sharpened the way you want it to be, use an awl to scratch a line in the varigrind and in the arm. Next time you need to sharpen, hit these exact lines and you will get the exact sharpen. You are right, though. If your wheel shrinks significantly it will change the angle on the tool. But your wheel should only reduce in diameter by a few 1000th's or 100th's of an inch each sharpening so it won't make much of a difference. But if you don't want any change then the raptors (or home-made jigs like them) will work to replicate the depth of the pocket to the wheel as the wheel shrinks.

    GK

  11. #11
    Join Date
    Jul 2007
    Location
    Pleasanton, California
    Posts
    730
    Quote Originally Posted by Thom Sturgill View Post
    That's correct. It DOES affect the angle, but not as much as it affects the wings.

    Many recommend fixing the angle on the vari-grind once you determine the extent of sweep you want on your wings and leaving it. Some go so far as to weld it. Use something to measure from the face of the wheel rather than just marking the stem of the wolverine. A block of wood or the raptor setup gauge. The raptor specifies the angle of the vari-grind in order for the angle marked on the raptor to be true.


    The gauges also set the angle on the platform in relation to the diameter of the wheel. Remember that the diameter changes every time you use the wheel. While it may not seem noticeable from grind to grind - it will be when you replace the wheel!!!
    Be careful with the Raptors, though. You have to be sure to mount your Wolverine exactly as they specify in the instructions and use the wheel size they specify. If it isn't right, the measurements aren't right and the angles end up being off. If you make your own then it will be right for YOUR setup. And if you like a 43.5 degree angle, you can do that.

  12. #12
    youtube stu in tokyo, sharpening and he shows you how he sets up his grinder with a homemade varigrind, but he has spacers for the specific angles he uses. I asked this same question a while back and someone (sorry, I forgot who) has the distances all mapped out for the various angles. It is no different than the ellsworth jig in concept, using a fixed distance for repeatable bevels.
    Im new, and yes there's a learning curve, but I can sharpen faster with the variG than by hand and it's sharper at this stage of my game. Good luck!
    mj

  13. #13
    Hmmmm......

    I have always looked at this differently. For me, the distance of the cup from the wheel has determined the angle of the bevel on the sides or wings of the gouge (regardless of where you have the vari-grind leg set). And the angle of the sides might not necessarily be the same as the tip angle. It appeared to me while fooling around w/ different adjustments that you can get an overly steep or even negative side bevel angle as you get further from the wheel w/ the cup. This would mean that to make any cutting at all, or to postion for side bevel cuts or scraping cuts the gouge would be held in unusual positions.

    The leg, again for me, sets the angle of the nose bevel when presented straight on to the wheel.

    It is the combination of the two that determines what angles I have on the nose and the sides.

    I actually have never thought about the effect of the leg angle w/ regards to the length of the sweep. Thanks for the obvious insight.

    This is what happens when a completely self-taught turner is left alone for several years.

  14. #14
    Join Date
    Sep 2006
    Location
    Stow, OH
    Posts
    1,023
    Quote Originally Posted by Mark Levitski View Post
    The leg, again for me, sets the angle of the nose bevel when presented straight on to the wheel.

    It is the combination of the two that determines what angles I have on the nose and the sides.
    From this chart in Tormek manual:

    It has the same principle as Varigrind. The JS setting is equivalent to the leg angle setting, which affects the length of the side grind. JS 0 is the leg almost parallel to the tool shaft; JS 6 is when the leg closer to vertical to the tool shaft. The nose angle is determined by the distance from the wheel.
    Last edited by Gordon Seto; 11-03-2010 at 9:41 PM.
    Gordon

  15. #15
    Join Date
    Jul 2007
    Location
    Pleasanton, California
    Posts
    730
    Quote Originally Posted by Mark Levitski View Post
    Hmmmm......

    I have always looked at this differently. For me, the distance of the cup from the wheel has determined the angle of the bevel on the sides or wings of the gouge (regardless of where you have the vari-grind leg set). And the angle of the sides might not necessarily be the same as the tip angle. It appeared to me while fooling around w/ different adjustments that you can get an overly steep or even negative side bevel angle as you get further from the wheel w/ the cup.
    This would mean that to make any cutting at all, or to postion for side bevel cuts or scraping cuts the gouge would be held in unusual positions.
    Negative angle means you are rolling the tool over too far. To reach the top edge of the wings you have two choices: roll over until you hit it (maybe going to 95 degrees) or, 2) stop at some rotation you want (85 or 90 degrees) and then let the wheel grind away the lower-metal that is in the way until the wheel hits the edge.

    The leg, again for me, sets the angle of the nose bevel when presented straight on to the wheel.
    Try it. Pick an angle for the varigrind leg and then set your pocket so the bevel is even with the wheel. Now pull the pocket out 1", what will happen to the bevel when you turn on the wheel? Push it in 1", what will happen? So the leg angle only matches the angle on the tip for one pocket depth. Now, set the pocket at some random depth. Now adjust the leg angle and you can get the bevel flat on the wheel. So you can get the tip-bevel to match the wheel at "any" combination of leg-angle and pocket depth.

    But, try to get the side wings to match. There really is only one setting of the leg angle that will match that bugger. Once you have that you set the depth of the pocket to match the tip bevel. *should* work. But I've always had to do it by trial and error. Or follow someone like Thompson's recommendations since he knows what he is doing!

    It is the combination of the two that determines what angles I have on the nose and the sides.
    Very true.

    I actually have never thought about the effect of the leg angle w/ regards to the length of the sweep. Thanks for the obvious insight.

    This is what happens when a completely self-taught turner is left alone for several years.
    You and I are a lot alike. I'm completely self taught too. I just read a LOT from lots of people with more skill/experience. Someday I hope to take many formal classes.
    Last edited by Greg Ketell; 11-04-2010 at 2:12 AM. Reason: fixed typo

Posting Permissions

  • You may not post new threads
  • You may not post replies
  • You may not post attachments
  • You may not edit your posts
  •