Page 1 of 3 123 LastLast
Results 1 to 15 of 35

Thread: All things Pyro - let's talk! (Richard Madden and Donny Lawson!)

  1. #1
    Join Date
    Oct 2007
    Location
    Central KY
    Posts
    17,595

    All things Pyro - let's talk! (Richard Madden and Donny Lawson!)

    In a recent thread on the D-way beading tools I purchased in which I posted a "Basket Illusion" by Jim Adkins, Richard Madden inquired, "after seeing this post http://www.sawmillcreek.org/showthread.php?t=142643 and the article an in Woodturning Design, I knew I was going to have to give it a try someday. If you will be burning the beads, what burner will you use? I have been leaning toward the Razertip with the create-a-tip pen, but haven't pulled the trigger on it yet."

    And, I noticed Donny Lawson posted a thread in the General Woodworking forum regarding reference sources for pyro work.

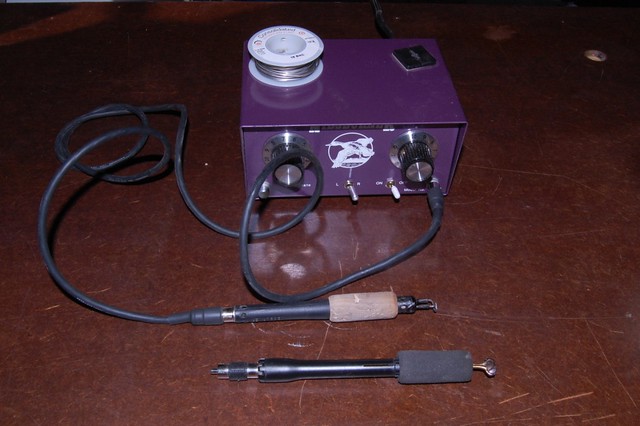
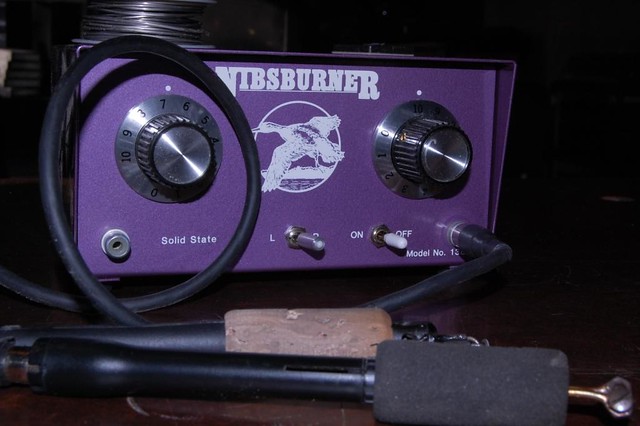
    So, in answer to Richard's inquiry, and in hope of getting some good discussion going on this topic, I thought I would post pics of my equipment, and ask that others post pics of theirs, as well as any comments - pro/con - on what they prefer on equipment.

    I bought this unit and all tips from a fellow that had it listed on CL. He had done a lot of carved fish, so he had a large selection of "fish scale" tips for the DetailMaster pen.

    1.jpg2.jpg3.jpg

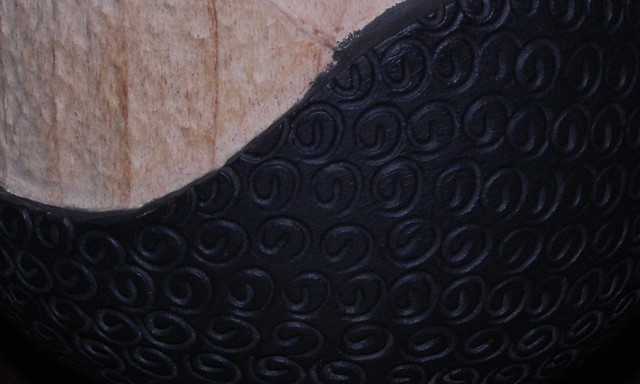
    That is the exact type of tip used by Jim Adkins on his basket turnings. Fortunately, included were the 1/8" and 3/16" tips to fit the beading tools I purchased. The tips are more hemispherical than appear in the angle of these pics, and should fit the beads perfectly.

    I have used this unit only to sign a few pieces, and the pen gets pretty hot - even at a lower setting - thus the athletic tape on it, which seems to help. Otherwise, I am pretty happy with the way it works, though I have not played with it much. Seems like most information I can find favors dedicated tip pens vs. interchangeable tips. I suspect I will end up with a cooler running version of the DetailMaster if one is out there.

    So, what kind of equipment do you have, what would you prefer, and can you tell us about any good resource materials you know of?

  2. #2
    Join Date
    May 2008
    Location
    Kansas City, MO
    Posts
    151
    Wow! Never used a fancy rig like that. Congratulations! Looking forward to seeing what you make with it.

    I have been using the old soldering iron style with interchangeable screw-in tips. Pretty low-tech, but it works, if you take it slow.
    Quando Omni Flunkus - Moritatem!

  3. #3
    Dang you John K!!! Just when I thought I was caught to the '00's in my turning stuff. Little more practice and Im going down that road. I will be watching you for tips, tricks pointers and equipment evals!
    Looking forward to seeing what you do with this!
    Michael

  4. #4
    I've only used my standard Weller soldering "gun" for burning a five pointed "blossom" into the bottom of my turned pears and apples.

    But I've eyed those commercial units plenty of times!

    That and a power carver are on my long (not short) list of stuff to get....
    CarveWright Model C
    Stratos Lathe
    Jet 1014
    Half-a-Brain

  5. #5
    Join Date
    Mar 2009
    Location
    Missouri
    Posts
    939
    John, that's a good looking rig you have there, should get the job done! What I find most interesting is the tips you show. I had no idea that shape you are calling "fishscale" was available, and it looks perfect for the burning of beads. I thought I would need to make my own, bending wire to conform to the bead. The Razertip brand burner has been recommended by a few and looking in catalogs like Woodturners Supply, and Packard, they both offer the Create-a Tip pen by Razertip. I figured that would be the way to go, but after seeing the ones you have, I need to search further. I really didn't think a wire (even 22 ga.) could be bent to both comform to the bead and have the tips reach to the outer radius in one burn. An article in the Summer 2008 issue of Woodturning Design was good, and inspired me to give this a try, but when I emailed the author of the article and the artist to get more detail as to the burning tip used, neither was much help.
    Lucky finding the entire set-up you have there, including all the tips. Looks like you're ready to go. I have been thinking about either the Razertip brand, or making one myself as shown here;http://www.svwoodturners.org/TipsTri...Vaporizer.html
    I was referred to this site by Nedra Denison that has some good pyrography info. She sells the Razertip brand and the site has some good info, most of which I haven't been able to check out yet.http://www.nedraspyrography.com/Nedr...ction-home.htm
    What you have there certainly looks like it should get the job done. Thanks for posting the pictures. Now I need to look for some fishscale tips.

  6. #6
    Join Date
    Nov 2009
    Location
    Peoria, IL
    Posts
    4,546
    I have the Detail Master, and the hand pieces do get hot. I bought some sleeves to insulate them, $4.95 for 4 sleeves. And they work very well. http://www.detailmasteronline.com/finger_detail.html
    I just bought the book, Woodburning with Style by Simon Easton. http://www.amazon.com/Woodburning-St.../dp/156523443X
    I liked it better than most books because he has sections on just adding texture. Most woodburning instruction has to do with animals and landscape scenes. Eastons book does have a little of that, but many good ideas for texture.
    I just did my first bowl rim in the style of Matthew Hill. Our club had him teach for a weekend. His gallery is pretty impressive. http://www.matthewhillstudio.com/about.html
    For that work, he suggests an 80 watt Weller soldering iron. This unit uses a 3/8" rod. I modified my first brass bar and branded in bumps all around the rim. I liked the result, but man does that take time! You have to clean the pocket in the brand every 4 impressions. LOML didn't much care for all the smoke smell coming upstairs either. I'm just getting started at this, but having fun.

  7. #7
    Join Date
    Jan 2009
    Location
    La Grange, IL
    Posts
    1,425
    John,

    Timely subject. Here are pictures of my rig, couple of pens, wire and a WIP. I have used this rig on several pieces and I am happy with it. There are a couple of weaknesses in most systems used by wood turners. These systems are more geared toward the wonderful and delicate work of the pyro artists. Most wood turners are heavy handed "branders". So even the most powerful units could use more power to keep irons hot and the handpieces tend to heat up and have a shorter than wanted life.

    Graeme Priddle recently visited the Chicago Turners and did a demo day that I was lucky to attend. Graeme uses a lot of branding in his work. He is also an electrical engineer. For his work he converts 10amp battery chargers and makes his own handpieces. He hopes to market a handpiece soon that is geared for the brander market. In the mean time, for those interested google Graeme and charger. (oops, Just followed Richard's link. That is one of them!) There are several clubs that have posted instructions on making his setup. For making a version of his pen, google Molley Winton. There is a pdf article out there where she describes making hers. The pen is heavy duty, uses custom built tips/nibs and gets rid of heat better.

    I will probably make a pen to try with my unit. I have had good luck just making branding tips with nichrome wire. Wire can be purchased at McMaster and Carr.

    As Richard stated Nedra's site is a good place to check out. I have purchased from her and would give her a thumbs up.

    Last edited by Mark Hubl; 12-07-2010 at 11:42 AM.

  8. #8
    Join Date
    Dec 2005
    Location
    Benton City, WA
    Posts
    1,465
    I'm pretty excited about this thread. My wife gave me this set last Christmas after me begging for one for many months. I was going to use it in my Cigar Box Guitar building. Well shortly after I turned on the lathe and haven't gone back to the CBG building since. I have only turned my burner on once. I'm anxious to use it so I will be following this closely.
    Attached Images Attached Images

  9. #9
    Join Date
    Feb 2007
    Location
    Inver Grove Heights, MN
    Posts
    798
    Before I started turning I carved a lot of decoys. I built my burner using a fan speed control (similar to a light dimmer switch) and a small transformer. I used several makes of handpieces and built a few of my own, but ended up with mostly detail master handpieces. I have used cork and rubber hose as insulation from the heat and to give a little more bulk to hold on to. If anyone is planning to make their own unit, and needs help, I could dig mine out and take some photos and measurements, part numbers etc. I think I remember where it is.

  10. #10
    Join Date
    Mar 2010
    Location
    Vestal, NY
    Posts
    908
    I'm hoping Wally Dickerman reads this thread and chimes in .... his pyrography is beautiful (love those giraffe HF's), and I've wanted to ask him for advice on what to get and where to get more info.

  11. #11
    Here are two links I dug up a couple years ago. One instructs how to make the handpiece, and the other how to make a control out of a PC's power supply.

    http://www.fishcarver.com/images/bur...structions.PDF

    http://www.thegourdreserve.com/tutor...ol/burn1.shtml

    I'd love comments on either or both of these. Would the PC powersupply be as good as the 10A battery charger?
    CarveWright Model C
    Stratos Lathe
    Jet 1014
    Half-a-Brain

  12. #12
    Here's Lauren's current setup.

    She has a mix of Burnmaster pens and RazerTip pens.
    Attached Images Attached Images
    Lathes: Nova DVR XP, Delta 46-460, Jet 1014vsi; Bader III 2"x72" belt grinder; Triton 2.25 router; CMT Industrio table; Jointech fence; SC planer; Dewalt miter; Delta 14" bandsaw; Festool TS55, MFT/3, CT22, ETS150/3, OF1400, PSB300EQ, CXS; Hegner Scrollsaw; JJ-6CS jointer; Grizzly 1023s cabinetsaw, Jet 17" drill press; Rigid OSS; 9" SandFlee; 3M AirStream & Breathe Easy PAPRs

  13. #13
    John, you simply must get some more tools and wood if you are going to take this turning thing seriously!
    David DeCristoforo

  14. #14
    Join Date
    Sep 2009
    Location
    Enid, Oklahoma
    Posts
    6,741
    Quote Originally Posted by David DeCristoforo View Post
    John, you simply must get some more tools and wood if you are going to take this turning thing seriously!
    It is a shame that someone with talent continues to mearly dabble... Just imagine what he could do if he only had proper tooling and some beautiful wood to play with.

  15. #15
    Join Date
    Dec 2005
    Location
    Suwanee (near Atlanta), GA
    Posts
    842
    I attended an all day workshop our club had a few months ago taught by fellow club member Mike Gibson (that is his HF on the back cover of the latest American Woodturner) and his wife Cynthia. Cynthia provided some useful information on pyrography. Some of her points included:

    · Practice on a scrap of the same type of wood prior to burning your project.
    · Doverpublications.com is an excellent source for clipart you can transfer to your work with graphite paper.
    · There are sources all around us for patterns to use including:china, fabric patterns, neckties, tooled leather and silver engraving. There are even patter books!
    · It is very difficult to do acceptable animals if you can not draw.
    · The Razertip is a good unit.
    · Start at a low heat range – more forgiving than high!
    · Three tips are probably plenty: a skew or knife tip, a writing tip with a ball and a shader.
    · Burning technique takes a lot of practice. Think of using the burning tip more like a brush rather than a pencil. Think of a plane touching down and taking off.
    After getting inspired by Cynthia’s woodburning, I found this wonderful site with some great information on pyrography: www.nedraspyrography.com
    I finally decided to get an Optima 1 dual burner and two heavy duty pens. The Optima is very similar to the Razertip unit Cynthia uses but at lower cost.
    God is great and life is good!

Posting Permissions

  • You may not post new threads
  • You may not post replies
  • You may not post attachments
  • You may not edit your posts
  •