I was wondering if anyone has built or adapted something on a plane to make chamfers. If so would you mind posting some pictures? Thanks in advance. John


 [OP]
Member
[OP]
Member
I was wondering if anyone has built or adapted something on a plane to make chamfers. If so would you mind posting some pictures? Thanks in advance. John
Member
Look in the LV catalogue -- they have an attachment for their block plane that is for chamfering. I think it fits in place of the moveable piece that adjusts the mouth opening. Food for thought. The link is below --
http://www.leevalley.com/US/wood/pag...=1,41182,48942
 Contributor
I have this and think it works pretty well. Of course if the OP doesn't have the LV block plane that might be a problem. Seems like you could make a wooden fence that's beveled 45° at the bottom, then comes up high enough that it could be temporarily attached to the side of the plane with a spring clamp or something. Maybe embed a rare earth magnet or two in the wood and then it would stick onto the side.Originally Posted by Joel Goodman

Member
I was not suggesting that the OP could use the LV -- merely that it was idea that might be copied or adapted.
 Member
John:
I chamfer with my block plane - alot. With a bit of practice, and a fine cut, take the number of strokes to get to the chamfer wanted. Slight irregularities
along the length of the edge being chamfered add character, IMHO. Just like edging a board freehand with a plane; it can be done with a bit of practice.
Dave Beauchesne
 Member
I am of this school of thought too.
Deane
Last edited by Zahid Naqvi; 03-16-2012 at 2:04 PM.
Originality is the art of concealing your source.
Franklin P. Jones
Comments & criticism on postings welcomed.
Contributor
Sorry if I came across snitty, was not my intent.() You're right, it's a good example.
For an over-the-top design idea, how about the Bridge City chamfer plane. Looks like a sportscar on pontoons.
Member
As with tools and methods, there are many ways to add a chamfer detail. Several I have used are: LV block plane with the chamfer attachment (works well and is predictable), freehand with another block plane (works well but not as even - gives a planed look) and my Stanley 65 chamfer spokeshave (again works well).
Experiment with your block plane first: scribe a pencil line on both surfaces of the chamfer detail (eyeball a mark on each side, say an eighth of an inch in, using your finger as a gage) and plane till you meet your marks.
Member
I think that the LV La block plane and its attachment are the best way to make chamfers.You can use the block plane freehand for large chamfers and the attachments for small chamfer.
There are also some wooden chamfer planes, you can find some construction plans in john whelan's book: "make traditional wooden planes"
I use a LV DX60 freehand,it's a good choice IMO.
 Contributor
Mostly I use a block plane to chamfer edges. If you want, use a cutting gauge or pencil line to mark the dimensions.
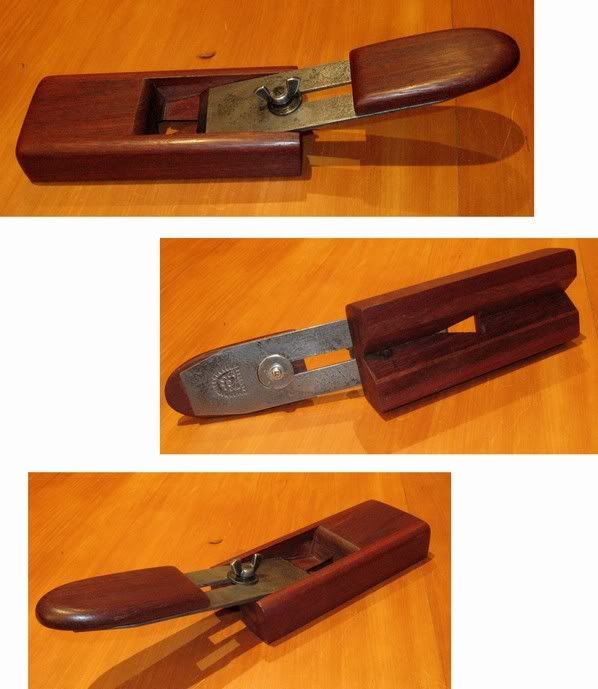
When I want precision, then I use a chamfer plane I built ...
This has a 15 degree bed and a BU configuration, which suits two blades - one high angle for with the grain and one low angle for across the grain.
Regards from Perth
Derek
Member
Derek,
I love the simple design of this, and am now thinking about making one. But I have a question. Since the width of the chamfer is determined not by a moving fence (as in other models), but by raising/lowering the iron, does a deeper set make it harder to get a nice chamfer? It seems that it would try to dig in too much, or else you would have to intentionally hold it off the rail a bit, which seems that it would also be a bit inaccurate.
Do you have more information on how you built this plane?
Contributor
Hi Roy
Some years after I designed and built this chamfer plane, I bought the chamfer attachment for the Veritas LA Block Plane. I had no previous exposure to the latter beforehand. Interestingly, the basic design for the Veritas was the same as mine - that is, a bevel up configuration where the size of the mouth does not play a part, and where the blade is advanced incrementally for the deepth of cut.
If you set a plane like this to take a deep cut, it will cause much tearout, even with a high cutting angle. This particularly the case with some of the hard, interlocked woods I use. Take a shallow slice, progressively deeper, and you are rewarded with a clean, even chamfer.
This is the reason for the wing nut on the plane. It is simply easier and quicker to grasp, loosen and tighten, to move the blade forward.
I will see what I can do to draw up a plan for this plane, for those that want to build one. Essentially it is built from 3 (or 4) pieces. The centre section can be made one- or two piece - just a vee grooved sole. Then cut away the top bed (at 15 degrees) for the blade. Finally add the cheeks at each side. The wingnut is drilled all the way through, but recessed at the sole, with the hole plugged. I used Jarrah for this plane, which has lasted several years.
From: http://www.inthewoodshop.com/Furnitu...%20Tables.html
Regards from Perth
Derek
Member
Hi Derek,
Did you ever made a drawing or sketch?
Stig
Last edited by Stig Taube; 03-17-2012 at 7:55 AM.
Member
I made a long 45 degree wedge with two rare earth magnets embedded that sticks to the bottom of my apron plane. It acts as a fence allowing me to plane an accurate chamfer.
Contributor
John -
You can try sticking a fence onto the side (Or Bottom) of a regular block plane using double-faced tape.... it'll work to solve an immediate problem....
Cheers -
Rob
 Posting Permissions

 Reply With Quote