Page 1 of 3 123 LastLast
Results 1 to 15 of 34

Thread: Building a treadle lathe

  1. #1

    Building a treadle lathe

    Well, I have been wanting to build a treadle lathe for a long time now. I finalized my plans and started work. I will be posting more information and pictures on this forum and on my site HERE as I go along. Any thoughts and comments are welcome.

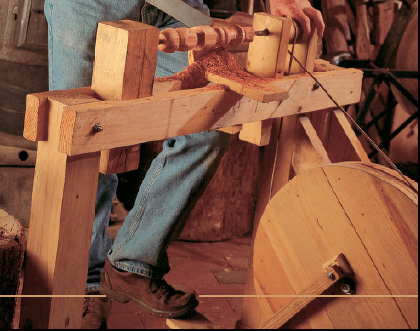
    Let me start by saying that my design is based on Roy Underhill's design. However, I have made some alterations to his design to suit my wants and needs. I will point out my modifications as I go along.


    Here is a picture of Roy's lathe:


  2. #2
    This is also an interest of mine. I've made the flywheel, and glued up some stock for the head and tail, but that's as far as I got.

    Will be following along! Thanks for posting.
    CarveWright Model C
    Stratos Lathe
    Jet 1014
    Half-a-Brain

  3. #3
    Join Date
    Jun 2009
    Location
    Katonah, NY
    Posts
    191
    Hi Ray

    As coincidence has it, this past weekend I finished the treadle lathe I have been building. Currently going thru its initial sea trials. Took me about 5 months, but I work slowly, and much of the time was spent figuring things out, like bearings and the axle. If memory serves, Underhills lathe does not need an axle, right?

    I took the kids to Colonial Williamsburg this past Feb - saw one in the joiners shop, and become hooked. I read Underhills article, found a few other plans on the web ala Adams and Schmeck, but most importantly for me was a bunch of pics I found from a few Renaissance Fairs. I built mainly from these pics. I found Underhills lathe much too "unattractive", too "crude" for my tastes. For me, the building of the lathe was as much a part of the enjoyment as having a lathe will be. So, I wanted mine to not only be functional, but it had to look good too (read here - fine furniture).

    It is my intention, this weekend, to get some pics taken of my lathe for posting.

    I am not a turner - as the last time I did any was in High School shop class. That said, I can report that it works better than I expected. I initially had some issues with the belt slipping out of the groove on the flywheel and pulley, but that was resolved with a new design (2.0) idler pulley. In addition, originally, it was very loud - but that was also corrected as well with the addition of different bearings in the idler pulley. I also snapped my first axle, but I think that was due to the metal in the pins being harder than the metal axle. A new axle with a filed down (softer) 3inch nails as pins works great.

    I would be happy to answer any questions, exchange ideas, etc. I get the feeling that I will be tinkering for some time.

    I am already contemplating adding Underhills scroll saw table. I am also thinking about adding a duplicating attachment of some kind so I can turn chess pieces. All a work in progress.

    For the time being, just getting used to turning.

    BTW - turning and pumping the treadle is something that one needs to get used to. It is a good workout, at the very minimum. So far I have been turning off the heat in the shop when I am going to turn a stick down to round and dont get a chill at all (even when it is 10 deg outside). Probably why you never see an overweight treadle turner. LOL.

    Russell

  4. #4
    Russell,

    Heck yeah! Let's see some pix!
    CarveWright Model C
    Stratos Lathe
    Jet 1014
    Half-a-Brain

  5. #5
    Join Date
    May 2010
    Location
    Great Falls, Montana
    Posts
    26
    Hello there you all. I have a thread lathe that I build and set it up at the local farmers market and it has gotten a lot of attention. It can be seen in operation on You Tube at CAW0924. I looked a lot on the web about thread lathes. I saw one on a web sight like the one in made so I made it similar. I had trouble with the wooden head stock to much friction and did not work like I wanted. So in the corner of my shop was this older AMT lathe. I thought this might just fit so i tried it and it worked. So I have been turning on it a lot. It is so much fun turning the old slow way. You learn how important sharp tools are. I am not done with the lathe i need to work on it more to get it to run as I want it to run.

    Hope it all goes well for you and have fun with it.

  6. #6
    Ah... another glutton for punishment is revealed! That looks a lot like a medieval torture device!
    David DeCristoforo

  7. #7
    Join Date
    Mar 2007
    Location
    Wetter Washington
    Posts
    888
    I'll have to see if I can dig up a photo or two of the one I have... They are fun

    Russell, it is a nice workout, isn't it? I took mine to a club demo and it was fun to see the turners not able to keep the lathe moving and cut. It really does take a little practice.

    Although I still do most of my serious work on the power lathes
    Making sawdust mostly, sometimes I get something else, but that is more by accident then design.

  8. #8
    Join Date
    Jun 2009
    Location
    Katonah, NY
    Posts
    191
    DSCN0197.jpgDSCN0186.jpgDSCN0198.jpgDSCN0192.jpg

    I hope this works, as I have never attached photos before.
    Attached Images Attached Images

  9. #9
    Join Date
    Jun 2009
    Location
    Katonah, NY
    Posts
    191
    DSCN0198.jpgDSCN0199.jpgDSCN0200.jpgDSCN0202.jpg

    OK, not quite what I had hoped for, but some pics came thru, although blury.

    Here are some more - hopefully

    DSCN0201.jpg

    Again - sorry for my ridiculous showing - but, I did get them posted - so, I call it a good first attempt.

    Some description - a shot of the front in the first post, as well as the bent in the axle and the linkage to the treadle arm, as well as too many shots of the treadle arm itself - not sure if you can see it, but there is a piece of leather nailed over a small hole in the treadle arm - the hole is used to oil the axle and the leather hopefully will keep it clean of chips.

    In this post, you can see the idler pully, tail stock, and tool rest. The blue masking tape under the idler pully is just holding a piece of scrap to the side of the ways protecting it from the the rubbing spring used to tension the idler pulley. This is temp - I need to attach the spring to the idler pulley frame in a more permanent fashion.

    Any tips on how to attach pics better or easier would be appreciated.

    Now that I can see the posting (after editing) I will take some better pics for posting - any requests?
    Last edited by russell lusthaus; 12-20-2010 at 12:55 AM.

  10. #10
    Join Date
    Sep 2009
    Location
    Enid, Oklahoma
    Posts
    6,741
    Pretty cool looking setup... I got a little winded just looking at the photos, so I don't think I'd last too long actually turning on that beast.

  11. #11
    Thanks for all the interest. And thanks for sharing your experience and photos. I am still working on this beast. I did make a lot of headway. I have updated my site to include some more photos with detentions. Have a look HERE to see my progress. Sorry to make you click, but it is much easier for me to only have to post pic and text once. I'll let you know when I have added more.

  12. #12
    Join Date
    Jun 2009
    Location
    Katonah, NY
    Posts
    191
    Hi Raymond

    I looked at your site and pics. Looks great. Very nice site as well. My lathe breaks down for transport as well - although by a different mechanism than you have chosen. I am a little nervous about its stability with only hinges holding the bottom of the posts. It may tend to rock when you pump the treadle- as there are some goodly amounts of forces being applied.

    Mine breaks down by removing the bolts holding the ways to the uprights and removing the bolts which hold the uprights to the floor cross pieces. Ending up with the ways (separate pieces), three upright assemblies, and the floor cross pieces - and of course the tail stock, shaft, pulleys, etc.

    Russell

  13. #13
    Thanks for your response and concerns Russell. However, it is very stable even when treadling. Maybe you didn't see in my pics the long tenons that are at the bottom of the vertical members. This is where my stability comes from. You are right. If it where just the hinges, there would be a lot of movement in the lathe.

  14. #14
    I made a lot of progress on this project over the holidays. I have added some information about my build on my website HERE but most of my time recently was spent in the shop, not on the computer. However, I plan to add more soon.

  15. #15
    I have a buddy who made one, and he used a car brake drum for the main fly wheel. Fairly heavy and already spin balanced.

    robo hippy

Posting Permissions

  • You may not post new threads
  • You may not post replies
  • You may not post attachments
  • You may not edit your posts
  •