


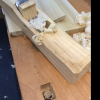
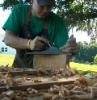
Well, in between the Christmas festivities today, I took a few minutes (90?) to try my hand at some dovetails. I had just gotten my Veritas dovetail saw and had a small piece of cherry that I had milled up. The cherry was an end of a board that had a split in it so I cut it off, resawed it (with a table saw, though), and then dimensioned by hand. These pieces are about 3/8" thick, 3" wide and the long pieces are about 5" long. My Veritas carcass saws got a nice workout, as did my new shooting board!
Anyhow, without further ado, here are three pics each of my first two dovetails. What do ya think?
After cutting these two, I definitely had some impressions about cutting dovetails.
- Hogging out the waste with a chisel is kind of a pain. My next purchase will be a fret saw.
- I need a better marking gauge...mine wandered a bit and didn't leave a straight line.
- I need better lighting, like a swing arm lamp. It was really hard sawing to the line when I couldn't see that well.
- I see a 20 tpi Veritas rip dovetail saw in my future for doing these small pieces


 Reply With Quote


 I slapped a couple coats of finish on it and put it on the table!