Page 1 of 2 12 LastLast
Results 1 to 15 of 17

Thread: Flying Rib Vase

  1. #1
    Join Date
    Jan 2009
    Location
    Southern California
    Posts
    736

    Flying Rib Vase

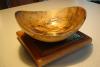
    7 x 6 She Oak / Wenge

    This is a technique I have been playing with, and I feel this my best execution of it so far. There are some technical challenges in clamping and alignment that I feel I am overcoming.

    Rather then classical staves, I first turn the body then deconstruct it, add the ribs and reconstruct it. I prefer this method as it allows the grain from the wood of the body to follow through the ribs.

    My goal here was to have the two shapes create a nice contrast, yet each retain it's own individual form.

    c&c's welcome
    Attached Images Attached Images
    [SIGPIC][/SIGPIC]
    Please see personal profile for website info.

  2. #2
    Join Date
    Oct 2006
    Location
    Harvey, Michigan
    Posts
    20,804
    John - very interesting design and you did a great job on lining everything up! I can see where you have to make sure the outside of the form is finished as far as form and sanding before the deconstruct phase but was wondering if you do any clean-up turning on the inside once everything is glued back together?
    Steve

    “You never know what you got til it's gone!”
    Please don’t let that happen!
    Become a financial Contributor today!

  3. #3
    John that is really cool. I like the vessels that you have done in this style. This one is really neat because of the fact that you can clearly see the form inside of the fins. Just great.
    -------
    No, it's not thin enough yet.
    -------

  4. #4
    John,

    That is a great piece. I love the concept and the execution.

    Very well done!!

    Alan

  5. #5
    Great job, John! Excellent contrast and color and the effect of "two forms" is unique!

    This is a very interesting technique!! I would think a slow set glue would be a priority, and special clamping jigs a must!! Great work, and I had the same question as Steve regarding inside "return" for clean up - the inside diameter would have changed ever so slightly so it seems that cleanup would be necessary. And, how did you rechuck if this was done? I suppose the tenon, if used, would still work with a little less than complete jaw contact.

  6. #6
    Join Date
    Dec 2008
    Location
    Chesterfield, VA
    Posts
    1,332
    That's quite a beautiful and unique piece. I like that and I like how you did it...hmmm...got me thinking again. Thanks for sharing this.

  7. #7
    Join Date
    Jan 2010
    Location
    Lewiston, Maine
    Posts
    1,506
    Very nice contrast and a very unique form. I can certainly see that gluing this up presents a challenge, to say the least. Nice work, John.

  8. #8
    The "HowDeDoDat" factor is pretty large there.... That's a pretty cool form/object. Tell us more!

    How did you fixture the form to make the cuts during deconstruction?
    CarveWright Model C
    Stratos Lathe
    Jet 1014
    Half-a-Brain

  9. #9
    Join Date
    May 2009
    Location
    Washington's Coast
    Posts
    1,767
    Very cool John. Not sure I want to tackle it, but sure like looking at it!

  10. #10
    Join Date
    Oct 2008
    Location
    Fresno, Ca
    Posts
    4,032
    Great execution and wood combination John. That must have been a challange!
    Your Respiratory Therapist wears combat boots

  11. #11
    The creativity and skill level I see gets more impressive every day. I am no artist, so I dont know the vernacular, but that is a fantastic piece!

  12. #12
    Join Date
    Feb 2004
    Location
    Marietta GA
    Posts
    1,120
    Ok. We need a little corn here. Do you take a lot of ribbing? Hoot!

    I too would like to know "howd-he-do-dat".. Six segments? No re-chucking needed? Glue up with rubber bands or strap?

    Lot's of questions!

    BTW.... Great job! Got my brain in the wonderment zone. Thanks for posting!

  13. #13
    Join Date
    Jan 2005
    Location
    Goodland, Kansas
    Posts
    22,605
    Now that is cool. Really a great job on it. Inquiring minds want to know.
    Bernie

    Never put off until tomorrow what you can do the day after tomorrow.

    To succeed in life, you need three things: a wishbone, a backbone and a funnybone.


  14. #14
    Join Date
    Sep 2009
    Location
    Enid, Oklahoma
    Posts
    6,741
    Nicely done. I like the light/dark wood combo, and the process needed is intriguing.

  15. #15
    Join Date
    Jan 2009
    Location
    Southern California
    Posts
    736
    Thanks for the comments.

    Yes, I do clean up the inside after assembly. Figuring out how to keep the strength in the tenon to re-chuck it was another one of the challenges ( I did break one, well two actually). Removing the tenon is also very delicate...and scary !
    [SIGPIC][/SIGPIC]
    Please see personal profile for website info.

Posting Permissions

  • You may not post new threads
  • You may not post replies
  • You may not post attachments
  • You may not edit your posts
  •