Results 1 to 13 of 13

Thread: Building a router table in my table saw - torsion box or angle iron to keep if flat.

  1. #1
    Join Date
    Jul 2008
    Location
    Noblesville, IN
    Posts
    49

    Building a router table in my table saw - torsion box or angle iron to keep if flat.

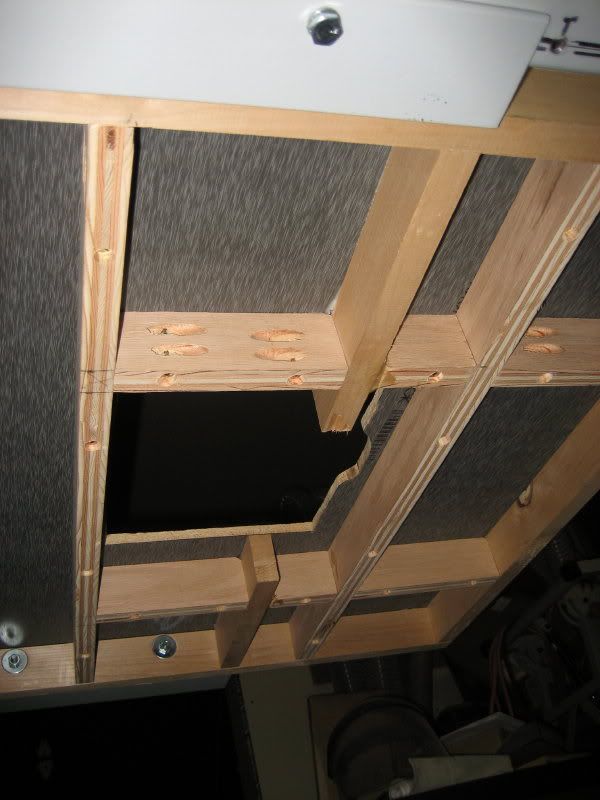
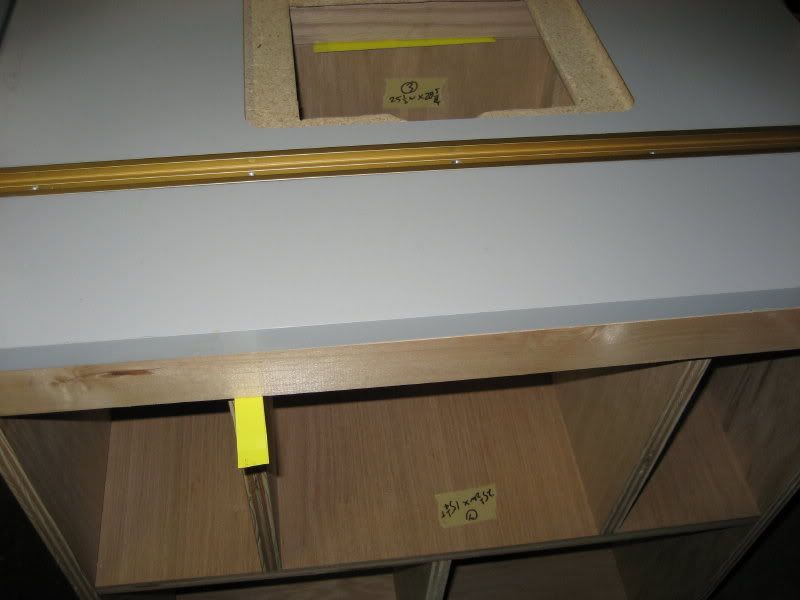
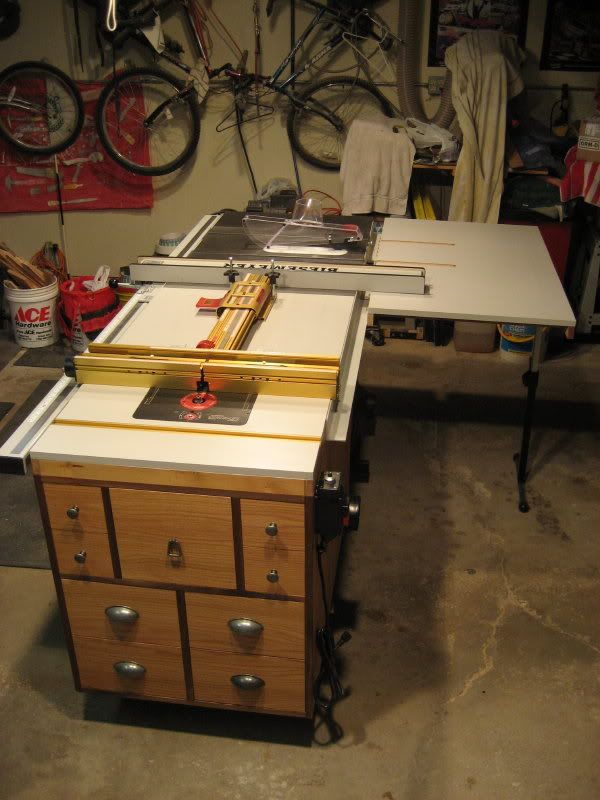
    I'm building a router table to attach to my 52" fence on my table saw. I've got a nice 3/4" 7 ply plywood that has a nice veneer applied and sealed; something I picked up at Rockler (it's made for jigs). I was originally going to just glue two of these together for the router table but I noticed there's a slight bend/cup in the board. Wanting the router table dead flat I'm considering a torsion box or using 1 1/2" aluminum angle iron. I'm leaning toward using the angle iron because a torsion box usually has thinner skins then the ply I have and just the time commitment. Thoughts?

  2. #2
    Join Date
    Jan 2010
    Location
    Northern Colorado
    Posts
    1,884
    Have you thought about doing the "Mister Sawdust RAS Table" approach:

    He recommends two sheets of marine/hardwood plywood - 3/4" thick.

    Dado three grooves across the length of both pieces, deep enough to sandwich the boards together with a piece of steel bar stock epoxied/glued into each dado.

    Then glue the two boards together, weighing them down with a LOT of weight, resting on a FLAT surface, for 24hrs.

    Normally, you'd run the bar stock lengthwise, but ... to allow your router insert ... you could run them widthwise, spaced to allow your router to nestle in between two bars.

    I did something like this for MY RAS table:


    It's flat, and ... I'm pretty sure ... it's going to STAY flat

  3. #3
    Join Date
    Jul 2008
    Location
    Noblesville, IN
    Posts
    49
    Neil, that's a nice idea. I've not thought about that. My only concern is to get the boards flat during glue up. I'd like to have some type of fastener that pulls the plywood flat during glue up. That's why I was leaning toward the angle iron.

  4. #4
    Join Date
    Jun 2006
    Location
    The Hartland of Michigan
    Posts
    7,628
    Use the table saw top. They're usually flat.
    Attached Images Attached Images
    Never, under any circumstances, consume a laxative and sleeping pill, on the same night

  5. #5
    Join Date
    Oct 2008
    Location
    Columbus, OH
    Posts
    3,064
    Not sure I'd trust >aluminum< angle to be rigid enough to keep the table flat, particularly with the weight of a router hanging from the center of it. My woodpeckers router extension for my TS came with a pair of steel angle irons to add stiffness.

  6. #6
    Join Date
    Jan 2006
    Location
    Chicagoland
    Posts
    2,802
    I made use of the warpped table board that came with my Unisaw. I cut the router plate hole and reinforced it. Then it's hard to see but I shimmed between the table top and top of the cabinet to flatten it out and used fasteners to pull the top to the cabinet. It's been around 3-years now and it hasn't budged at all.

    Mike


  7. #7
    Getting something thats dead flat and will stay that way is difficult. On top of that if you don't have a bench in your shop that's flat what do you use for a master? The only thing I know of that's cheap and flat is a hollow core door that has honey comb inside of it. Doors if stressed over a long period of time will also warp but they come from the factory as flat as one could hope for. Solid core doors will cold flow and are ng.

    You can use one door but as the thickness goes up so does the resistance to warping. I glue up two doors back to back making sure they are flat to start with and not stressed while gluing. It's important that the centers are clamped and glued as well as the edges. I use a shop made Vac system but clamps with cauls work also. The skins are very fragile so be careful . use a plate under the cauls.

    After the glue has dried glue 3/4" ply on the top and bottom and glue again The ply can be warped and will bend flat with out warping the doors.. After that has dried run though the saw to clean up the edges and glue on 3/4" oak edges. Now you have a bullet proof, no warp top that will last longer then you will. I have some benches 20 years old as flat today as when they were made.

    For the router you have to cut a hole in the top clear though the bottom big enough to clear all parts of the big router. Then make a box out of ply with a hole cut in one side and slip it and glue it into the hole which will enclose the router and jack.

    For the final operation you have to make a top insert to make a perfect fit for the router base plate. I use oak again about 2" W x 1/2" thick that fits up to the box.. A bit of work but not that hard to do.

    For the router raise/lower mechanics I use a common scissor jack from the auto parts store. Don't laugh until you try it. It holds it's position and can be adjusted easily to under .001. For installing bits I simply raise the router by the jack and remove it from the hole. The box, by the way, has a 6" hole in one side to connect to the DC. I use PVC. Can't use the bottom because that's where the jack sits. A portion of the box is cut out to allow access to the jack and a small clear door is added with holes in it for air flow.

    Clear as mud eh?
    Last edited by Aaron Rowland; 03-07-2011 at 1:29 PM.

  8. #8
    Join Date
    Jun 2006
    Location
    The Hartland of Michigan
    Posts
    7,628
    Just use 2 pieces of 3/4" MDF. Glue them together putting the convex )( sides together. That will cancel any warp and the table will be dead flat.
    Never, under any circumstances, consume a laxative and sleeping pill, on the same night

  9. #9
    Join Date
    Jul 2008
    Location
    Noblesville, IN
    Posts
    49
    Ok, now I'm leaning toward the torsion box. After holding the router, lift, and plywood it's pretty heavy and I don't think the angle iron will hold up. Now the question is around torsion boxes. This there a minimum ratio for the internal grid? I want to keep this as thin as possible so I'm thinking of 1/2" x 1.5" runners for the grid. Is that too small?

  10. #10
    Join Date
    Jan 2004
    Location
    Fredericksburg, TX
    Posts
    2,576
    I have been fairly happy with just the frame similar to one suggested by Beisemeyer and 3/4" Melamine coated MDF. I made the frame from 1x2 red oak that was left over from another project. The frame is supported by the fence support angles front and back and attached to my Delta contractor saw. I hardened up the MDF where the router insert sits. I have added some of the 3/8" deep T-tracks for hold-downs and fence. Of couse, I don't plan to dance on the table, but it is flat and slick.

  11. #11
    Join Date
    Jan 2005
    Location
    central Arkansas
    Posts
    34
    Quote Originally Posted by Thomas Canfield View Post
    I hardened up the MDF where the router insert sits.
    Thomas, how do you "harden up" MDF? I am curious 'cause I am building a router top with MDF and have an insert with 1/4" setscrews for leveling. I know the weight and vibration will cause them to eat into the MDF over time and was considering a metal or hardwood insert to prevent that. And your method is??????

  12. #12
    Join Date
    Apr 2010
    Location
    Maryland
    Posts
    323
    Quote Originally Posted by John P. Smith View Post
    Thomas, how do you "harden up" MDF? I am curious 'cause I am building a router top with MDF and have an insert with 1/4" setscrews for leveling. I know the weight and vibration will cause them to eat into the MDF over time and was considering a metal or hardwood insert to prevent that. And your method is??????
    John... when I made my top, I put 2 coats of poly where the lift sits. It has worked perfect. You could also put countetsunk screws where the leveling screws will hit. The poly has not budged but if it fails, this is what I plan to do.

  13. #13
    Join Date
    Jan 2005
    Location
    central Arkansas
    Posts
    34
    Quote Originally Posted by Cyrus Brewster 7 View Post
    John... when I made my top, I put 2 coats of poly where the lift sits. It has worked perfect. You could also put countetsunk screws where the leveling screws will hit. The poly has not budged but if it fails, this is what I plan to do.
    I never would have thought that would be hard enough... goes to show you never can tell. Since I plan to seal / finish all surfaces of the MDF, that won't even be an extra step. Then if that ever fails, I can just epoxy in little snips of metal banding strap. That stuff is thin, but hard, so the plate would only require minor adjustment to get it back down flush. Thanks for the help.

Posting Permissions

  • You may not post new threads
  • You may not post replies
  • You may not post attachments
  • You may not edit your posts
  •