OOh, maybe I just made my own. Thanks Derek for posting yours, I copied it and made one for myself to go along with my new LV BUJ.
100_1540.jpg 100_1542.jpg


 [OP]
Contributor
[OP]
Contributor
OOh, maybe I just made my own. Thanks Derek for posting yours, I copied it and made one for myself to go along with my new LV BUJ.
100_1540.jpg 100_1542.jpg
Member
Are you stealth gloating with that LV BUH and saw on the side there?Originally Posted by Andrew Gibson

Seriously, is that mdf for the body? What are the trim pieces?
 Contributor
Hi Andrew
That looks great! Only it is not my design. It is LN's - I just added the hardwood bits to make it more durable, less destructive of the plane, and easier to set up.
Regards from Perth
Derek
[OP]
Contributor
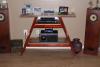
Dwain It is MDF made form a quarter sheet of half inch. the trim pieces are Cherry that I had laying around.
I guess it could be a stelth gloat for the Plane. I didn't even think about the saw. I have posted it here a few times, along with its matching friends. It's a Wenzloff plate with a handle of my own making.
I saw the original thread by Derek and it made me want to go out and make a new one. I am struggling with one question though. I notice that a couple of his options are inclined so as to create a skew cut with a straight blade. How critical is this? The reason I ask is that my current one which combines 90 & 45 works very well, but is not inclined. I know that only one part of the blade contantly is used on such a board, but how much of a downfall is this? I'm willing to make another if necessary, but am curious as to what schools of thought you folks have.
 Member
Andrew...where did you get the threaded insert hardware that you used for the miter attachment?
Building a New Shop...
 Contributor
Nice job! I like the trim.
[OP]
Contributor
I got it at the BORG. The one I got is a press in insert. I am concerned it will pull out over time. If it does I will drill though the board and get a T nut that mounts from the other side.
If I were to do it again I would go that route, but I didn't think of it at the time.
 Member
Harbor Freight has a 36piece brass assortment for $9-$12 It is nice to have on hand for jig building.
From the HF website:
Description of Storehouse 67553
The perfect way to put threads into wood.
Includes 10 pieces #8-32, 10 pieces 1/4"-20, 8 pieces 5/16"-18, 8 pieces 3/8"-16 and carrying case. Case dimensions: 5-3/8" L x 3-1/2" W x 1-1/8" thick
- Insert threads into wood fixtures for easy assembly of furniture, cabinets, and other wood assemblies
- Strong, wide external thread spacing resists pulling out and offers maximum strength, reduced splitting
Contributor
Hi Don
The ramped shooting boards have a 5 degree incline. This is not much when compared with the 20 degree skew of the blade in the #51 plane (I am not sure one could even say that it is a true skew cut). Nevertheless it does have a noticeable effect in practice. It is just enough to cause the blade to enter the wood at a slight angle. This reduces the impact "shock", and there is less jarring. Once you have used a ramped board you will understand why it is preferred to a flat board. There may be a slight spreading of wear over the blade, but this is not a biggie.
A ramped board with a straight-bladed plane is better than the latter on a flat board.
A skew-bladed plane on a flat board probably trumps that.
A skew-bladed plane on a ramped board is even better (probably just because this is has greater skew).
Regards from Perth
Derek
Contributor
I just finished my version of it. I used Jatoba for my stops and a screw-in style thread insert for the miter attachment which I got at HD. I decided against putting some more Jatoba on the rails of the shooting board after doing some research.
Here are some pics.
Member
Beautiful shooting boards Adam.
I applied cherry edging to my 4 foot long shooting board. I like the way it looks against the birch plywood.
I am torn between using my reconditioned Bedrock 605 and the LV LAJ for shooting edges now. Actually, I am favoring the LAJ.
Jim's shooting boards 005.jpgJim's shooting boards 003.jpg
Jim's shooting boards 001.jpgJim's shooting boards 002.jpg
Member
Adam, could you elaborate on why you didn't use Jatoba on the rails?
It came to pass...
"Curiosity is the ultimate power tool." - Roy Underhill
The road IS the destination.
 Posting Permissions

 Reply With Quote