Page 1 of 2 12 LastLast
Results 1 to 15 of 30

Thread: My TV Console - Finally Finished

  1. #1
    Join Date
    Dec 2007
    Location
    Metro West MA
    Posts
    127

    My TV Console - Finally Finished

    This project took a lot longer than I anticipated (big surprise). I just finished with some of the hardware this evening.

    We recently decided to spend some money to execute some much needed decorating in the house (moved into this new house 3 years ago, but several rooms look like we moved in yesterday).

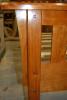
    One of the decorating items was to bring our family room into the modern era and get rid of the portly rear projection TV and associated media unit (which I built about 10 years ago) and update it to a modern flatscreen. But being the quasi-video/audiophile that I am, I wanted to make sure that the TV was at the right height, and that the center channel was also optimized. Neither of those two could be achieved with any of the store bought TV consoles that would fit between the two windows to where this must go, so I designed and built my own.

    It was my first project using essentially solid maple for all exterior surfaces and despite what I thought I already knew, I learned a lot - particularly about finishing maple. It's far from perfect, but in the end, I am pleased with it.


    You can see more pictures and some during the build here:
    http://picasaweb.google.com/sliderul...onsoleProject#

    -Chris

  2. #2
    Join Date
    Feb 2003
    Location
    In the foothills of the NM Sandia Mountains
    Posts
    16,647
    Chris, that is stunning! I love the design and the color you achieved on the maple is warm & pleasant.
    Do you have it vented to deal with the component heat?

    Well done!
    Please help support the Creek.


    "It's paradoxical that the idea of living a long life appeals to everyone, but the idea of getting old doesn't appeal to anyone."
    Andy Rooney


  3. #3
    Join Date
    Dec 2007
    Location
    Metro West MA
    Posts
    127
    Quote Originally Posted by Bruce Page View Post
    Do you have it vented to deal with the component heat?

    Well done!
    I do, though I'll be honest that this is a bit of an experiment. I'm not sure that convection alone will move the heat out of there well enough, but I figured I'd give it a try before installing actual fans in. The routed groove at the bottom of the compartment is to let cool air in and the holes at the top will hopefully let warm air escape.

    Thanks!

  4. #4
    Join Date
    Feb 2003
    Location
    In the foothills of the NM Sandia Mountains
    Posts
    16,647
    I have a similar cabinet setup (not nearly as nice) with a convection design. I ended up installing a component fan to keep my a/v system under control.
    Please help support the Creek.


    "It's paradoxical that the idea of living a long life appeals to everyone, but the idea of getting old doesn't appeal to anyone."
    Andy Rooney


  5. #5
    Join Date
    Nov 2009
    Location
    Sinking Spring, PA
    Posts
    881
    That is a beautiful piece! How about a pic with all the electronics in & on it please (once that's done of course!)?

    And I love the color too, can you describe your finishing schedule too please?

  6. #6
    Outstanding design and execution! +1 re: your finishing schedule, it looks flawless.

  7. #7
    Join Date
    Jun 2004
    Location
    KC, MO
    Posts
    2,041
    Chris -

    This is a beautiful cabinet. The finish looks incredible - tight joints...........WOW! I would love to hear more about the finishing.

    This cabinet is SO good looking........

  8. #8
    Join Date
    Dec 2007
    Location
    Metro West MA
    Posts
    127
    Haha.. I'm blushing.

    The positive comments on the finish are actual a bit comical to me.. I very nearly threw the whole thing out after the first attempt at staining... So I'll give you the COMPLETE rundown of the finishing process for this piece.. :-)

    (For the record, I wanted a medium brown-red tone that would still show the slight curl of the maple and then warm it up further with a dark glaze in the crevices for a rich furniture look)

    Finishing schedule:
    1. Research for 4 days different maple finishing techniques.
    2. Buy no less than 4 different dyes, 2 gel stains, 1 water based stain, 2 oil based stains and 2 glazes for experimenting
    3. Spend 5 days blending, layering, sanding and top coating no less than 25 cutoffs
    4. Find the combination that you like! (for the record, it was 1:1:1 General Finishes Cinnamon:Med Brn:Reducer)
    5. Show sample to SWMBO and promptly get rejected for being too 'red'.
    6. Go to Rockler with SWMBO - she picks out 'Candlelight' Gel Stain
    7. Final prep piece
    8. Apply stain....
    9. Shriek in horror with the results... (For my tastes, it was much too orange/yellow - it had a country cottage type look that I felt would have looked much more at home in knotty pine. Further, my prep job was HORRENDOUS. Areas that I thought were smooth were not even close, areas where I thought I had cleaned up glue I had not, and so on. It was really really bad).
    10. Deliberate for a day over how to fix.. decide to take the most painful but best path - Sand it out.
    11. Make decision to get glaze effect by subtraction instead of addition.. that is, sand out all flat surfaces to bare wood but not the nooks and crannies.
    12. Spend 4 hrs with the ROS and multiple grits trying to get the flat surfaces as good as possible.
    13. Stain with General Finishes 'Brown Mahogany' Gel stain - when wiping, be gentle. It's easy to wipe the maple down to be too light and lose the warmth in the stain. In the corners/nooks/crannies especially if you want to have the glaze effect.
    14. Sigh in great relief for recovering from the finishing nightmare.
    15. Top coat with 4 coats of Arm-r-seal gloss.
    16. Laugh when people admire/inquire how you achieved such a great finish.

    :-)

    I did the doors and drawers only in the brown mahogany - I didn't make the mistake of using the candlelight on them after doing the main carcass. So to get the glazing look on them I had to take a slightly different approach. I sanded the flat surfaces and primary endgrain sections all the way down to 400 grit (prior to staining).. Except in the corners and crevices - for those I only went down to 220 grit, and even at that I tried not to sand well in the corners. Then, they took the stain darker than the other surfaces, giving me the glaze effect without any follow up treatment.

    In the end, the hue is pretty close to what I wanted (maybe a touch more red would have been nice) and I got the glaze look that I wanted.. But the maple is a lot more work to get even coloring than I had thought.. Anywhere that I had used a wet wipe to wipe up glue or a pencil mark (even if I did it before 'final' sanding) made these awful dark regions of stain... similarly, sanding marks that I couldn't see at all in bare wood, showed up instantly when stained. It was quite a learning experience.

    -Chris

  9. #9
    Join Date
    Jun 2004
    Location
    KC, MO
    Posts
    2,041
    Chris --

    Great report with nice humor! Glad to know many of us have the same issues.......

    I have also had great success with General Finishes -- Seal-a-Cell and Arm-r-seal. Great products for a great finish --- even I can't mess it up

    Thanks again and the cabinet is terrific!

  10. #10
    Join Date
    Nov 2006
    Location
    Trussville, AL
    Posts
    3,589
    Fantastic! Prepare to be shamelessly copied...

  11. #11
    Looks great, Chris. I chuckled at your finishing schedule. I've had the same experience of sanding off version 1.0 of what I though was going to be the perfect finish. That glaze look you got in the details really makes them pop. I'm going to have to remember that the next time I make stained furntiure. Thanks for sharing.

  12. #12
    Join Date
    Jan 2010
    Location
    Montgomery, Texas
    Posts
    287
    Chris,
    Very well done in both execution and design! Out of curiosity, why did you decide to have the bead detail integral with the drawer and door parts, instead of the frames? I'm working on a built-in piece as I've been going back and forth on how to do the bead detail, i.e. a part of the case, separate from the case and applied, or apart of the doors and drawers.

    By the way, I hope you protected that nice road bike (carbon wheels and frame?) in the background during the build.

  13. #13
    That is very nice. Kudos especially for the finishing, really does justice to the beauty of maple. Sympathies for all the extra sanding!

  14. #14
    Join Date
    Jan 2004
    Location
    Lewiston, Idaho
    Posts
    28,555
    Chris.....Very, very nice! I am about to embark on something similar. I would love to have results as good as yours! Very nicely done Sir!
    Ken

    So much to learn, so little time.....

  15. #15
    Join Date
    Dec 2007
    Location
    Metro West MA
    Posts
    127
    Quote Originally Posted by Brett Bobo View Post
    Chris,
    Out of curiosity, why did you decide to have the bead detail integral with the drawer and door parts, instead of the frames?

    By the way, I hope you protected that nice road bike (carbon wheels and frame?) in the background during the build.
    Personally, I just like the look of the bead detail on the doors/drawers instead of the frame. Further, I think it's a little easier to execute if you're willing to do mitered doors/drawer fronts. I milled my lumber for the frames all at once and was able to make just a few long extrusion-like pieces that I then cut/mitered to length to make the frames. For the doors, the cross section is slightly different for the glass, so I did that separate from the drawer fronts, but it was the same process.

    As for my road bike - that's my latest build up. Carbon frame with 50mm carbon clincher wheels. The frame showed up in the middle of my Console construction so I had to take a break from the console to build my bike.

    -Chris

Posting Permissions

  • You may not post new threads
  • You may not post replies
  • You may not post attachments
  • You may not edit your posts
  •