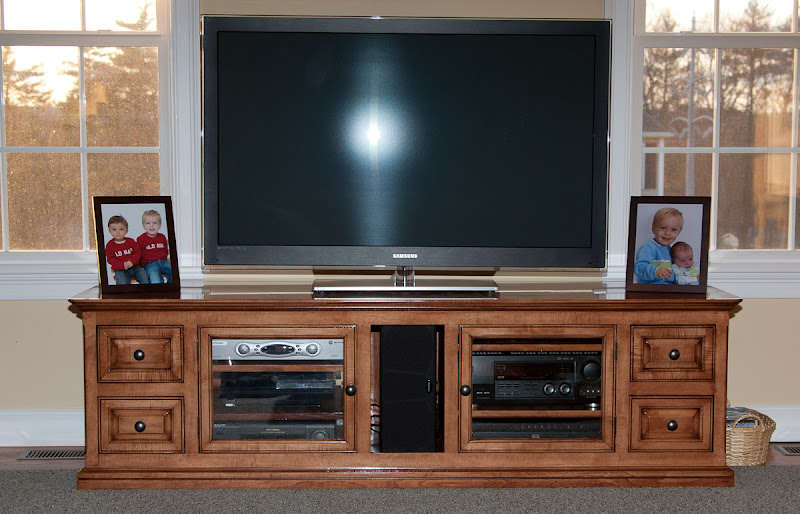
Installed!
(Note: Yes - I know the TV is crooked.. its actually between the TV and the base of the TV and it annoys the crap out of me.. Is it wrong to return a $1300 TV because the base is crooked?)


 [OP]
Member
[OP]
Member
Installed!
(Note: Yes - I know the TV is crooked.. its actually between the TV and the base of the TV and it annoys the crap out of me.. Is it wrong to return a $1300 TV because the base is crooked?)
Member
Chris,
Your cabinet looked great and it just happens to be very close to the color I am trying to obtain for a corner cupboard that was designed by Lonnie Bird from a corner cabinet that was originally built in about 1745 from the Eastern Shore region of Virginia. I have completed about 95 % of both cabinets, and started applying the finish on one of the cabinets. I started with a coat of Boiled Linseed Oil and let it dry for over one week. I then added a small amount of lemon trans-tint dye to a wash-coat of dewaxed blonde shellac before applying General Finish Brown Mahogany gel stain. I had put on a one coat of Brown Mahogany stain, but was not able to make the finish dark enough with an additional coats of stain on a test board. The yellow - amber color from the shellac just didn't provide a pleasing result with a light coat of brown mahogany gel stain.
I noticed that you mentioned that you needed to apply the brown Mahogany Gel Stain with a light touch. That was a fantastic tip. By very carefully wiping off the excess gel stain with clean paper towels using a very light touch, the project seems to be back on track. Since I have spent an unbelievable amount of time making the cabinets, obtaining a good finish is very important to me. I spent an lot of time trying to come up with a good finish before deciding to use the General Finish Brown Mahogany Gel Stain. Both my wife and I now like the color of the wood I have stained, but it will be a while before I am able to complete the entire cabinet.
Your project and staining procedure has been very helpful, and I appreciate the time that you spent letting others understand how you achieved your fine finish.
Thanks
Ed
Originally Posted by Chris Bruno

Member
I meant to say your TV Cabinet looked great, not your corner cabinet
Ed
 Member
Very nice work Chris. Your finish is excellent and it was fun to read about your experience obtaining it.
Best Regards,
Gordon
Contributor
I can tell it took a long time ,my guess is you started it about 1974. You are the only guy I know who missed the
"entertainment center" era. Where are you going to get a tv small enough to fit in there? Nice looking job though!
Member
Very nice project !
MARK
 Contributor
Chris that is a very nice piece. As others have mentioned the finish looks really nice. I also like the overall design and fit-up of the drawers and doors - just the right gaps. A question though on the end panel. Any idea why the top portion of the panel turned out so much darker than the lower portion? It seems to be just that panel, so not something caused by the photograph. Maybe the photo or lighting just accentuates this but if the colors are correct it would drive me crazy after putting in all the great work you did.
 Contributor
Stunning work Chris. I love the raised panels on the ends, but wonder why you ran the grain horizontally?
 Member
Nicely done...Good job! Looks great!!
Jerry
 Moderator
Very nice work, Chris!
--
The most expensive tool is the one you buy "cheaply" and often...
Contributor
Awesome design. execution and finish.
Wish my projects came out as fine as yours did.
George
 Member
Chris,
Your TV console really turned out great. Your finish looks outstanding. All of your hard work to obtain the finish was well worth it.
Great job, Sam
 Contributor
Chris, I really think the finish makes the piece. Its funny to read your process, been there done that....but not that well! Very nice piece and you should be proud.
A bus station is where a bus stops. A train station is where a train stops. My desk is a work station.
[OP]
Member
Haha, funny to see this thread revived after so many months.
Sorry to everybody for the delays in responding - I haven't been on the site in a little while.
I didn't get all of my maple at the same time and that piece of wood took the stain darker. If you look at the 'before stain' pictures on Picasa, you'll see that they look exactly the same before finishing. As it was a 'wood character' thing instead of an 'I screwed up' thing, it doesn't bother me so much, but the takeaway is that glued up panels should really try to use wood off the same tree if possible if you're not going for the look of different boards standing out.
-Chris
[OP]
Member
Hi Mike,
If you look carefully, I made the panels in the front drawers horizontally because it was a more efficient use of the maple boards I had - I didn't want them to be glue-ups. So I thought it would make more sense if the side panels grain direction were consistent. I've never looked at them and had it bother me, but then, it probably wouldn't have bothered me in the end if the side panels grain direction was different than the drawers...
-Chris
 Posting Permissions

 Reply With Quote